
Assembly build errors in QuickBooks Desktop can disrupt inventory tracking and production workflows. These errors often occur due to insufficient component stock, incorrect Bill of Materials (BOM), or data corruption. To resolve these issues:
- Check Component Quantities: Ensure you have enough stock for all components and verify transaction dates align with build dates.
- Review the BOM: Confirm component lists and quantities are accurate.
- Fix Pending Builds: Adjust or recreate builds stuck in "Pending" status.
- Use QuickBooks Tools: Run Verify Data, Rebuild Data, or tools from the QuickBooks Tool Hub to repair file corruption.
- Update QuickBooks: Always use the latest software version to avoid recurring errors.
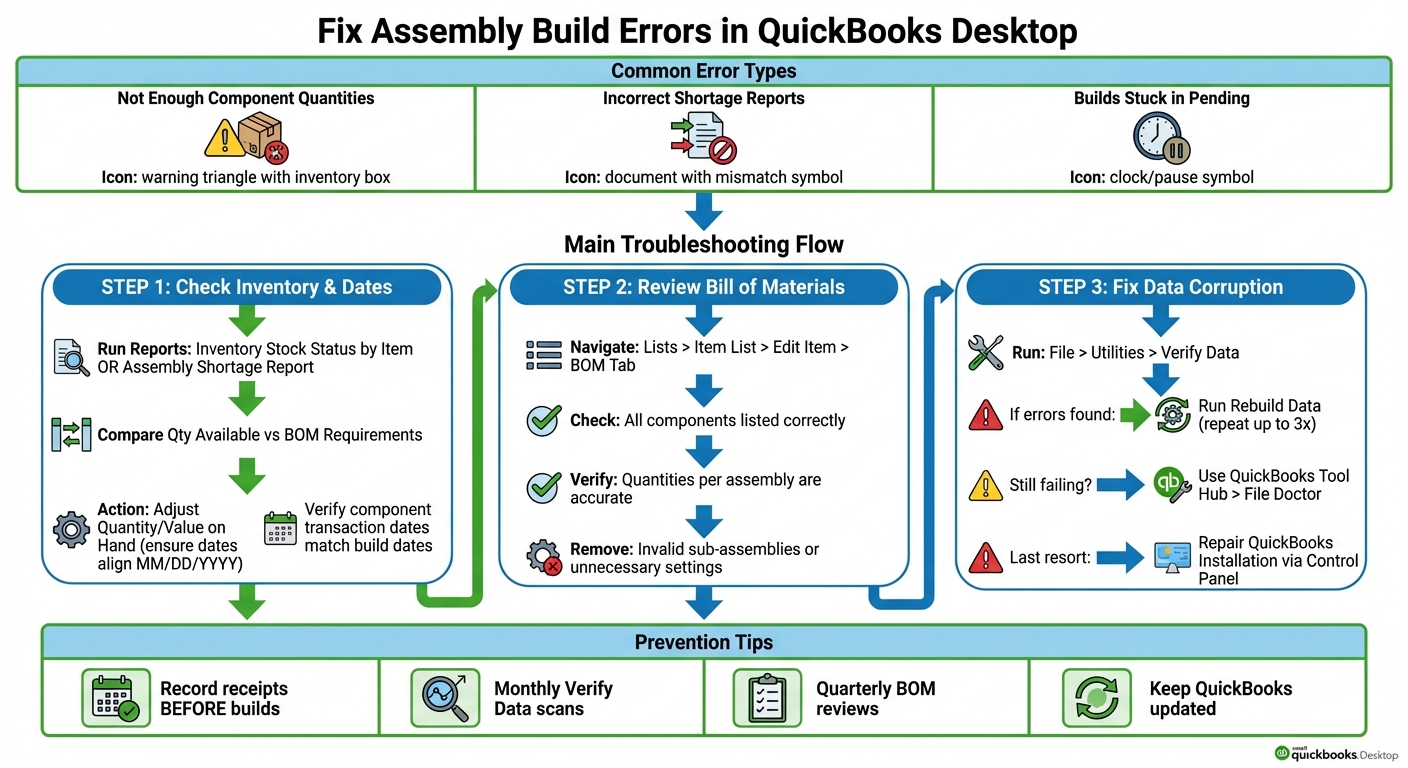
QuickBooks Assembly Build Error Resolution Flowchart
QB Power Hour: QuickBooks Inventory Assemblies and Manufacturing - Part 3
Common Assembly Build Errors
QuickBooks Desktop users often face a few recurring assembly build errors. Below, we break down three common errors, their causes, and what you can do to address them. Each issue requires specific steps to keep your inventory records accurate.
Error: Not Enough Component Quantities
This error pops up when QuickBooks shows the message: "QuickBooks cannot build this assembly item because there is not enough quantity on hand for one or more of its components."
The main reason? QuickBooks calculates the available quantity for each component based on what's on hand and what's already reserved. For instance, if you have 10 units of a component but 8 are tied up in a pending build, only 2 units are free. If you try to start a new build that needs 5 units, you’ll run into this error. Negative inventory is another culprit, which happens when items are used or sold before they’re officially received. Incorrect build dates, like setting a build date before the components were received, can also trigger this problem.
Error: Incorrect Shortage Reports
Shortage report mismatches can make production planning a headache. You might notice that the Shortage or Inventory Stock Status reports don’t match the quantities shown in the Build Assemblies window. This often happens due to negative inventory or errors in the bill of materials (BOM). For example, if the BOM mistakenly lists 2 units of Component A when only 1 is actually needed, the shortage report might flag a shortage - even when your stock is actually sufficient.
Error: Builds Changing to Pending Status
Sometimes, builds that were previously marked as completed suddenly switch to "Pending Non-Posting" in the Inventory Center. When this happens, the components are reserved, but their quantities and values aren’t reflected in inventory or the general ledger. This also means the finished goods won’t show up in reports. The root cause is often data corruption in your company file. Contributing factors may include large file sizes, incomplete software updates, or changes to older transactions.
How to Fix Inventory and Bill of Materials Errors
Once you've pinpointed the issues impacting your assembly builds, you can address them by reviewing component availability, correcting your Bill of Materials (BOM), and adjusting pending builds. Here's a step-by-step guide to resolve inventory shortages and BOM inconsistencies effectively.
Step 1: Check Component Quantities and Dates
To avoid the "Not Enough Component Quantities" error, start by verifying your component quantities and transaction dates. Use the Inventory Stock Status by Item report or the Assembly Shortage Report to check quantities. Navigate to Reports > Inventory and select the appropriate report. Compare the Qty Available with the requirements outlined in your BOM. If you find shortages, adjust inventory levels by going to Inventory > Inventory Activities > Adjust Quantity/Value on Hand. Ensure the adjustment date aligns with or precedes the build date (use the MM/DD/YYYY format, like 12/13/2025).
Next, confirm that component transaction dates align with your build dates. Open QuickReport by going to Lists > Item List, selecting the relevant component, and running its QuickReport. If a build date falls before the components were received, edit the build date in the Build Assemblies window to a valid current or past date. This step ensures your builds won't get stuck in pending status due to insufficient component quantities.
Once you've verified the quantities and dates, move on to reviewing your BOM.
Step 2: Review and Fix the Bill of Materials
Go to Lists > Item List, locate your assembly item, right-click, and select Edit Item. Under the Bill of Materials tab, check that all components are listed correctly and that their quantities per assembly are accurate. For instance, if your BOM lists 10 units of a component but your shortage report indicates 12 are needed, update the quantity to reflect the actual requirement. Use the Inventory Valuation Summary to confirm and update component costs as needed.
Additionally, remove any invalid sub-assemblies or unnecessary "Subitem of" settings that might be causing calculation errors. A similar issue was resolved in the past by carefully reviewing the assembly setup and eliminating sub-assembly mismatches.
Step 3: Fix Pending Builds and Shortage Mismatches
To handle pending builds, go to Inventory > Build Assemblies and filter for builds in pending status. Adjust these builds by reducing quantities or updating dates to match available stock. If a build remains stuck, delete it and recreate it with updated information - always back up your company file before making significant changes. Pending builds can sometimes cause shortage miscalculations (referenced as bug INV-19434). As a temporary solution, manually calculate shortages by summing up component needs across all pending assemblies.
For additional troubleshooting, run File > Utilities > Verify Data to check for data corruption. If errors are detected, proceed with File > Utilities > Rebuild Data, repeating the process up to three times if necessary.
A 2023 forum discussion highlighted a solution shared by user @jbyrne210, who resolved inaccurate shortage reports by using QuickBooks File Doctor via Tool Hub after Verify/Rebuild attempts failed. They restored a pre-rebuild backup, scanned the file (a process that took about 5 minutes), and manually reviewed pending builds. This resolved missing items in reports and ensured accurate shortage data.
sbb-itb-19ed50f
How to Fix Data and Application Errors
When dealing with program-level errors in QuickBooks - like crashes, error codes (-6000, H-series), or persistent file corruption - basic tools like Verify/Rebuild Data might not be enough. In these cases, additional utilities like QuickBooks Tool Hub and even repairing the software installation may be necessary.
Run Verify Data and Rebuild Data Tools
Start by backing up your company file. Then, navigate to File > Utilities > Verify Data. This tool scans your file for integrity issues, such as inventory assembly corruption. If you see a message like "Your data has lost integrity" or specific errors listed, move on to File > Utilities > Rebuild Data. During this process, QuickBooks will prompt you to create a backup before attempting to repair the file. Depending on the file size, this could take several minutes.
Once Rebuild finishes, run Verify Data again to check for lingering issues. If errors persist, repeat the Verify/Rebuild process up to three times. According to Intuit support and ProAdvisors, some stubborn data problems may only clear after multiple cycles. This step is critical to ensure your assembly builds work smoothly, as unresolved corruption can cause builds to fail or revert to pending status.
If problems continue after several attempts, it’s time to use QuickBooks Tool Hub.
Use QuickBooks Tool Hub and File Doctor

Download QuickBooks Tool Hub directly from Intuit's website, then close QuickBooks Desktop and install the tool as an administrator. Open Tool Hub, go to the Company File Issues tab, and select Run QuickBooks File Doctor. Choose your company file (.QBW), click "Check your file", and provide administrator credentials if prompted.
File Doctor will automatically scan and repair file damage that might be causing issues like incorrect shortage reports, assembly build failures, or -6000 and H-series errors. After the scan is complete, reopen your company file and test an assembly build that previously failed. Run shortage and inventory reports to confirm the problem is resolved.
If QuickBooks still freezes or behaves unpredictably, use the Program Problems tab in Tool Hub. Here, you can run tools like Quick Fix my Program or QuickBooks Program Diagnostic Tool to address crashes and other program-level issues.
Repair QuickBooks Desktop Installation

If neither the data tools nor QuickBooks Tool Hub resolve the issue, repairing the QuickBooks installation itself might be necessary. Close all applications and navigate to Control Panel > Programs and Features > QuickBooks Desktop > Uninstall/Change > Repair. Follow the prompts, and once the repair is complete, restart your computer.
After repairing the installation, open QuickBooks and update it to the latest version by going to Help > Update QuickBooks Desktop > Update Now > Get Updates. Restart QuickBooks to apply the updates. These updates often include patches for inventory and assembly-related issues, reducing the chances of recurring errors caused by outdated software. Finally, run Verify Data one last time to ensure the application is functioning correctly with your company file.
How to Confirm Fixes and Prevent Future Errors
Test Your Builds and Reports
Once you've fixed errors and adjusted your inventory, it's time to test your builds with current data. Start by creating a test build for one or two assemblies that previously failed. Check that the requirements in the Build Assembly window match the data in your Inventory Stock Status reports - component quantities should align across both.
Next, run the Shortage Report and ensure the "For This Build" quantities match the build screen and on-hand balances. Post the test build and re-run your inventory reports. You should see finished goods increase while component counts decrease - but without any negative balances. If previously stuck builds in Pending Non-Posting status now process correctly and update your inventory, you’ll know your fixes are effective.
Finally, use the Verify Data tool to double-check that no errors remain in your system.
Better Inventory Management Practices
Once your test builds are successful, it's important to adopt better practices to avoid repeating the same issues. For starters, always record receipts before logging builds that consume those parts. Avoid selling assemblies that haven’t been built yet to prevent inventory discrepancies. Make it a habit to run monthly Verify Data scans, especially after major inventory changes.
Take a close look at your Bills of Materials (BOM) on a quarterly basis, particularly for high-volume assemblies. Confirm that each component, its quantity, and its unit of measure match current production standards. For assemblies that frequently encounter shortages or pending statuses, perform monthly spot checks to identify missing components, incorrect quantities, or inactive parts in the BOM. Regular weekly or monthly cycle counts of key items can also help. Compare physical inventory counts to your QuickBooks data and make adjustments as needed. Lastly, keep your QuickBooks Desktop software updated to the latest release to ensure accurate inventory tracking and assembly processes.
Optional: Improve Inventory Control with Rapid Inventory

If you want even more control over your inventory, consider integrating a tool like Rapid Inventory. This solution syncs automatically with QuickBooks, keeping item lists, quantities, and transactions aligned in real time. This reduces the chances of negative inventory and prevents pending build errors.
Rapid Inventory also brings added features like mobile barcode scanning, which improves accuracy when receiving, picking, and producing items. It ensures that component usage and finished goods production are recorded correctly. With multi-location tracking, lot and serial number tracking, and real-time inventory reports, you can quickly locate components before scheduling builds in QuickBooks. By setting up workflows where daily transactions pass through Rapid Inventory and sync back to QuickBooks at scheduled intervals, you can keep your accounting and operational inventory in sync, significantly reducing assembly errors.
Conclusion
Assembly build errors often stem from issues like incorrect inventory counts, errors in the Bill of Materials (BOM), or data corruption. To address these problems, start by checking component quantities, verifying dates, and reviewing your BOM for accuracy. Clear any pending builds, and if the issue persists, use the Verify Data and Rebuild Data tools - running them up to three times can help fix file damage. For more advanced fixes, turn to the QuickBooks Tool Hub or File Doctor. If the application itself is damaged, reinstalling QuickBooks Desktop may be necessary.
Once you've resolved the errors, it's crucial to focus on prevention. Regularly updating and verifying your data is key to avoiding future issues. Always record receipts before building or selling assemblies. Keep your BOMs accurate by routinely reviewing component lists, quantities, and units of measure. Running monthly Verify Data scans, especially after significant inventory changes, can help catch potential problems early. Also, ensure that your QuickBooks Desktop is always updated to the latest version.
For businesses dealing with complex assemblies, managing inventory across multiple locations, or handling high transaction volumes, consider integrating Rapid Inventory with QuickBooks Desktop. Features like two-way syncing, mobile barcode scanning, and real-time reporting can minimize data entry errors and help maintain accurate component quantities, significantly reducing the risk of build failures.
FAQs
How do I avoid assembly build errors in QuickBooks Desktop?
To keep assembly build errors at bay in QuickBooks Desktop, start by double-checking that your inventory items are properly set up and that their quantities are recorded correctly. Staying on top of updates and using the latest version of QuickBooks can also help you sidestep potential software glitches.
For an extra layer of efficiency, consider integrating an inventory management tool like Rapid Inventory. This type of solution works seamlessly with QuickBooks, helping to simplify processes, cut down on manual mistakes, and ensure smoother synchronization. These steps can go a long way in reducing the likelihood of assembly build errors.
What should I do if my assembly builds are stuck in 'Pending' status in QuickBooks Desktop?
If your assembly builds are stuck in a 'Pending' status, here’s how you can troubleshoot and resolve the issue:
- Refresh the build process: This ensures QuickBooks Desktop reflects any recent updates or changes.
- Look for errors or missing components: Double-check the assembly for unavailable parts or incorrect item details that might be causing the delay.
- Confirm inventory levels: Make sure you have the necessary items in stock, along with the correct serial or lot numbers entered.
- Restart QuickBooks Desktop: Sometimes, a simple restart can clear out temporary glitches. Also, verify that the integration with Rapid Inventory is working as expected.
- Check your network connection: Ensure there aren’t any disruptions that could be interfering with the system's performance.
If these steps don’t solve the issue, try clearing temporary files or reach out to QuickBooks or Rapid Inventory support for further help.
How can QuickBooks Tool Hub fix data corruption issues in QuickBooks Desktop?
QuickBooks Tool Hub is an essential utility designed to tackle data corruption issues in QuickBooks Desktop. One of its standout features is the Repair Data tool, which scans your company file for errors and fixes any detected damage. This helps ensure your data stays accurate and reduces the risk of future problems.
The tool is easy to use and can save you valuable time by resolving file integrity issues without requiring complex manual troubleshooting. It’s a reliable resource for keeping QuickBooks Desktop running smoothly.


