

If QuickBooks Desktop and inventory management software do not match, you can end up with duplicate invoices, bad stock counts, and wrong inventory value.
I’d check compatibility in 4 parts before connecting any live file:
- Confirm your QuickBooks Desktop setup: year, edition, release, Windows version, hosting, and multi-user setup
- Check the connection method: SDK or Web Connector, plus admin access and hosted-file limits
- Match workflows and fields: items, POs, SOs, invoices, bills, locations, lot/serial numbers, and write-back actions
- Test in a backup file only: run small test orders, receipts, counts, and transfers, then review logs and the Audit Trail
This article is about U.S. QuickBooks Desktop Pro, Premier, and Enterprise. It does not apply to QuickBooks Online or non-U.S. desktop editions.
A few facts stand out right away:
- QuickBooks Desktop 2024 and later require 64-bit Windows
- Enterprise may include extra inventory tools like multiple locations, bins, and lot/serial tracking
- A sync that only reads data is not enough if you need warehouse actions to post back into QuickBooks
- A $10.00 test in a restored backup can help you spot mapping and permission problems before they hit live data
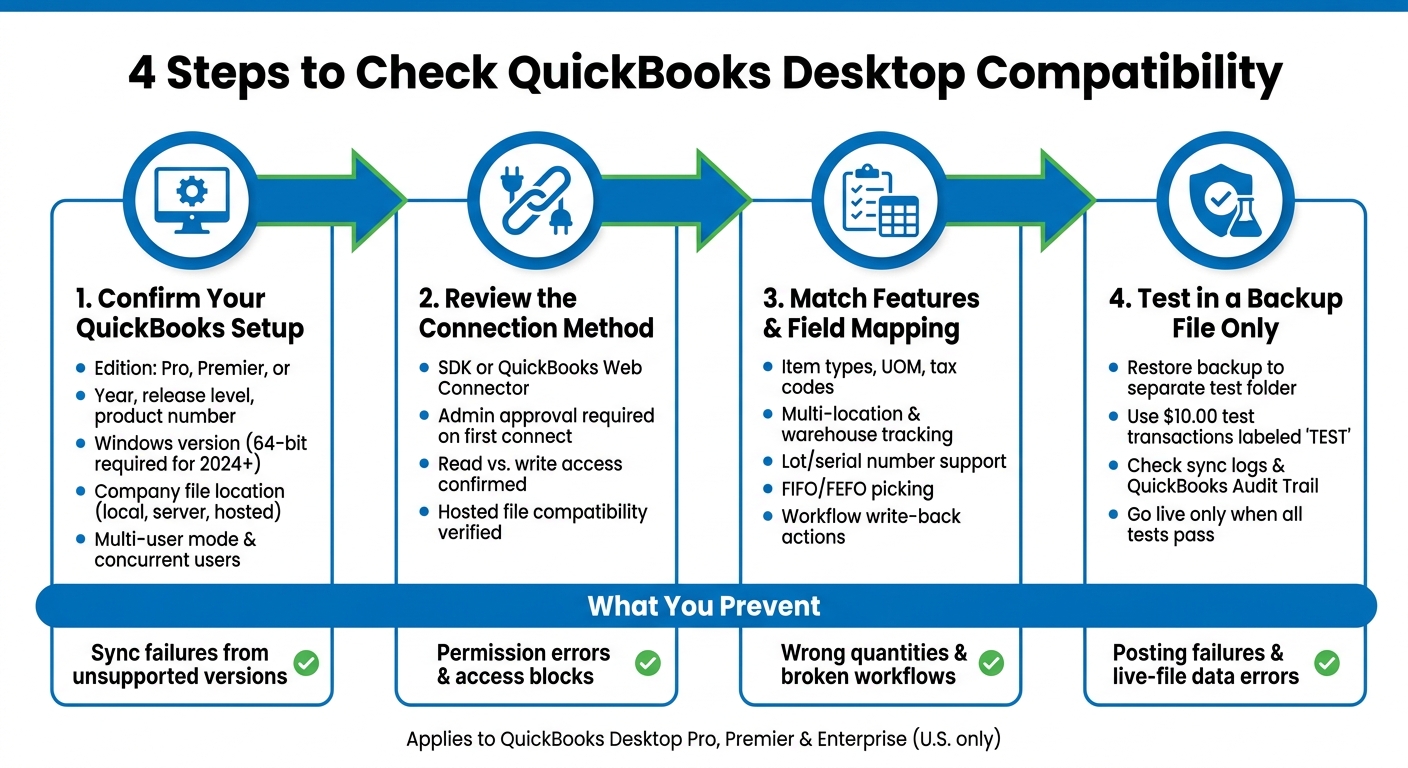
4-Step QuickBooks Desktop Compatibility Check Process
Quick Comparison
| Check | What I look at | What can go wrong if I skip it |
|---|---|---|
| Setup | Edition, year, release, Windows, hosting, users | App will not connect or is not supported |
| Connection | SDK/Web Connector, admin approval, file access | Sync errors, permission blocks, file access issues |
| Workflows and fields | Items, orders, locations, UOM, tax, lot/serial | Wrong quantities, bad postings, broken warehouse flow |
| Test run | Backup file, sample transactions, logs, Audit Trail | Live-file cleanup, duplicate entries, stock errors |
If I can pass all four checks, I can move forward with much less risk.
sbb-itb-19ed50f
Step 1: Confirm Your QuickBooks Desktop Setup

Next, line up your sync needs with the QuickBooks setup you have right now. Before you compare inventory tools, write down the basics of your QuickBooks Desktop environment. These details shape whether a product can connect cleanly to your company file.
Check Your QuickBooks Year, Edition, and Release
Inside QuickBooks Desktop, press F2 or Ctrl+1 to open the Product Information window. Record the product name, year, release level, product number, license number, and seat count.
Pay close attention to the edition: QuickBooks Desktop Pro, Premier, and Enterprise. That matters because Enterprise includes Advanced Inventory features like multiple locations, bin-level tracking, and serial or lot number tracking.
Edition also affects file size limits and sync behavior. A Pro user may only need item and sales sync. An Enterprise user may need assemblies, multiple warehouses, and serial numbers. So when you look at Rapid Inventory, check whether it lists support for your QuickBooks edition and the inventory features you use.
Verify Your Windows, Hosting, and User Setup
A few setup details can make or break a QuickBooks Desktop connection:
- Windows version and architecture - QuickBooks Desktop 2024 and later require 64-bit Windows. 32-bit Windows is not supported.
- Company file location - Your file may live on a local PC, office server, NAS, or in a hosted setup. Each one can call for a different connection method.
- Multi-user mode - This can affect when syncs run and whether you should use a dedicated integration user.
- QuickBooks Database Server Manager - This is needed for steady multi-user access, and many integrations rely on it.
If a third-party host manages your company file, confirm that the inventory software can run in that hosted setup. That one detail can rule out a product before you even start testing.
It also helps to note how people use QuickBooks day to day. Write down how many users log in at the same time, what roles they have, and whether you already use a dedicated admin account for integrations. For example, a warehouse with five people in QuickBooks at once in multi-user mode may need scheduled syncs to avoid file-lock issues.
Build a Simple Environment Checklist
Check the F2 Product Information screen, your Windows settings, and any IT notes you have. Then pull everything into a one-page reference sheet. The idea is simple: something you can send to a vendor in seconds.
Include:
- QuickBooks edition (Pro / Premier / Enterprise), year, release level, product number, license number, and seat count
- Windows version and 64-bit status on the machine running QuickBooks, such as Windows 11 Pro 64-bit
- Company file path and whether the file is on a local PC, office server, or hosted setup
- QuickBooks Database Server Manager status: installed (yes/no) and where it is installed
- Number of licensed users and the usual number of concurrent users
- Operating mode: single-user or multi-user
- Advanced Inventory status: enabled (yes/no) in Enterprise
Once you have that written down, you're ready to look at how the software connects to QuickBooks Desktop.
Step 2: Review How the Software Connects to QuickBooks Desktop
Once you’ve documented your QuickBooks setup, the next step is simple: figure out how the software gets to your company file. That connection path tells you a lot. In many cases, it tells you whether the integration will work in your setup before you spend time digging through feature lists.
Identify the Connection Method and Access Requirements
Most inventory tools connect to QuickBooks Desktop in one of two ways: the QuickBooks Desktop SDK or the QuickBooks Web Connector. SDK-based integrations connect through the installed QuickBooks application. Web Connector acts as a bridge between web-based software and QuickBooks Desktop. In both cases, you need a Windows machine running QuickBooks Desktop.
The first time you connect, QuickBooks Desktop will usually ask for admin approval through an application certificate prompt. You’ll need to approve file access and, if required, allow access even when QuickBooks is closed. If the person handling setup doesn’t have admin rights, that approval will often fail.
If your company file is hosted, make sure the integration works in that exact hosted setup. That detail matters more than many teams expect.
Next, check what level of access the software needs.
Confirm What the Software Needs to Read and Write
QuickBooks compatibility only goes so far. The bigger issue is whether the software can read and write the records your team uses every day.
Read access means the software can pull data from QuickBooks, like item lists, sales orders, or purchase orders. Write access means it can send data back, such as inventory adjustments, receiving transactions, or updated quantities. A connection that only reads data may be fine for reporting. But if your team needs transactions posted back into QuickBooks, that kind of setup won’t get the job done.
Before you move on, ask the vendor for a plain-English list of supported read and write actions. For inventory work, these records usually matter most:
| Data Category | Read from QuickBooks | Write to QuickBooks |
|---|---|---|
| Items | Yes | Yes, including updates and adjustments |
| Sales Orders and Purchase Orders | Yes | Status updates, including partial and full updates |
| Warehouse actions | - | Receiving, picking, counting |
| Lot/Serial Number Fields | Yes | Lot and serial assignments |
| Inventory Locations (Sites) | Yes | Transfers and moves |
For example, Rapid Inventory uses the QuickBooks Web Connector for two-way sync, pulling items and orders from QuickBooks and pushing receiving, picking, and cycle counts back.
Start by matching your day-to-day workflows to the read and write objects the software supports. Once that lines up, you can move on to checking inventory fields and workflow fit.
Step 3: Match Features, Data Fields, and Workflow Requirements
Once you know how the software connects and what it can read and write, the next step is simple: can it handle the way your team works every day? A connection can work on paper and still fall apart in daily use if it doesn't fit your warehouse process or keep QuickBooks Desktop in sync.
Check Support for Your Inventory Workflows
Start with the workflows that touch inventory accuracy and order fulfillment every single day. This is where problems usually show up first. Common trouble spots include multi-location inventory, warehouses, assemblies or kitting, lot and serial number tracking, barcode scanning, transfers between locations, cycle counts, and backorder handling.
For each workflow, ask one direct question: does it match the way we work, and does it write back correctly? Partial support can still create sync problems between QuickBooks and your warehouse system. For example, a platform may bring in inventory counts but fail to post adjusted quantities the way QuickBooks Desktop expects.
If you deal with expiration-sensitive items, check for FEFO picking support. If you operate two or more warehouses, make sure transfers, counts, and reports stay location-specific on both sides of the sync. Rapid Inventory supports multi-location and warehouse tracking, FIFO/FEFO picking, lot and serial tracking, mobile barcode scanning, cycle counting, and backorder tracking.
Once you confirm the workflow exists, look at the item fields and transaction data behind it. That part has to line up with QuickBooks Desktop too.
Review Field Mapping and Item Structure
A live connection can still break if item fields don't match. Field mismatches lead to posting errors even after the integration is live.
The fields that tend to cause the most issues are item types, item names, units of measure, and tax settings. If item types don't line up, the sync may fail or post the wrong data. Units of measure can cause the same kind of mess. If one system uses "each" and the other expects a case quantity, receiving and sales quantities won't match.
Match these fields to the item types and units already set up in your QuickBooks Desktop file. Before go-live, test a small set of representative SKUs. Include items with different units, bundles, and assemblies. That small test can save a lot of cleanup later.
Tax settings matter just as much. If taxable flags, tax codes, or shipping charge fields don't align, invoices created by the inventory system may post the wrong way in QuickBooks Desktop. Ask the vendor for a field-by-field mapping list that covers:
- item name
- item type
- unit of measure
- quantity on hand
- location
- cost
- preferred vendor
- tax status
- lot or serial number
- reference numbers
Use a Compatibility Comparison Table
Use the table below to mark each requirement as supported, partially supported, or not supported. Partial support can look fine at first, then cause problems after go-live when your team starts using the system at full speed.
| QuickBooks Desktop Feature | Your Current Setup | Inventory Software Support | Compatibility Status |
|---|---|---|---|
| Multi-location / warehouse tracking | e.g., 2 warehouses | Supported / Partially Supported / Not Supported | - |
| Lot / serial number tracking | e.g., lot numbers required | Supported / Partially Supported / Not Supported | - |
| FIFO / FEFO picking | e.g., FEFO for perishables | Supported / Partially Supported / Not Supported | - |
| Inventory assemblies | e.g., builds from components | Supported / Partially Supported / Not Supported | - |
| Mobile barcode scanning | e.g., receiving and picking | Supported / Partially Supported / Not Supported | - |
| Cycle counting | e.g., weekly counts | Supported / Partially Supported / Not Supported | - |
| Backorder tracking | e.g., partial order fulfillment | Supported / Partially Supported / Not Supported | - |
| Workflow write-back | e.g., daily inventory actions post back correctly | Supported / Partially Supported / Not Supported | - |
| Field mapping | e.g., mixed item types, UOM, tax codes | Supported / Partially Supported / Not Supported | - |
A missing convenience feature is often something you can work around. A missing core workflow, like lot tracking, location-specific transfers, or dependable write-back to QuickBooks Desktop, is usually a dealbreaker. Start with the requirements your business can't run without, then look at the nice-to-have features after that.
Step 4: Run a Safe Test and Confirm Results
Once your compatibility checklist is done, test only a restored backup file. Then run the exact items, workflows, and write-back actions you matched in the earlier steps. This is where you catch permission problems, field mismatches, and sync failures before anything touches live data.
Test With a Backup or Sample Company File
Create a full backup in QuickBooks Desktop, restore it as a separate test file, and save it in a clearly labeled test folder. Connect the software to the test file only, then double-check the file path before you sync.
Start small. Sync a limited batch of items first. Then test purchase order receiving and a sales order or invoice so you can confirm that on-hand quantity updates the way it should and that accounts post to the right places.
A few simple habits make this safer:
- Use small dollar amounts, like $10.00
- Label test transactions TEST
- Run Verify Data before and after testing to catch file issues early
Review Errors, Logs, and the Go-Live Decision
After each test action, check both the inventory software's sync log and the QuickBooks Audit Trail report. The sync log should show each record processed with a status such as success, warning, or error. The Audit Trail, filtered to your test date and reference numbers, shows what posted in QuickBooks and who created or edited it.
If the Web Connector shows an error, remove and reauthorize the application before you keep going. Also watch for permission warnings. In many cases, that means the app has not been granted access under Integrated Applications.
Use the same high-priority workflows you picked earlier. Fill in Expected before testing, then add Notes after each run.
| Test Action | Expected QuickBooks Result | Expected Inventory Software Result | Notes |
|---|---|---|---|
| Sync 5–10 items from QuickBooks | Items appear with correct types, accounts, and quantities | Items import with correct item type, cost, and location | Confirm no field mapping errors in the log |
| Create a $10.00 test purchase order and receive it | Item Receipt created; on-hand quantity updates correctly; valuation updated | Receipt recorded with the correct cost and warehouse | Verify the cost method |
| Pick and ship a test sales order | Sales order status updates or an invoice is created; on-hand quantity decreases correctly | Order marked as picked or shipped; on-hand quantity reduced | Check COGS and inventory asset postings |
| Run a test cycle count adjustment | Quantity Adjustment transaction created in QuickBooks | On-hand balance matches the count; adjustment appears in the activity log | Confirm the user has permission to post adjustments |
| Transfer stock between locations | Inventory Site transfer recorded in QuickBooks | Stock reflects the updated location | Verify that multi-location sync is active |
If the test passes, you have a green light. If it fails, stop there.
Go live only when all high-priority workflow tests pass with no unresolved errors, QuickBooks reports match the expected quantities and amounts, and syncs stay stable after repeated runs. If core tests fail, especially receiving, shipping, or financial posting, document the errors in the table above and send them to the vendor's support team before connecting to your live file.
Conclusion: 4 Checks That Prevent Compatibility Problems
A compatibility review doesn't take long. Skipping it, though, can get expensive fast. When teams skip verification, the trouble usually shows up after live orders start moving and inventory is already being touched - negative on-hand quantities, unposted invoices, or warehouse actions that don't sync.
That risk comes down to four checks. The guide's four steps turn compatibility from guesswork into a simple pass/fail review.
Even Rapid Inventory needs to be checked against your exact QuickBooks Desktop setup. The software matters, but your QuickBooks environment is what decides how things play out.
Checking your setup upfront costs a lot less than cleaning up bad data, retraining staff, or swapping software later.
Use this as your final go/no-go summary.
| Check | What It Prevents |
|---|---|
| Environment confirmation | Sync failures from unsupported versions or hosting setups |
| Connection method review | Permission errors and mismatched sync schedules |
| Feature and field verification | Inaccurate counts, valuation errors, and broken workflows |
| Safe test before go-live | Posting failures and data cleanup on live files |
If all four checks pass, go live. If one fails, fix it before connecting the live file.
FAQs
How do I know if my QuickBooks Desktop edition supports my inventory workflows?
First, identify your QuickBooks Desktop version. Features vary across Pro, Premier, and Enterprise, so this step matters.
QuickBooks Desktop Pro and Premier cover basic accounting. If you need advanced tools like integrated barcode scanning, those are available only in QuickBooks Desktop Enterprise with Advanced Inventory.
For more involved workflows, Rapid Inventory adds extra muscle across all QuickBooks Desktop versions with two-way sync. That includes:
- Multi-location tracking
- FIFO/FEFO picking
- Lot or serial number tracking
- Mobile barcode scanning
What permissions do I need to connect inventory software to QuickBooks Desktop?
To connect inventory software like Rapid Inventory to QuickBooks Desktop, you need administrative access during the first setup.
Inside QuickBooks Desktop, set integration access to Yes, but ask me every time. Then use the Set Up Users and Roles menu to choose None, Full, or Partial access.
That lets you keep permissions tight while still allowing the two-way sync to work as expected. It also supports QuickBooks Web Connector setup.
What should I test before syncing with my live QuickBooks file?
Before you sync your live QuickBooks Desktop file, start with the Verify and Rebuild utility. Then clean up duplicate items, wrong SKUs, and missing details. It also helps to standardize names and account details so they line up across both systems.
Next, run a test sync with 10 to 20 SKUs. Check that quantities, costs, and descriptions come through the way they should. Do this in a separate test environment before you go live.



