
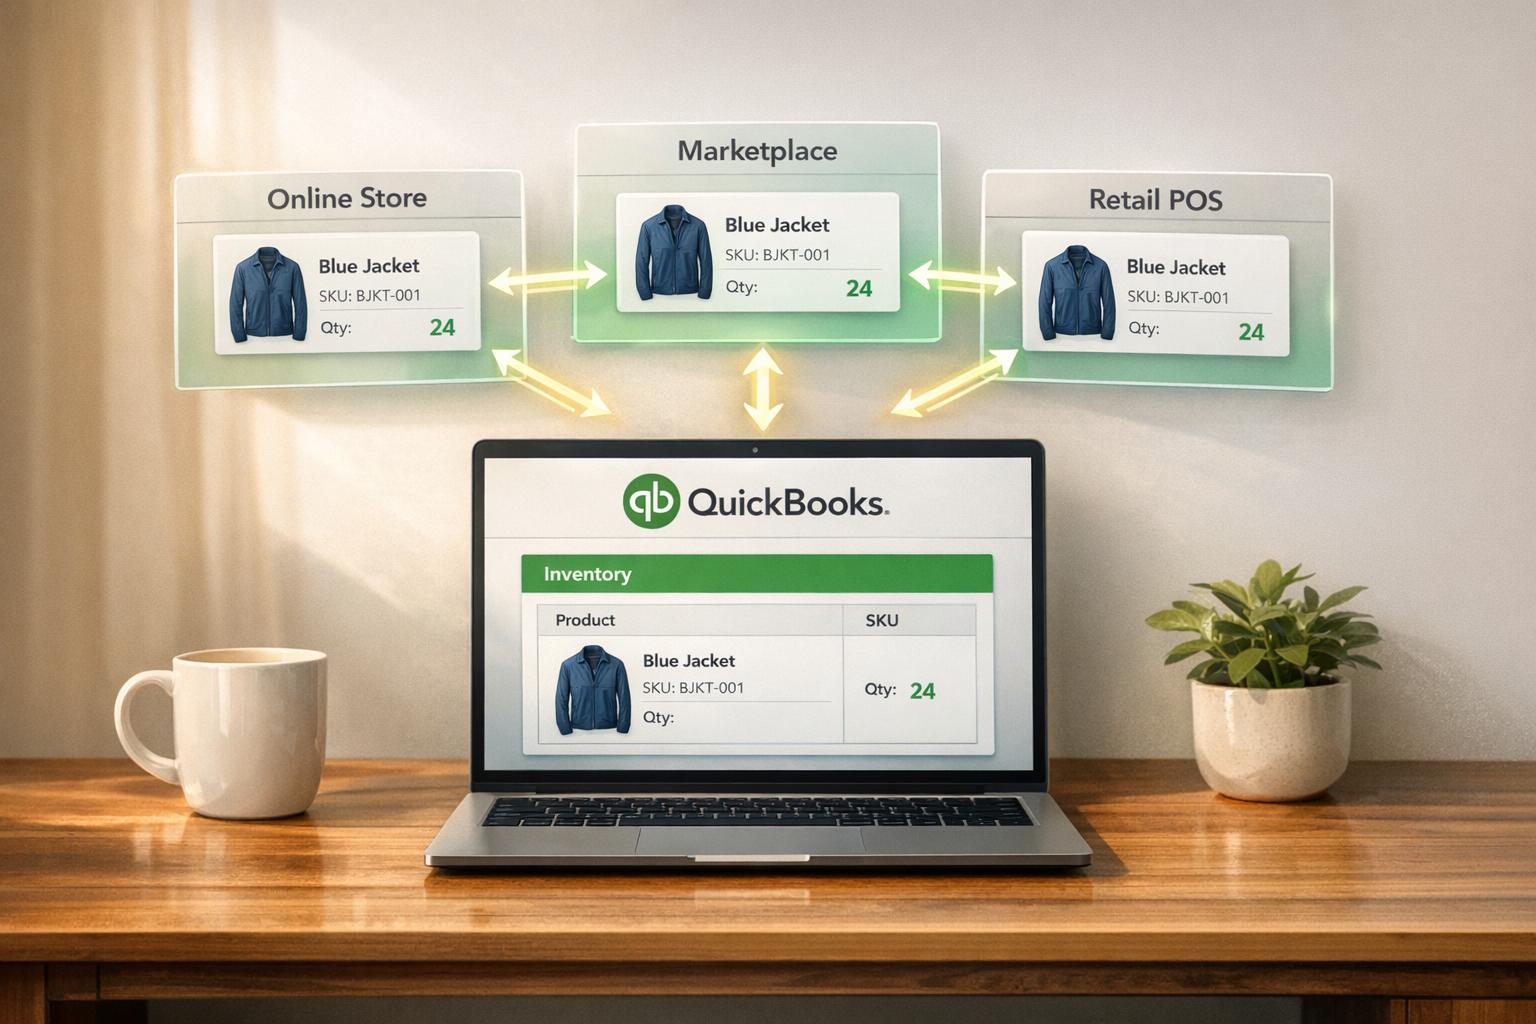
Syncing inventory across sales channels is essential to avoid overselling, stockouts, and costly errors. QuickBooks Desktop users can streamline inventory management by integrating sales channels for real-time updates, reducing manual work, and improving accuracy. Here's how:
- Prepare your data: Clean up SKUs, categories, and units of measure to ensure consistency across platforms.
- Choose a sync method: Opt for batch updates for smaller volumes or real-time sync for high-volume, multi-channel operations.
- Connect sales channels: Use tools like Rapid Inventory or third-party connectors to link platforms like Shopify, Amazon, and eBay.
- Set up sync configurations: Match products, enable inventory tracking, and configure update intervals.
- Monitor and maintain accuracy: Use barcode scanning, conduct cycle counts, and resolve discrepancies promptly.
- Automate financial reconciliation: Match transactions, track costs, and streamline reporting.

6-Step Process to Sync Inventory Across Sales Channels with QuickBooks
Sync Shopify, Amazon, Etsy, TikTok & More to QuickBooks #Shopify #QuickBooks #MultichannelSelling
sbb-itb-19ed50f
Step 1: Prepare Your Inventory Data
Before connecting your sales channels, it’s essential to clean up your inventory data. Skipping this step is one of the leading causes of inventory sync failures - 68% of multi-channel syncing issues stem from problems like mismatched SKUs or inconsistent units. By starting with clean, organized data, you can avoid errors and ensure smooth syncing later on.
Clean and Standardize Your SKUs
Your SKUs (Stock Keeping Units) must match perfectly across QuickBooks and all sales channels. Even minor inconsistencies - like "Widget-S" versus "S-Widget" - can lead to duplicate entries and costly overselling errors, with losses sometimes reaching up to $5,000.
To get started, export your product list from QuickBooks by navigating to Reports > Inventory > Inventory Valuation Detail. Open the exported file in Excel and use conditional formatting to spot duplicate SKUs. Next, standardize your SKUs into a consistent alphanumeric format, such as "SKU-ABC123." Stick to 10-12 characters, avoid special symbols, use uppercase letters, and ensure every SKU is unique. Once cleaned, re-import the updated list into QuickBooks via File > Utilities > Import > Excel Files. This step alone can reduce syncing errors by up to 90%.
After SKUs are standardized, turn your attention to product categories and units of measure.
Organize Product Categories and Units of Measure
Consistency is key when it comes to product categories and units of measure. In QuickBooks Desktop, you can assign categories by going to Lists > Item List, right-clicking on an item, and selecting Edit Item. Aim for a simple hierarchy with three to five levels, such as "Electronics > Phones > iPhone Models", to align with how your sales channels categorize products. Using QuickBooks’ Class Tracking feature can improve syncing efficiency by 40-50% in multi-channel setups.
For units of measure, stick to imperial units like "lb" (pounds), "each", or "dozen" in the Sales/Purchase UOM fields. Be consistent - don’t use "lb" in one place and "pounds" in another. If you sell cases of items, make sure QuickBooks understands that "1 case" equals "24 each" to prevent quantity mismatches. Use decimal points for partial units (e.g., 1.5 lb) and follow US number formatting (periods for decimals, commas for thousands).
Reconcile Current Inventory and Open Orders
After standardizing SKUs, categories, and units, reconcile your current inventory and open orders to establish a clean baseline. This prevents errors from snowballing across multiple sales channels. Issues like unrecorded shrinkage (typically 1-2% annually) or unposted adjustments can quickly multiply if left unchecked.
Start by running an Inventory Valuation Summary report under Reports > Inventory to compare QuickBooks’ data with your actual stock. Conduct a physical inventory count - either through cycle counting or a full audit - and enter any adjustments in QuickBooks via Inventory > Inventory Activities > Adjust Quantity on Hand. Then, review open purchase orders (Reports > Purchases > Open Purchase Orders) and sales orders (Reports > Sales > Open Sales Orders). Close or update outdated orders, ensuring all records use the MM/DD/YYYY date format.
Step 2: Choose Your QuickBooks Integration Method
Once your data is prepped and ready, the next step is figuring out how to sync it with your sales channels. You’ve got two main options here: batch updates or real-time sync. Each has its own advantages and challenges, so your choice will depend on your business needs, like order volume and how much manual effort you're willing to invest.
Batch Updates vs. Real-Time Sync
Batch updates involve importing sales data at scheduled intervals using CSV files. This could mean running updates daily, hourly, or somewhere in between. It’s a solid option for smaller businesses handling fewer than 100 orders a day or for sellers with predictable, seasonal sales patterns. Why? It’s cost-effective (tools like Zapier even offer free tiers), easy to set up, and doesn’t strain your system’s servers. But there’s a catch: since updates only happen at set times, you risk overselling if inventory levels change rapidly between syncs.
Real-time sync, on the other hand, uses APIs to update inventory the moment a sale happens. Every transaction on your sales channel instantly adjusts your QuickBooks inventory. This method is a better fit for businesses managing over 50 orders daily or juggling multiple sales channels where overselling can quickly become a headache. In fact, it can cut inventory discrepancies by 70–85% compared to batch updates and help avoid overselling mistakes that could cost up to $5,000 annually. However, this convenience comes at a price - expect monthly integration costs between $50 and $200. Plus, there might be occasional delays if API limits are hit.
Here’s an example to illustrate the difference: A U.S.-based T-shirt business using batch updates might export sales CSVs twice a day, spending about 15 minutes on the process. With real-time sync, those updates happen automatically after every sale - no manual effort required.
If you use QuickBooks Desktop and want a more seamless real-time solution, there’s a tool designed just for that.
Use Rapid Inventory for QuickBooks Desktop
For QuickBooks Desktop users, Rapid Inventory offers a built-in solution to simplify inventory management. It provides automatic two-way syncing, so your sales data flows smoothly between your sales channels and QuickBooks Desktop. Adjust stock levels or process returns? Those changes sync back instantly. This means no more spreadsheets or manual data entry.
"Automatic 2 way sync with Quickbooks means that your items and orders are synced to Rapid Inventory and Rapid Inventory actions are synced back to Quickbooks. Say goodbye to spreadsheets and manual entry."
Rapid Inventory also supports advanced features like multi-location and warehouse tracking. Whether you’re managing stock across multiple U.S. distribution centers or organizing bin locations in a single warehouse, it’s got you covered. It even offers FIFO/FEFO picking strategies, lot and serial tracking, and mobile barcode scanning for iOS and Android. These tools help ensure accuracy when receiving or picking items. Plus, it’s web-accessible, so you can manage inventory from anywhere, and it works with QuickBooks Desktop Enterprise, Pro, and Premier, as well as hosted platforms like Rightworks, Swizznet, and Visory.
The implementation process typically takes just seven days, starting with planning and ending with a full data migration. Pricing is straightforward: the Pro plan starts at $90 per user per month (for 1–9 users), including unlimited warehouses, barcode features, and hands-on onboarding. For larger teams, the Unlimited plan costs $900 per month for 10+ users and adds perks like a dedicated account manager and custom inventory reports. There are no contracts, onboarding fees, or hidden costs.
"My team was up and running in a few days. Very straightforward and easy to use." - Jacob, CEO
For businesses selling on platforms like Amazon, eBay, and Shopify, Rapid Inventory’s real-time sync can improve inventory accuracy to about 97%, cut reconciliation time by 80%, and even prevent costly stockouts - all while supporting imperial measurements like pounds for weight.
Step 3: Connect Your Sales Channels to QuickBooks
Once you've chosen your integration method and prepared your data, the next step is linking your sales channels to QuickBooks. This process involves authenticating each channel and accurately importing historical sales data. While the exact steps may vary depending on the platform, the general idea is the same: allowing data to flow seamlessly between systems. Follow the specific authentication steps for each channel to ensure a smooth connection.
Authenticate and Link Sales Channels
For Shopify, start by installing the QuickBooks Desktop Connector app from your Shopify admin panel. Ensure you're using the latest version of QuickBooks Desktop inventory management software on the same computer hosting your company file. Authentication relies on a unique app token. To generate this, open QuickBooks Desktop, go to File > Utilities > Manage Web Apps, and create a token. Paste this token into the Shopify Connector app. Before proceeding, confirm that Sales Tax is enabled in QuickBooks Desktop by navigating to Edit > Preferences > Sales Tax. If necessary, create a 0% tax item to avoid sync errors later.
For Amazon and eBay, the process is slightly different since QuickBooks Desktop lacks the native Commerce tab available in QuickBooks Online. You'll need third-party tools like QuickSync (which offers a 14-day free trial) or Webgility (costing approximately $799 annually, with strict refund policies). These tools require authorization in your seller dashboard to access your inventory, orders, and listings. During setup, you’ll need to choose between Summary mode (for high-volume sellers with over 14,500 rows) or Detailed mode (for smaller datasets). Be aware that this choice is permanent, so make your decision carefully.
To avoid issues, ensure that SKUs are unique across all platforms. Mismatched SKUs are a common cause of duplicate listings and sync errors. Additionally, designate one platform - often Shopify or QuickBooks - as your "source of truth" for inventory and sales data. This prevents conflicts when updates are made on multiple channels simultaneously.
"Syncing Shopify, Amazon, and eBay is not just a setup task you do once and forget. It is what keeps your business running as one connected system instead of three separate ones fighting each other." - Chloe Martin, QuickSync
Import Historical Data and Verify Accuracy
Once your channels are connected, the next step is importing historical sales data to complete your inventory records. Standard connectors can sync Shopify data for up to 24 months, Amazon and eBay data for 90 days, and Etsy data for 6 months. For older records - typically beyond three years - you may need specialized tools like MoneyThumb or Link My Books.
If you're using QuickBooks Desktop, importing sales data involves a bit more manual effort compared to QuickBooks Online. Export your sales data as an Excel file from your sales channel, convert it to an IIF (Intuit Interchange Format) file, and then import it into QuickBooks Desktop. Use a generic customer name like "Amazon Sales" and import the data as Sales Receipts. This ensures inventory levels adjust correctly, as QuickBooks Desktop only reduces inventory through a recorded sale or a manual adjustment.
"Inventory is only reduced by one of two actions, a sale with that item listed, or an inventory adjustment. So to sync Amazon with QBDT inventory you need to import each sale by item." - Rustler, Level 15, QuickBooks Community
After importing, double-check that the data in QuickBooks matches your sales channel records. Address returns promptly to keep inventory accurate. Implementing a real-time integration at this stage can help reduce overselling risks by up to 90% and cut order processing times by 30% to 50% during busy periods.
Step 4: Configure Inventory Sync Settings
Once your sales channels are connected, the next step is to configure QuickBooks so it updates stock levels accurately across all platforms. Here's a closer look at the two key tasks involved in setting up inventory synchronization.
Match Products and SKUs Across Platforms
QuickBooks automatically pulls in product details like names, variants, and SKUs from your connected sales channels. This feature helps ensure that items are matched correctly and avoids creating duplicate records when the same product is sold on multiple platforms. For users of QuickBooks Online Commerce, suggested matches will appear in the Commerce Overview dashboard. You can confirm these matches by selecting "Confirm match" if the suggestion is accurate. Alternatively, you can manually search and link SKUs using the "Find matches" tab. It's a good idea to regularly review these mappings and manually sync them if needed to keep everything aligned.
Before syncing, make sure to enable the following settings in QuickBooks:
- "Track inventory quantity on hand"
- "Track inventory for sales channels"
These options ensure that inventory tracking is seamless and accurate.
Set Sync Intervals and Update Rules
Real-time synchronization is key to maintaining accurate stock data. It eliminates delays and reduces the risk of overselling by instantly reflecting inventory changes across systems. With two-way syncing, any adjustments - whether made in your warehouse or through a connected sales channel - are automatically updated in QuickBooks Desktop and vice versa. In fact, when paired with routine cycle counts, real-time syncing can improve inventory accuracy to about 97%. For QuickBooks Desktop users, the QuickBooks Web Connector is essential for enabling frequent data exchanges to keep everything up to date.
For a seamless experience, tools like Rapid Inventory offer two-way real-time sync. This integration keeps stock levels in sync across all locations, significantly cutting down on manual data entry and reducing the chance of overselling. Features like multi-location tracking and real-time inventory reports make it easy to monitor activity and quickly spot discrepancies before they affect customer orders.
To maintain accuracy during cycle counts or physical inventory reconciliations, pause transactions temporarily. Also, make it a habit to check sync logs for any connectivity issues or mismatches that could disrupt operations. Regular monitoring and proactive adjustments will help keep your inventory data reliable and error-free.
Step 5: Monitor and Maintain Synced Inventory
Keeping a close eye on inventory daily and addressing issues promptly ensures accuracy and prevents overselling.
Use Barcode Scanning for Daily Inventory Updates
Mobile barcode scanning simplifies inventory management. By scanning barcodes during tasks like receiving, picking, and counting, you can instantly update Purchase Orders, Item Receipts, Sales Orders, Invoices, and Inventory Transfers.
To activate barcode functionality in QuickBooks Desktop, go to Edit > Preferences > Items and Inventory > Company Preferences > Advanced Inventory Settings, and enable the barcode feature. Use the QuickBooks Barcode Wizard to map barcodes to fields like "Item Name" or "Part Number" to reduce errors. Configure your scanner - whether USB or Bluetooth - to insert a single carriage return (Enter key) after each scan for seamless line-item entry.
"Rapid Inventory helps us run our warehouse operations. Easy to use and reliable. Using it since 2015, we especially love the barcode scanning and mobile picking and we've implemented it for all our warehouse operations." - Fernanda C, Director of Operations
Instead of relying on annual physical counts, conduct daily cycle counts for high-priority items using mobile scanners. This method identifies discrepancies early and, when paired with real-time syncing, can achieve inventory accuracy rates of up to 97%. Scanning during the receiving process ensures that new stock is immediately reflected on your sales channels as soon as it arrives in the warehouse.
Reconcile Stock Discrepancies
Even with automated updates, discrepancies can arise. Common causes include negative Quantity on Hand (QOH), incorrect journal entries, or mapping errors between sales channels and QuickBooks. Resolving negative inventory balances quickly is crucial to avoid syncing issues and inaccurate financial records.
Use the QuickBooks Audit Trail to track inventory changes, filter transactions, and identify the source of discrepancies. When performing manual adjustments or cycle counts, pause all transactions temporarily to maintain accuracy. After making adjustments, run pre- and post-sync checks to ensure your warehouse system aligns with QuickBooks before resuming normal operations.
Handle Returns and Adjustments
Returns and adjustments require careful handling to keep systems in sync. Use mobile barcode scanning during the return process to update inventory instantly, ensuring returned stock is available for resale across all channels without delay.
In QuickBooks Desktop, you can adjust inventory for quantity, value, or both. Be meticulous when selecting accounts during adjustments, as errors here can lead to significant reconciliation problems. For businesses using assemblies, confirm component quantities and clear pending builds before making adjustments to prevent errors in assembly builds.
Real-time two-way syncing keeps all systems updated immediately, preventing overselling and ensuring accurate financial records. Following these practices helps maintain consistent inventory levels across platforms while managing daily operations efficiently.
Step 6: Automate Financial Reconciliation
Once your inventory channels are aligned, it’s time to simplify your financial records by automating reconciliation. This step ensures your financial data stays accurate and up-to-date.
Match Transactions with Bank Deposits
QuickBooks Online Commerce integrates with platforms like Amazon, eBay, Etsy, and Shopify to automatically import orders and payouts, categorizing transactions for reconciliation purposes.
For QuickBooks Desktop users, the process is more manual. Only finalized invoices and bills are synced, either through scheduled updates or manual uploads.
Before your first sync, double-check the "books closed date" in QuickBooks, as data beyond this date won't be imported. Keep in mind the historical data limits for each platform: Shopify allows syncing for up to 24 months, while Amazon and eBay only provide data for the previous 90 days. After the initial download, review the Overview page to confirm data accuracy.
This automated system helps ensure that transactions are properly matched, laying the groundwork for precise inventory cost and revenue reporting.
Improve Reporting for Inventory Costs and Revenue
With accurate syncing, you can track COGS (Cost of Goods Sold) and revenue in real time. QuickBooks offers tools for inventory management using either FIFO (First-In, First-Out) or weighted-average costing methods, enabling detailed and accurate COGS reporting. When transactions are mapped correctly, revenue and expenses are categorized properly, making monthly closes smoother and more efficient.
Conclusion
Keeping your inventory in sync across multiple sales channels with QuickBooks comes down to maintaining clean data, using the right tools, and staying consistent with monitoring.
Start by setting up a clean inventory baseline. This step is crucial to avoid issues like mismatched mappings, duplicate entries, or incorrect quantities. Once your data is in order, select an integration method that suits your sales volume. For QuickBooks Desktop users, tools like Rapid Inventory offer reliable two-way syncing.
After establishing a solid data foundation, regular monitoring is key to maintaining accuracy. Build daily and weekly habits into your operations - such as cycle counts, barcode scanning updates, and reconciliations. These practices help catch and fix discrepancies early, reducing the risk of overselling and ensuring smoother order fulfillment.
The final piece of the puzzle is financial reconciliation. When your synced inventory data is accurate, it streamlines critical financial processes like calculating the cost of goods sold, generating revenue reports, and aligning bank deposits - all without manual adjustments.
FAQs
Which system should be my inventory “source of truth”?
When it comes to managing your inventory, the "source of truth" should be the system that gives you the most accurate and up-to-date picture of your stock levels and operational data. This is usually a warehouse management system (WMS) or an inventory platform like Rapid Inventory.
While QuickBooks Desktop is excellent for handling your financial records, it’s not designed to be your go-to tool for primary inventory tracking - especially if you’re dealing with multiple locations or more complex inventory needs. To keep everything aligned, make sure to use a real-time sync between systems. This helps maintain consistency and prevents stock discrepancies that can throw your operations off track.
How do I stop duplicate SKUs from being created during sync?
To keep your inventory in order and avoid duplicate SKUs when syncing with QuickBooks, standardization is key. Here’s how you can ensure a smooth process:
- Use a consistent naming convention: Stick to a clear and uniform format for SKUs, like "ABC-123", across all your sales channels and QuickBooks.
- Manually match products or review suggested matches: When connecting your sales channels to QuickBooks, take the time to carefully match products or verify any suggested matches to ensure accuracy.
- Regularly reconcile your item list: Periodically review your QuickBooks item list to catch and resolve any duplicates.
- Merge duplicates in QuickBooks: If duplicates slip through, use QuickBooks' tools to merge them and maintain a clean inventory.
- Ensure accurate SKU mapping during setup: Double-check your mappings during the initial setup to prevent mismatches that could lead to errors.
By following these steps, you can maintain a clean inventory and avoid the headaches that come with duplicate SKUs.
What’s the best way to handle returns so inventory stays accurate?
To keep your inventory accurate while managing returns, it's crucial to record and reconcile items correctly. Use tools like QuickBooks to create a sales receipt or credit memo, adjust inventory levels as needed, and compare your records with physical stock counts regularly. For added efficiency, consider advanced tools like Rapid Inventory, which offer features such as real-time updates and barcode scanning. Maintaining detailed records of all returns will help ensure both your stock and financial data stay precise.


