

If your inventory is off, cycle counts help you fix it without shutting down the warehouse. In QuickBooks Desktop Enterprise with Advanced Inventory, I can set up small, scheduled counts by item, site, or bin, send them to mobile devices or worksheets, review variances, and post adjustments in smaller batches instead of doing one big annual count.
Here’s the short version:
- I use cycle counts to check a small group of SKUs on a set schedule.
- I use full physical counts when I need a one-time snapshot of all inventory.
- In QuickBooks Desktop, I can count by site, bin, and filtered item lists.
- I can run counts with mobile scanners or with paper/Excel.
- I should keep count batches small, such as 15–30 SKU-location counts.
- I should review variance history and move problem items into more frequent counts.
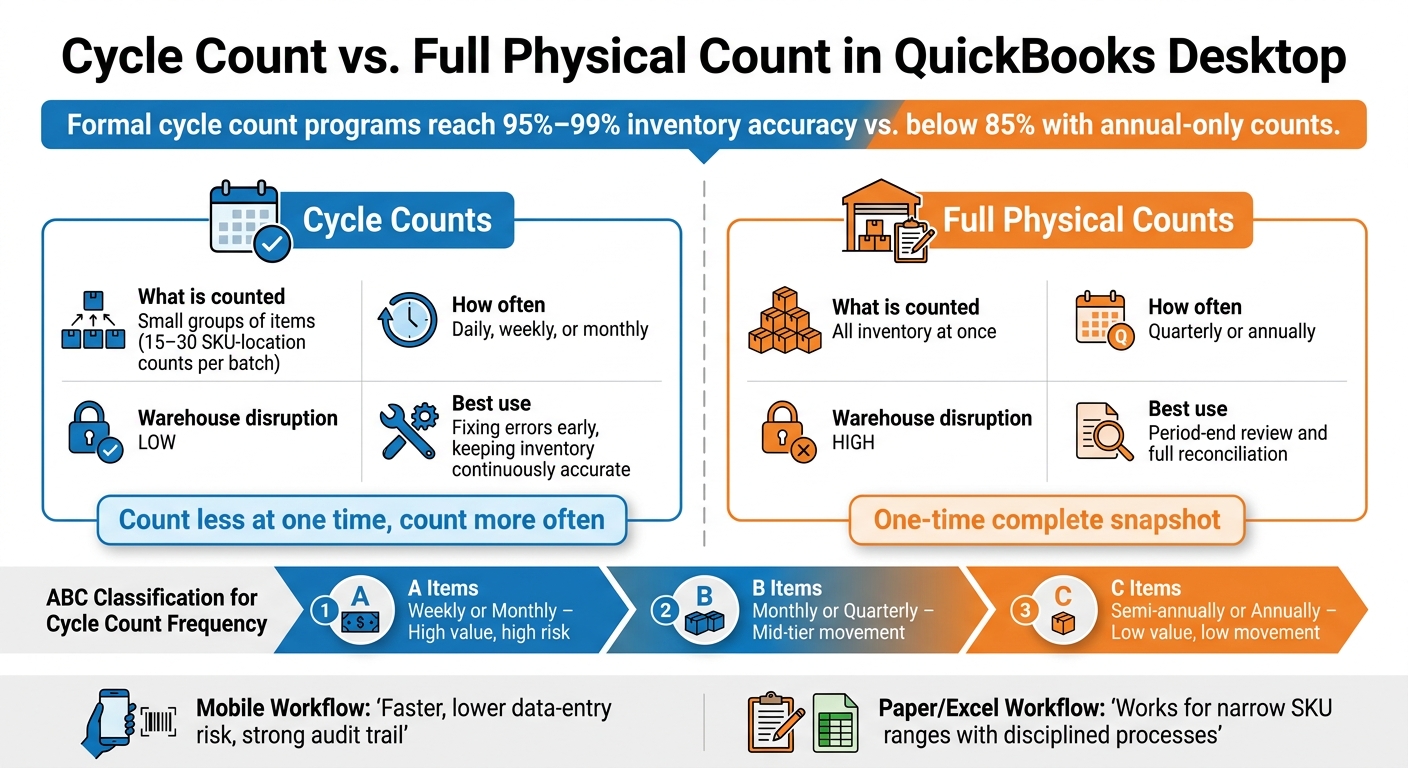
- Formal cycle count programs can reach 95%–99% inventory accuracy, while warehouses that rely only on annual counts may fall below 85%.
A simple setup usually looks like this: turn on inventory management software for QuickBooks Desktop, map sites and bins to the warehouse, create adjustment accounts, sort items into A/B/C groups, assign counters and reviewers, then post quantity or value changes after checking each variance line.
If I need a fast side-by-side view, this helps:
| Method | What I count | How often | Effect on warehouse work | Best use |
|---|---|---|---|---|
| Cycle counts | Small groups of items | Daily, weekly, or monthly | Low | Fixing errors early and keeping inventory in line |
| Full physical counts | All inventory | Quarterly or annually | High | Period-end review and full reconciliation |
That’s the core idea: count less at one time, count more often, and fix errors before they spread.
Cycle Count vs. Full Physical Count: QuickBooks Desktop Inventory Methods
Set up QuickBooks Desktop for cycle count automation

Enable inventory, sites, and bin tracking
Turn on inventory, sites, and bin tracking before your first count. Set up sites and bins so they match the way your warehouse is laid out, and use the same naming pattern across every location.
QuickBooks supports alphanumeric and special-character bin names up to 31 characters, so labels like A-03-S2-B12 work fine.
It also helps to create dedicated inventory adjustment accounts in the Chart of Accounts. Accounts like Inventory Shrinkage or Cost of Goods Sold – Cycle Count Adjustments make it easier to send variances to the right place when you record count results. Decide where routine variances should post before the first count starts.
Once that setup is done, you’re ready to connect devices and assign count lists.
Connect mobile devices and barcode scanners
In QuickBooks Desktop Enterprise, you can create a cycle count, choose a site, pick items, assign counts to specific people, and send count lists to mobile devices.
After the count list is ready, pair your mobile devices or barcode scanners with the count workflow and run a test scan session before the first live count. Scan a few items you already know, then check that the scan results match the floor count. That small test can save a lot of cleanup later.
Barcode scanning also cuts down on manual entry and helps reduce errors.
Once your devices are working the way they should, you can build the count schedule and decide which items to include.
How Rapid Inventory connects when you need more warehouse control

If you need two-way sync and web-based cycle counting, Rapid Inventory connects to QuickBooks Desktop with two-way sync, so cycle count results flow back without manual re-entry. It also adds barcode scanning, multi-location tracking, and web-based cycle counting.
sbb-itb-19ed50f
QuickBooks Enterprise Cycle Count Tutorial: A Step-by-Step Guide to Efficient Inventory Management
Build a count schedule and choose which items to count
After setup, the next step is deciding what each cycle count will include. That’s the part that turns cycle counting into a repeatable routine instead of a one-off physical inventory. The simplest place to start is by sorting items into priority groups.
Set count frequency by item importance and movement rate
Use ABC classification to rank items by value, movement, and shrink risk. Then match count frequency to that ranking:
- A items: weekly or monthly
- B items: monthly or quarterly
- C items: semi-annually or annually
Dollar value is only part of the story. Shrink history matters just as much. If a low-cost item keeps showing discrepancies in your Inventory Adjustment Detail report, move it into a higher-priority count group until those discrepancies stop.
Review variance history quarterly. If certain items keep coming up with count issues, reclassify them.
Filter items by class, site, bin, or variance history
Store the ABC class in a custom field so you can filter count batches by item, class, site, or bin. That ties the count plan directly to the sites and bins you already turned on during setup.
Keep each batch small: 15–30 SKU-location counts is a good target. That’s usually enough to finish in one short session without dragging the process out.
If you’re using Rapid Inventory, those filtered lists can turn into mobile count tasks that sync back to QuickBooks Desktop.
Item-based vs. location-based count planning: comparison table
Use location-based counts for routine coverage. Use item-based counts for A items and SKUs with high variance.
| Planning Approach | Speed of Execution | Control over Key SKUs | Ease of Scheduling | Fit for Small Warehouses |
|---|---|---|---|---|
| Item-based | Slower if items are spread across many bins; faster for short A-item lists | High - targets high-value or high-risk SKUs regardless of location | Moderate - requires ABC ranking, variance data, and sales reports | Best for a short list of critical SKUs |
| Location-based | Generally faster - counters move through aisles and count everything in view | Moderate - all items in a zone get counted, but scattered critical SKUs may be undercounted | High - easy to assign zones by day or week; straightforward for small teams | Best for compact warehouses with clear aisle or bin labeling |
Once the plan is in place, the next move is simple: assign counters and sync the results.
Run the cycle count, sync results, and review adjustments
After you build the count list, it’s time to do the work: assign roles, gather counts, sync the results, and check any variances.
Assign user roles for counters, supervisors, and admins
Keep counting, review, and posting separate. In QuickBooks Desktop, go to Company > Users > Set Up Users and Roles and assign permissions by role, so counters have limited access before any counts are entered.
Counters move through the warehouse, record quantities, and flag exceptions like damaged stock, items in the wrong bin, or missing labels. Supervisors spot-check those exceptions, and admins post the adjustment. In a small warehouse, one person may wear more than one hat. Even then, it still helps to keep counting and approval apart for high-value items. That simple split can cut down on mistakes.
Step-by-step: mobile or worksheet sync process
Use the same item, site, and bin filters from the schedule. That keeps the count focused and avoids drift.
Mobile route: Create the count batch, then sync it to each counter’s device. Counters scan item barcodes and enter the quantity they find. Hide book quantity so they record what’s in front of them, not what they think should be there. After a counter submits the batch, the results sync back to QuickBooks Desktop. The system then compares counted quantities to system quantities and creates a variance list.
Paper or Excel route: Export the count list from QuickBooks Desktop with Send to Excel, print it, record counts by hand, then import the file and post the adjustment through Batch Actions > Adjust Quantity/Value on Hand.
Before posting any adjustment, review each discrepancy line. Check whether the change should affect quantity, value, or both. After variances are checked and reason codes are added, the admin posts the adjustment to the account mapped during setup on the correct date so it hits the right accounting period.
With Rapid Inventory, two-way sync sends counted quantities back to QuickBooks Desktop and gives supervisors a chance to review variances before posting.
Mobile workflow vs. paper or Excel workflow: comparison table
| Factor | Mobile workflow | Paper or Excel workflow |
|---|---|---|
| Task speed | Faster - scan and submit on the spot | Slower - manual recording, then separate data entry |
| Data-entry risk | Lower - item data comes from the system | Higher - handwriting errors, transposed digits, file-version errors |
| Training needs | Device and scanning basics; easy for smartphone users | Spreadsheet skills and careful sheet-handling instructions |
| Audit trail quality | Strong - timestamps, user IDs, and per-bin history captured automatically | Weaker - relies on manual initials, written dates, and file management |
| Fit for small warehouses | Best as SKU counts or transaction volume grow | Works for narrow SKU ranges with disciplined processes |
Conclusion: Common small-warehouse setup patterns and next steps
Once setup, scheduling, and sync are in place, cycle counting turns into a routine your team can repeat without much drama. Start small. Count your highest-risk SKUs on a steady schedule instead of trying to tackle the whole warehouse at once.
Key implementation points
Stick with five rules: enable inventory, sites, and bins; set A/B/C count frequency; group counts by aisle or bin; train counters on the workflow you picked; and review variances before posting. Formal cycle count programs can reach 95%–99% inventory accuracy, while teams that depend only on annual physical counts may drop below 85%. It also helps to set a clear recount threshold before you post anything.
At a certain point, manual work starts to slow the team down. That usually happens when you add a second location, take on more SKUs, or both. When that happens, tighter warehouse control matters more. That’s where Rapid Inventory comes in. It adds mobile barcode scanning, multi-location visibility, and two-way QuickBooks Desktop sync for cycle counts, so those counts can sit inside a broader QuickBooks Desktop workflow.
FAQs
How do I start cycle counts in QuickBooks Desktop?
Open Inventory > Cycle Count. Then use Find & Select Items to filter by site - your warehouse or location - and choose the items you want to count.
Next, send those count tasks to a mobile scanner or Android device. That lets staff confirm item counts and bin locations in real time, right from the floor.
If a count doesn’t match, the status changes to Pending Review. From there, go to Batch Actions > Adjust Quantity/Value on Hand, make the needed update, and then mark the count Closed.
When should I use cycle counts instead of a full count?
Use cycle counts when you need to keep inventory accurate without shutting down daily work. Instead of counting everything at once, you count small sections on a set schedule. That makes it easier to spot problems early, fix them fast, and keep shipping and receiving on track.
Cycle counts make the most sense for high-value items or products that move fast. Less critical stock can be counted less often. To get clean results, plan counts during off-peak hours and pause inventory movement in the area being counted.
What should I do before posting inventory adjustments?
Before you post inventory adjustments, pause all transactions for a moment. That short pause helps protect data integrity and cuts down on avoidable errors.
Next, match your physical counts to the numbers in your system. Review the Inventory Valuation Summary, then update or close old open purchase orders and sales orders that no longer reflect what’s happening in the business.
If you use assemblies, check that component quantities are correct and clear any pending builds before you move ahead.



