

If QuickBooks Desktop no longer matches what’s on your shelves, the fix is usually simple: clean your item data, connect your inventory app the right way, test a small batch first, and reconcile on a set schedule. For many small businesses, that means fewer stock errors, less duplicate entry, and tighter control over cash tied up in inventory.
I’d boil the article down to this:
- Check QuickBooks first so inventory features, sites, and item settings are correct
- Clean SKUs, counts, and account mappings before any sync starts
- Test with 3 to 10 items first instead of pushing your full catalog live
- Use barcode-based receiving and picking to cut typing mistakes
- Track counts weekly and monthly so small gaps do not turn into month-end problems
- Keep one source of entry per transaction to avoid duplicate receipts and invoices
One bad setup can distort on-hand counts, COGS, and inventory value. Even a $5,000.00 overstatement in slow-moving stock can affect reorders, margins, and year-end reporting. That’s why I’d focus less on the software pitch and more on the setup, workflow, and review habits that keep both systems aligned.
If you want the short version, this article is a plain guide to getting QuickBooks Desktop inventory integration working without turning your books into a cleanup project later.
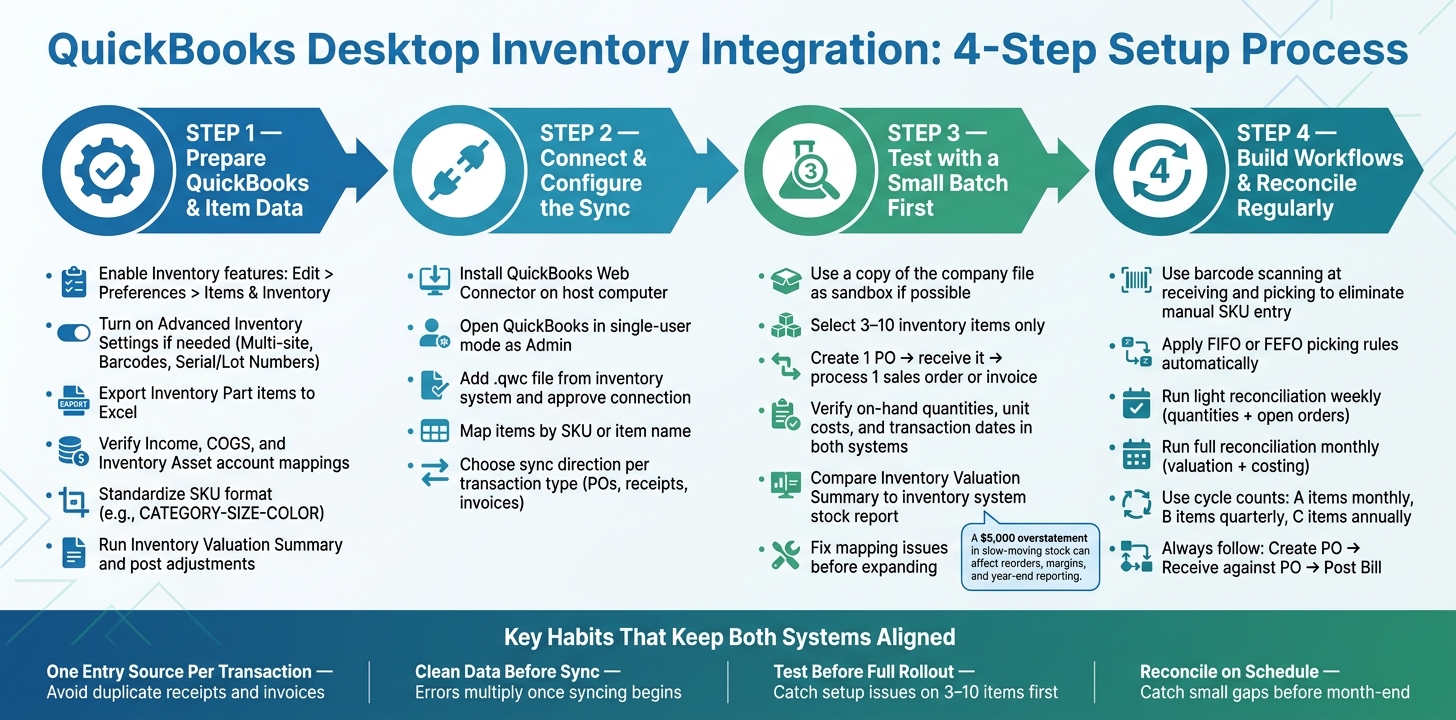
QuickBooks Inventory Integration: 4-Step Setup Process for Small Businesses
QuickBooks Enterprise Advanced Inventory | Full Tutorial on Locations, Lot Numbers, FIFO, Barcodes

sbb-itb-19ed50f
Prepare QuickBooks Desktop and item data before connecting anything

Sync multiplies bad data. If your SKUs, account mappings, or on-hand counts are messy before go-live, the mess spreads fast. Clean things up first. Then, when you run your sync test, you’ll spot actual setup problems instead of old inventory mistakes.
Enable inventory features and confirm your QuickBooks setup
Go to Edit > Preferences > Items & Inventory > Company Preferences and make sure "Inventory and purchase orders are active" is checked. If that setting is off, stock, purchase orders, item receipts, and adjustments can sync the wrong way.
If you use QuickBooks Enterprise and want to track stock across more than one location, use barcodes, or assign serial or lot numbers, open Advanced Inventory Settings from the same screen. Turn on only what you plan to use:
- Multiple Inventory Sites
- Barcodes
- Serial/Lot Numbers
Set these options before the first sync. Changing them later can cause headaches.
Clean item records, SKUs, quantities, and account mappings
Bad SKUs and bad account mappings lead to bad receipts, bad invoices, and bad reports. Start by reviewing your Inventory Part items and exporting them to Excel. That makes it much easier to catch duplicates, old items, and records that don’t match.
For each item, check the cost and sales price. Then verify that the Income Account, COGS Account, and Inventory Asset Account are mapped the right way. If those accounts are off, your gross margin reports can go sideways as soon as synced transactions begin posting.
Keep SKU formatting consistent. A simple format like CATEGORY-SIZE-COLOR works well. Skip special characters like slashes and ampersands, since they can break syncs. Also make sure units of measure match your actual pack sizes, such as Each, Box of 12, or Case of 24.
Run the Inventory Valuation Summary or Inventory Stock Status by Item report and compare the results with a physical count. If numbers don’t match, post Inventory Adjustments. It also helps to set a cutoff point, like close of business on a specific date, so both systems start from the same baseline.
Clean data cuts down on duplicate items, wrong postings, and poor reorder choices.
Next, connect the inventory system and test a small batch before full rollout.
Connect an inventory system to QuickBooks Desktop and test the sync
Now it’s time to connect your inventory system and make sure the sync works. Start small. Get the first test working, then add more once you know the setup is solid.
Set up the connection and choose what should sync
Most inventory systems connect to QuickBooks Desktop through the QuickBooks Web Connector, a free Intuit tool. Install it on the host computer, open QuickBooks in single-user mode, and sign in as Admin. Then add the .qwc file from your inventory system, approve the connection when QuickBooks asks, and choose Yes, always; allow access when QuickBooks is closed if you want scheduled syncs to run on their own. Keep Web Connector open so sync jobs can finish without issues.
After the connection is live, the system usually pulls in your main records: items, customers, vendors, and inventory sites. Go through the mapping screens with care. Each QuickBooks item should match the right record in the inventory system by SKU or item name. From there, decide which transaction types should move between the two systems, and in which direction.
A smart place to begin is with purchasing only: POs and item receipts. Once that works, you can add sales transactions. Before you sync the full company file, test the mapping with a small set of records.
Run a small-batch test before full rollout
Before you touch your full item catalog, run a tight test. If you can, use a copy of your QuickBooks company file as a sandbox. If you have to test in the live file, keep the scope narrow: choose 3 to 10 inventory items, create one purchase order, receive it, and then process one sales order or invoice.
Check both systems after each step. Make sure on-hand quantities match, unit costs are right, and transaction dates line up in both places. Run the Inventory Valuation Summary in QuickBooks and compare it to the inventory system’s stock report. Also confirm that the purchase receipt posted to the inventory asset account and that the sale hit the right income and COGS accounts.
If something looks off, don’t push ahead and hope it fixes itself. Trace the issue back to the mapping or setup, fix it, and then test again before adding more items or turning on more transaction types.
Use Rapid Inventory for two-way QuickBooks Desktop sync
If you need two-way sync plus warehouse control, Rapid Inventory is built for that kind of setup. It was made for QuickBooks Desktop users and supports controlled synchronization for core items and transactions. It also adds multi-location and warehouse tracking, lot and serial number traceability, FIFO and FEFO picking, mobile barcode scanning, and backorder tracking.
Because the platform is web-based, your team can use it from any location while QuickBooks stays in place as the accounting system. It also includes free onboarding, training, and ongoing support.
Key sync points to set up early:
- Items, customers, and vendors - map by SKU or another unique identifier so you don’t end up with duplicates or bad account postings
- Purchase orders and item receipts - set the sync direction based on where POs are created, which helps prevent quantity mismatches
- Invoices and sales orders - these often flow from Rapid Inventory to QuickBooks so fulfillment and accounting stay in step
Build workflows that cut manual entry and inventory mistakes
The biggest payoff from integration shows up on the warehouse floor. When you connect QuickBooks Desktop to an inventory system, you replace slow manual work with workflows that run in the background. That hits hardest in receiving, picking, and shipping, because that’s where small mistakes usually begin and then snowball.
Track stock by warehouse, bin, lot, or serial number
A solid setup lets you create warehouse and bin locations in the inventory system, while QuickBooks stays focused on item valuation and financial postings. Each SKU can have a default warehouse and bin. In plain English: use the inventory system to control where stock sits, and use QuickBooks to track what it’s worth.
Lot and serial tracking happen at the item level. At receiving, staff scan or enter the lot number and connect it to a specific location and quantity. QuickBooks should get item-level totals only. The integration passes summary quantities and amounts back to QuickBooks by item, not by lot or bin, which keeps reports clean and easy for accounting to review.
Serial numbers matter most for warranty-backed goods like electronics, tools, and machinery. Capture the serial number at shipment, and each unit ties back to the customer record. That makes warranty claims and service calls much easier later on. For perishable or regulated products like food, supplements, and cosmetics, lot numbers and expiration dates are a must for recall readiness and compliance records.
Apply FIFO or FEFO picking and use mobile barcode scanning
FIFO (First In, First Out) ships the oldest stock first. FEFO (First Expired, First Out) ships the stock closest to its expiration date first, no matter when it arrived. Once you set either rule in the inventory system, every pick list follows it on its own. Pickers see the exact bin and lot to use on screen, so there’s less second-guessing.
Over time, FEFO can cut spoilage, markdowns, and year-end write-offs. And when those picking decisions sync back to QuickBooks, cost of goods sold and inventory valuation stay in line with what’s happening in the warehouse. That means cleaner margin data and fewer nasty surprises at year-end.
Mobile barcode scanning pulls the whole process together. During receiving, a staff member scans the item barcode, confirms quantity, and the system posts the receipt with the right warehouse, bin, and lot, without anyone typing a SKU into QuickBooks. Each scan updates stock and posts the transaction with no duplicate entry.
For picking, workers scan bin and item barcodes while following a digital pick list on a phone or handheld device. The system checks the scan, updates inventory in real time, and sends the completed shipment and invoice back to QuickBooks. You can start with a phone or handheld scanner and expand later if needed. Rapid Inventory supports this setup with mobile barcode scanning and web-based access, so warehouse staff can work on the floor while QuickBooks stays up to date in the back office.
Manual processes vs. integrated workflows: a side-by-side look
The gap between paper-based work and an integrated, scan-driven workflow comes down to three things: staff time spent on data entry, how often mistakes slip through, and how fast you can see what’s in stock.
| Workflow aspect | Manual (paper + QuickBooks) | Integrated + barcode-driven |
|---|---|---|
| Accuracy | Lower; manual typing and memory; discrepancies common during busy periods | Higher; system validates each scan and enforces picking rules automatically |
| Labor time | Higher; duplicate entry and more reconciliation | Lower; one scan updates both systems |
| Training effort | Moderate; staff must learn item codes, paper processes, and QuickBooks screens | Lower daily effort; staff follow guided prompts rather than memorizing codes |
| Error risk | Higher; mis-keyed SKUs, missed updates, and inconsistent FIFO/FEFO application are common | Lower; mismatches are caught at the point of scan before they reach QuickBooks |
Those gains only hold if counts and reports stay current.
Keep the integration accurate and reconcile inventory on a regular schedule
Roll out in phases, set standard workflows, and run cycle counts
Once your warehouse workflows are live, the next job is keeping the data clean. The safest way to do that is a phased rollout. Start with one warehouse or a small test group of 50–100 high-volume SKUs, then expand after the process holds up. Before go-live, save matching valuation and stock reports from both systems. That gives you a clean baseline to check later if the numbers start to drift.
After launch, stick to the same purchasing workflow every single time: create a PO → receive against the PO → post the bill. That order matters. If someone skips a step and enters a bill before the receipt, QuickBooks can record the cost before the quantity updates. When that happens, average cost gets thrown off, and reconciliation turns into a mess.
It also helps to stop relying on one big year-end count. Use rolling cycle counts during the year instead. A simple setup looks like this:
- Count high-value or fast-moving A items every month
- Count mid-tier B items every quarter
- Count slower C items once a year
Post count adjustments in the inventory system first, then sync them to QuickBooks. That way, entries hit the right inventory asset account and, when needed, the right inventory variance expense account. Rapid Inventory also includes built-in cycle counting workflows and audit trails, which makes it easier to trace variances by location, bin, or user before they hit the books.
Check reports and fix issues before they grow
After go-live, reconciliation is what keeps small mistakes from turning into accounting problems. Run a light reconciliation weekly to review quantities and open orders. Then run a full reconciliation monthly to check valuation and costing.
Start by confirming the latest sync finished without errors. Then compare QuickBooks' Inventory Valuation Summary with the inventory system's valuation report. If totals don't match, go item by item and find the gap.
When you spot a discrepancy, check recent sync logs, item mappings, and any receipts or adjustments that may have been entered in only one system. Fix the issue in the inventory system, then let that fix sync into QuickBooks. Avoid plugging holes with manual journal entries that skip inventory items. That shortcut breaks the connection between quantities and dollar values, and it usually shows up later during month-end close.
Conclusion: A straightforward path to a reliable QuickBooks inventory setup
A steady QuickBooks inventory setup comes down to four habits: clean item data before you connect, test before you expand, use barcode-driven workflows to cut manual entry, and reconcile on a set schedule so issues show up early. That leads to more accurate stock counts, cleaner books, and fewer surprises at month-end.
Use the fixes below when reports drift or syncs fail. This table covers common integration issues, what usually causes them, and how to fix them in both systems.
| Integration Issue | Likely Cause | Resolution in QuickBooks Desktop | Resolution in Inventory System |
|---|---|---|---|
| Duplicate receipts or invoices | Transactions entered manually in QuickBooks and also synced from the inventory app | Void extras; stop manual re-entry | Set workflows so source documents are only created in the inventory app; retrain users |
| Mismatched on-hand quantities | Adjustments or receipts recorded in only one system; missed syncs | Post synced adjustments only; avoid direct QuickBooks fixes | Post synced adjustments; rerun cycle counts |
| Incorrect inventory valuation | Wrong cost settings or account mappings; manual journal entries to inventory | Review item setup and correct Inventory Asset/COGS accounts | Confirm costing method, such as FIFO; review item cost and mapping settings |
| Items not syncing or missing | SKU or item name mismatch; item not active or not set as Inventory Part | Fix SKU/item-name mismatches and rerun sync | Align SKU codes with QuickBooks; mark items for sync; re-run sync for affected records |
| Wrong accounts hit on adjustments | Incorrect asset or expense account mapping; manual user changes | Correct mapping and restrict changes | Update account settings; restrict who can change mappings; use standardized adjustment reasons |
FAQs
How do I know which system should be the source of truth?
Use Rapid Inventory as the source of truth for inventory updates, and keep QuickBooks Desktop focused on accounting and financial reporting.
Rapid Inventory gives you the most accurate, real-time view of stock levels and warehouse activity. Sync item quantities from Rapid Inventory to QuickBooks Desktop, and restrict inventory edits in QuickBooks Desktop with role-based permissions to help prevent discrepancies.
What should I do if my inventory counts already look wrong?
Start by running an Inventory Valuation Summary report to compare the numbers in QuickBooks with what you actually have in stock.
Then review the Audit Trail report in QuickBooks to find where things went off track.
Focus on invoices, bills, and inventory adjustments. Check Last Modified By to spot manual entries that may have skipped Rapid Inventory.
Once you find the mismatch, fix it by:
- deleting the transaction in QuickBooks, or
- updating the record in Rapid Inventory
The goal is simple: make sure both systems show the same inventory data.
When should I add barcode scanning to my workflow?
Add barcode scanning when you want to cut manual entry mistakes and keep inventory records more accurate.
It helps most with frequent receiving, picking, counting, and stock transfers. It’s also a strong fit for businesses that need tight lot or serial tracking, FIFO/FEFO handling, or traceability compliance.



