To update QuickBooks Desktop from barcode scans, I first match item records, connect Rapid Inventory, and map approved warehouse actions to QuickBooks transactions. “Real-time” means confirmed changes sync automatically - not that every scan posts immediately.
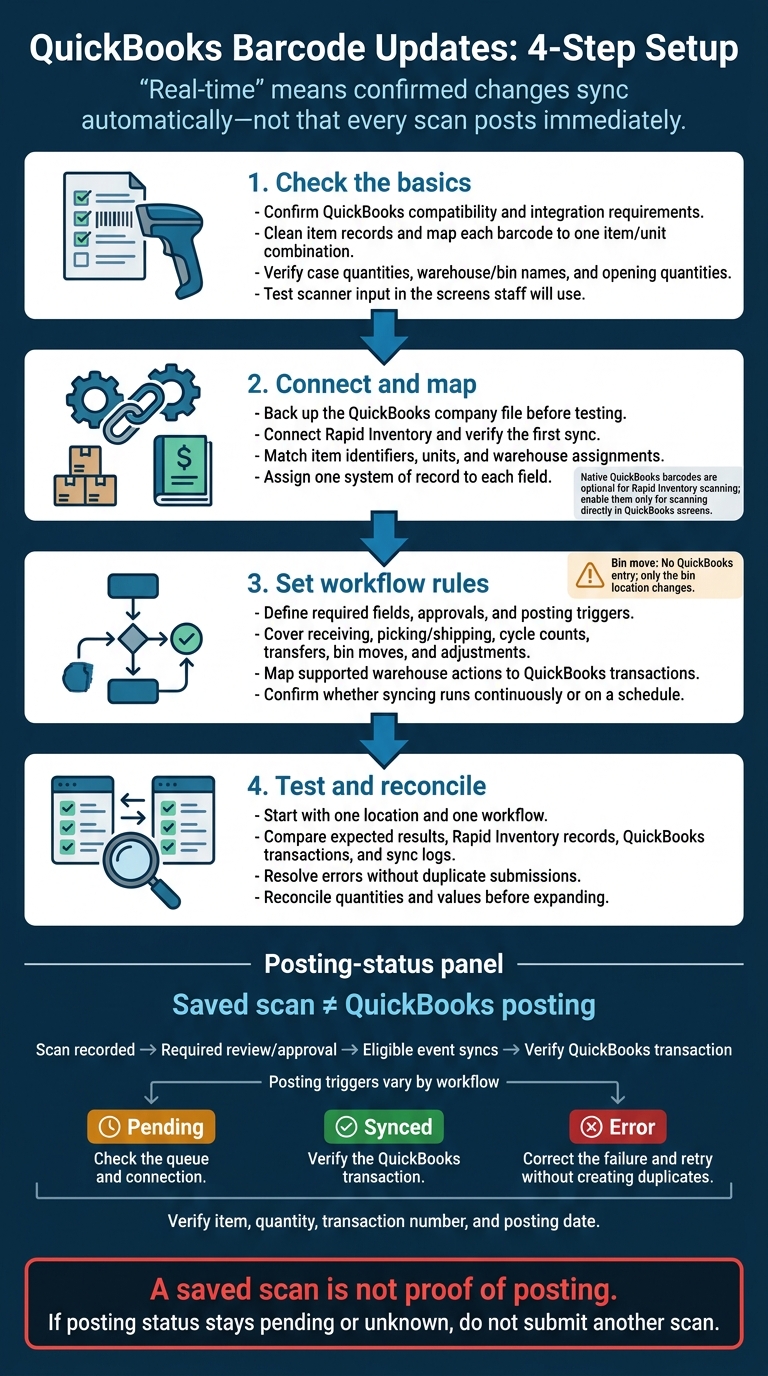
I check the setup in 4 steps:
- Check the basics: QuickBooks compatibility, barcodes, case quantities, locations, and scanner input.
- Connect and map: Back up the company file, test the first sync, and decide which system controls each field.
- Set workflow rules: Define required data, approvals, and posting triggers for receiving, shipping, counts, transfers, and adjustments.
- Test and reconcile: Start with one location and one workflow, resolve errors, and compare warehouse records with QuickBooks quantities and values.
My rule: <u>check posting status before scanning again</u>. A saved scan is not proof of a QuickBooks update - and retrying without checking can create duplicates.
QuickBooks Barcode Updates: 4-Step Setup
1. Check QuickBooks, Item Records, and Scanners
Check QuickBooks Edition and Feature Requirements
Confirm that Rapid Inventory supports your installed QuickBooks Desktop edition and version. Check the company file and subscription, and back up the file before changing settings.
Go to Edit → Preferences → Items & Inventory → Company Preferences and confirm that Inventory and Purchase Orders are Active. If Advanced Inventory settings aren't available, select Help → Manage My License → Sync License Data Online, then restart QuickBooks.
Native QuickBooks barcode scanning requires Advanced Inventory. It supports barcode scanning, multiple inventory sites, bin tracking, lot tracking, serial numbers, and warehouse workflows. Before enabling native scanning, ask your provider which QuickBooks features the integration needs.
Prepare Barcodes, Units, and Locations
Check the item list for duplicate SKUs, incorrect item types, and missing barcodes. Map each barcode to one item/unit combination, and define purchase and sales units. Keep leading zeros and remove stray spaces.
Check case-pack conversions carefully. A case scan should post the full case quantity, not a single unit. Before the first sync, decide which system controls item descriptions, units, costs, quantities, and locations.
Use consistent warehouse and bin names, and make sure physical bin labels match their records. Prepare lot numbers, required expiration dates, and a separate serial number for each serialized unit.
Before scanning, reconcile opening quantities with the warehouse count, accounting records, or approved adjustments. Once the item list is clean, test the scanner in the exact screens you'll use.
Set Up and Test Scanner Input
Test a keyboard-input scanner in a plain text field first, then in the intended inventory screen. Check characters, field focus, item lookup, and quantity entry separately.
For native QuickBooks scanning, use EAN-13 or Code 128 with a single carriage return. Serial-port scanners don't work with the native feature. For other screens, add Enter or Tab only when required.
Confirm supported devices, browsers, hardware, network needs, and offline behavior. Then test connectivity at receiving, storage, and shipping points. Once scanner input is clean, connect the integration and map the records.
sbb-itb-19ed50f
2. Connect Rapid Inventory to QuickBooks
Connect Rapid Inventory and Run the First Sync
Once scanner input is clean, connect the systems and run the first sync. Confirm the required connection components with Rapid Inventory support. Decide which system sends data during the initial sync and which record types sync both ways.
Back up the QuickBooks company file before testing. Run the first sync in a copy of the company file or a limited pilot. If supported, start with one warehouse and a small set of items.
Before allowing warehouse transactions, compare imported item counts, identifiers, quantities on hand, and location assignments against QuickBooks. Also verify that the sync finished.
Map Records and Assign Editing Responsibilities
Match each QuickBooks item to one Rapid Inventory item using a stable identifier, such as a SKU, part number, or existing barcode. Confirm unit mappings and warehouse assignments, and use the same warehouse and location names in both systems.
Keep bins, lots, and serial numbers in Rapid Inventory when QuickBooks has no matching native field. Sync only the transaction data the connection supports.
Document who edits what before turning on live synchronization. Accounting staff can handle item creation and financial transactions in QuickBooks. Warehouse staff can handle receiving, put-away, transfers, picking, shipping confirmation, and cycle counts in Rapid Inventory.
Limit duplicate editing of quantities and item identifiers. Assign someone to approve inventory adjustments and resolve sync exceptions. Before enabling assemblies, verify component consumption, finished-goods quantities, and posted transactions.
With records mapped, define which scan events create QuickBooks transactions.
Enable Native QuickBooks Barcodes Only if Needed
Rapid Inventory scanning does not require native QuickBooks barcodes. Enable them only if staff need to scan directly in QuickBooks screens.
After configuring native barcodes, if needed, set your scan rules and posting timing.
QuickBooks Enterprise Barcode Scanning Tutorial
3. Set Up Scanning Workflows and Sync Rules
Use the mapped records from the previous step to define what each scan must record before it posts.
Define Required Fields for Each Workflow
Set the scan order for each workflow: location, bin, item, lot or serial, quantity, unit of measure, review, and save. Collect the required data and approvals before syncing the mapped QuickBooks transaction. Two-way sync does not mean every scan creates an accounting entry.
Require these fields for each workflow:
- Receiving: Purchase order or receipt reference, vendor, item, quantity received, unit of measure, destination warehouse and bin, damage status, and applicable lot or serial number.
- Picking and shipping: Sales order or shipment reference, source warehouse and bin, item, quantity picked, applicable lot or serial number, and shipment status.
- Cycle counts: Warehouse and bin, item, counted quantity, unit of measure, applicable lot or serial number, counter, timestamp, and approval status.
- Transfers: Source and destination warehouses, item, quantity, applicable lot or serial number, and transfer reference.
- Bin moves: Source and destination bins, item, quantity, and movement reference.
- Adjustments: Item, warehouse and bin, actual quantity or variance, reason code, applicable lot or serial number, user, and approval.
Map Scan Events to QuickBooks Transactions
Match each scan event to the QuickBooks transaction your setup posts.
| Scan event | Posting trigger | QuickBooks result | Required verification |
|---|---|---|---|
| Receiving | Approve accepted units | Mapped QuickBooks receiving transaction | Item, quantity, vendor, warehouse, and transaction status |
| Picking/shipping | Confirm the configured pick or shipment step | Mapped QuickBooks sales transaction | Order reference, posted quantity, status, and on-hand balance |
| Cycle count | Approve the count variance | Approved variance posts as an inventory adjustment | Approval, adjustment quantity, date, reason, and inventory value |
| Bin move | Save the bin movement | No QuickBooks entry; only the bin location changes | Source and destination bins, quantity, and movement history |
| Warehouse transfer | Confirm the transfer | Mapped inventory transfer | Both warehouse balances and transfer completion |
| Adjustment | Approve the quantity correction | Inventory adjustment | One adjustment, correct reason, quantity, date, and resulting on-hand balance |
Check Sync Timing and Posting Status
Confirm what makes an event eligible to sync: saving, approval, or shipment confirmation. Then check whether the connector runs continuously or on a schedule.
Match the integration’s displayed labels to the status terms used earlier, and assign one action to each:
- Pending: Check the queue and connection.
- Synced: Verify the QuickBooks transaction.
- Error: Correct the failure and retry without creating duplicates.
After each test, open the matching QuickBooks transaction. Verify its item, quantity, transaction number, and posting date. Then check the warehouse, bin, lot or serial, approval history, and user in the inventory system.
A saved scan is not proof of posting. A posted QuickBooks transaction also doesn’t prove that every warehouse detail transferred.
Test these rules in one location before applying them elsewhere.
4. Test the Setup and Fix Errors
Once scan rules and sync timing are set, test the first live batch in one controlled location.
Test One Location and One Workflow
Back up the company file, then run a small pilot with one location and one workflow. Pause unrelated manual entries during the test.
Before scanning, use receipts, count sheets, or transfer slips to record expected quantities, units, bins, lot or serial identifiers, transaction dates, and operators. Compare those details with Rapid Inventory records, posted QuickBooks transactions, and sync logs. Match receipts, scan IDs, timestamps, operator names, and transaction numbers to spot duplicate receipts or adjustments.
Fix Common Scanning and Sync Errors
Change one variable at a time to trace the posting failure against the workflow rules defined earlier. After each fix, retest the affected item.
| Symptom | Likely cause | Corrective action |
|---|---|---|
| Wrong item appears | Incorrect or duplicate barcode mapping, or a nearby label was scanned | Rescan, check the barcode against the item master, remove duplicate mappings, and retest. |
| Duplicate transaction appears | Repeated submission, manual entry, or retry after posting | Check sync logs and QuickBooks history before retrying. Void or reverse duplicates under the approval policy. |
| Scanner produces no input | Lost power or connection, incorrect pairing, or wrong field focus | Check power, USB or Bluetooth pairing, field focus, and keyboard-wedge mode. Test in a blank text field. |
| Item is recognized but the transaction does not complete | Incorrect Enter, Tab, or line-feed suffix | Match the suffix to the workflow requirement, remove unsupported characters, and retest one item. |
| Inventory posts to the wrong warehouse | Incorrect device, user, or workflow location | Correct the default warehouse, require location confirmation, and review the posted transaction. |
| Lot or serial number is missing | Missing requirement, unreadable label, or unmapped field | Stop the transaction, verify tracking settings and mappings, and rescan or enter the identifier. Reject incomplete records; never assume a value. |
| Quantity differs from the physical count | Incorrect unit conversion, missed or repeated scan, or wrong opening balance | Verify units and case conversions, recount, compare scan totals with receipts or count sheets, and post only approved adjustments. |
| Sync is delayed or remains pending | Connection, credential, permission, service, or queue failure | Check the queue, connection, and credentials; verify permissions and integration status. Resolve the first failed event and retry in sequence without resubmitting the scan. |
If posting status stays pending or unknown, do not submit another scan. Contact the system administrator or integration support.
Reconcile Records Before Expanding
Once the pilot posts without errors, reconcile the results against QuickBooks and warehouse records.
Compare Rapid Inventory and QuickBooks Desktop on-hand quantities at the same cutoff time, using the same items, locations, and units. Check bins, lots, and serials in their system of record. Reconcile supported transactions and approved adjustments in QuickBooks, then use Inventory Stock Status by Item and Inventory Valuation Summary to check quantity and value.
Train staff on the tested scan sequence. Assign responsibility for daily sync checks and error review, and name an adjustment approver. Save the checklist, logs, and sign-off for rollout.
Conclusion: Keep Scans and QuickBooks Records Aligned
Before rollout, test one location and one workflow. Verify barcode mapping, units, lot/serial fields, and permissions before expanding.
Assign one system of record to each field. Inventory staff record physical activity in the inventory system. Managers approve variances, while accounting controls approved QuickBooks postings and inventory corrections.
A scan doesn’t mean QuickBooks has posted the change. After each batch, check scan, sync, approval, and posting status. Regularly reconcile physical counts against both QuickBooks and the inventory system to keep warehouse scans and records aligned.
FAQs
What happens to my scans if the connection drops?
If your connection drops, scans usually wait in a queue and sync automatically when you're back online. If your PC restarts during the outage, you may need to reopen your sync tools or reconnect to the service.
Before submitting new transactions, check the sync log or dashboard to avoid processing duplicates. If problems continue, check the integration logs for error codes or make sure QuickBooks is in Single-User Mode.
How should I handle partial receipts and shipments?
Enable split transactions in Rapid Inventory to sync with QuickBooks Desktop in increments.
For receipts, enter the quantity received against the open purchase order. Log any shortages or damaged goods before submitting to keep the purchase order balance accurate.
For partial shipments, enter the quantity shipped and choose a reason code, such as out of stock or damaged. The sales order then updates so customer service can track open lines.
Why do inventory values differ when quantities match?
Inventory values can differ even when quantities match. In QuickBooks Desktop, this can happen because of cost tracking errors or inconsistent unit of measure settings - for example, when one case isn’t defined as 24 individual units.
Other causes include negative quantity balances, incorrect journal entries, or mapping issues that don’t record costs correctly during receiving or inventory adjustments.
Check your cost basis and unit conversion settings to help align inventory values with on-hand quantities.