
If you manufacture products by combining raw materials and components, QuickBooks Desktop can simplify inventory management. The Build Assemblies feature automatically tracks the materials used and updates your inventory in real time. Here's how it works:
- Inventory Assemblies: These are finished goods made from raw materials, guided by a Bill of Materials (BOM), which lists all components and quantities needed.
- Automatic Updates: When you build an assembly, QuickBooks reduces the stock of components and increases the count of finished goods.
- Cost Tracking: QuickBooks calculates production costs, including labor and overhead, to keep financial records accurate.
- Shortage Alerts: The system notifies you when materials run low, helping you manage reorders efficiently.
- Subassemblies: QuickBooks can automatically build subassemblies during production, simplifying complex workflows.
To get started, enable inventory tracking, create assembly items, and configure accounts for costs, sales, and assets. For advanced needs like multi-location tracking or barcode scanning, consider integrating tools like Rapid Inventory.
What Are Inventory Assemblies in QuickBooks Desktop?

Definition of Inventory Assemblies
An inventory assembly is essentially a finished product made by combining various components - like raw materials, parts, non-inventory items, and labor. Each assembly is guided by a Bill of Materials (BOM), which serves as a detailed "recipe" outlining every item and its exact quantity needed to produce one unit of the final product.
QuickBooks Desktop simplifies this process by automatically adjusting inventory levels. When you build an assembly, it reduces the stock of components and increases the count of finished goods. This feature is available in the Premier, Enterprise, and Accountant editions of QuickBooks Desktop.
What sets inventory assemblies apart from other inventory types is how they’re tracked. As one expert explains, "Assembly is how you 'preassemble' from components to stock it as a different thing entirely". Unlike group items, which are merely bundles of products sold together, assemblies are treated as unique inventory items with their own stock levels and production costs. This distinction allows for precise tracking and cost management.
Benefits of Using Inventory Assemblies
Using inventory assemblies in QuickBooks Desktop offers more than just accurate tracking - it brings several operational advantages to the table.
When you create an assembly, QuickBooks calculates the total cost of the finished product based on the current costs of its components. This includes Cost of Goods Sold (COGS) and even allows you to include "Other Charge" items in the BOM for expenses like overhead or production fees.
Another helpful feature is the system’s ability to notify you of component shortages, making it clear which parts need reordering. You can also set a "Build Point (Min)" for each assembly, which acts as a trigger to remind you when it’s time to manufacture more based on your sales activity. If needed, QuickBooks even lets you reverse a build, returning the components back to your inventory.
These tools ensure that your production workflow stays aligned with your sales and purchase orders, helping you maintain accurate records and avoid disruptions. By streamlining these processes, inventory assemblies in QuickBooks Desktop make managing production and inventory far more efficient with inventory management software for QuickBooks Desktop.
sbb-itb-19ed50f
Build Assembly Process - Managing Inventory - BOM in QuickBooks - Kit Assembly ✔
Setting Up QuickBooks Desktop for Inventory Assembly Syncing
Here’s how to configure QuickBooks Desktop to track components, build products, and maintain accurate inventory counts.
Turn On Inventory Tracking
Start by enabling inventory tracking in your company file. Head to the Edit menu, select Preferences, and then click on Items & Inventory. Under the Company Preferences tab, check the box labeled Inventory and purchase orders are active. This step is crucial for managing assemblies.
If you’re using QuickBooks Desktop Enterprise, it’s a good idea to enable Don’t allow negative inventory quantities in this menu as well. This prevents your component quantities from dropping below zero during builds, ensuring cleaner and more accurate records.
Once this is done, you’re ready to set up your assembly items.
Create Inventory Assembly Items
With inventory tracking turned on, you can now create your assembly items. Navigate to Lists, select Item List, and choose New from the Item drop-down menu. From the available options, pick Inventory Assembly as the item type.
Before proceeding, make sure all the individual parts required for the assembly are already listed in your Item List. This includes inventory parts, non-inventory parts, and even "other charge" items like labor or overhead costs. Double-check your existing items to avoid duplicating entries.
When setting up the assembly, connect it to three key accounts: a Cost of Goods Sold (COGS) account to track production costs, an Income account for sales revenue, and an Asset account to record the value of finished goods. You can also assign a Build Point (Min) to get alerts when stock levels dip low enough to trigger a new production run.
Enable Multi-Location Tracking
If your business operates across multiple sites, you’ll need to configure additional settings. Multi-location tracking, part of Advanced Inventory, is available in QuickBooks Desktop Enterprise.
To activate it, switch your company file to Single-user Mode through the File menu. Then, go to Edit > Preferences > Items & Inventory > Company Preferences, and click Advanced Inventory Settings. Check the box for Multiple Inventory Sites is enabled.
Once activated, QuickBooks will add an Inventory Site Info button to each assembly item. This feature allows you to track Quantity on Hand and set build points for each specific location. Next, define your physical locations in the Inventory Site List under the Lists menu. This setup enables you to build assemblies using components from different sites while maintaining separate stock levels for each warehouse.
How to Sync Inventory Assemblies in QuickBooks Desktop
How QuickBooks Transactions Affect Assembly and Component Inventory Levels
Keeping your inventory and order records accurate during production is essential, and syncing inventory assemblies in QuickBooks Desktop helps you do just that. This feature is available only in the Premier, Enterprise, or Accountant editions of QuickBooks Desktop.
Create an Inventory Assembly
Start by navigating to Lists > Item List > New, and selecting Inventory Assembly. Assign a unique product name or build number to your assembly.
In the Bill of Materials section, list all the components required to build one unit, along with their quantities. Think of this as your production recipe. For instance, if you're assembling a desk, you might include four legs, a tabletop, and a hardware kit.
Next, assign the appropriate accounts for Sales, COGS (Cost of Goods Sold), and Assets. You can also set a Build Point (Min) to receive alerts when stock levels drop below a specified threshold, signaling it's time to produce more units.
Once you've entered all the details, proceed to build the assembly to update your inventory counts.
Build Inventory Assemblies
Creating an assembly item alone won’t adjust your inventory levels - you need to actually build the assembly. To do this, go to the Inventory menu (or Vendors > Inventory Activities) and select Build Assemblies.
From the Assembly Item dropdown, choose the product you want to build. Review the components, enter the quantity to build, and check the system's maximum build suggestion.
If you don’t have enough parts, you can click Mark Pending to save the build without completing it. Use the Show Shortage button to see which components need to be reordered. Once you’ve restocked the necessary parts, return to the pending build and select Remove Pending Status to finalize the process.
When finished, click Save and Close to update your inventory counts for both components and finished goods. If your assembly includes subassemblies, enable the Automatically build required subassemblies option to streamline the entire production process.
With the assemblies built, you’re ready to sync them with your sales and purchase orders.
Sync Assemblies with Sales and Purchase Orders
To ensure smooth inventory management, use Purchase Orders to restock components before building. Once vendor items are received, the component inventory updates automatically, allowing you to complete pending builds.
For sales, create Sales Orders to reserve assemblies before they’re built. These orders don’t reduce your stock levels but ensure inventory is set aside for specific customers. After building the products, convert the Sales Order into an Invoice. This step decreases your finished goods inventory and records the sale.
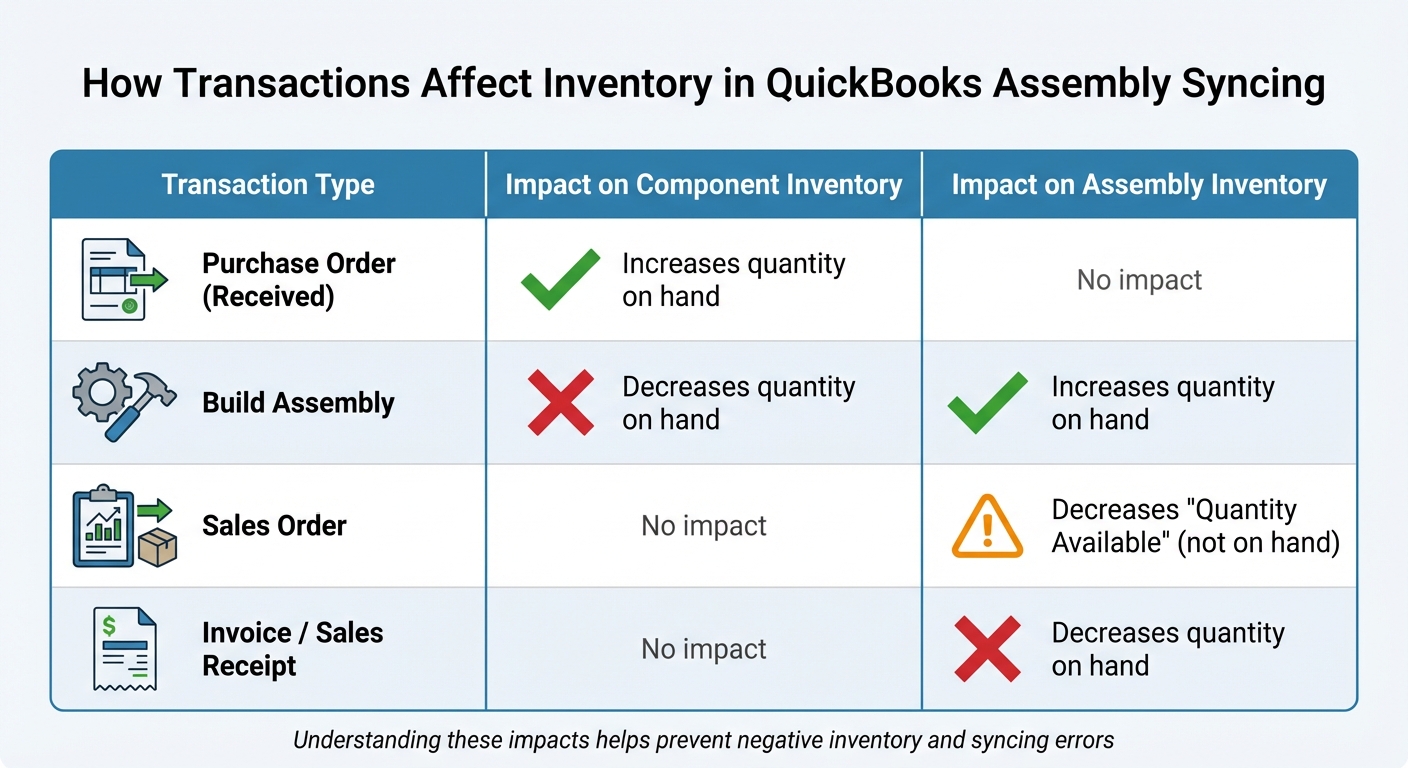
Here’s a quick breakdown of how different transactions affect your inventory:
| Transaction Type | Impact on Component Inventory | Impact on Assembly Inventory |
|---|---|---|
| Purchase Order (Received) | Increases quantity on hand | No impact |
| Build Assembly | Decreases quantity on hand | Increases quantity on hand |
| Sales Order | No impact | Decreases "Quantity Available" (not on hand) |
| Invoice / Sales Receipt | No impact | Decreases quantity on hand |
To double-check your assembly data, run the Sales by Item Summary report and filter it to include "All assembly items." For further analysis, you can export this report to Excel.
Following these steps ensures your inventory assemblies are synced properly, setting the stage for resolving any potential assembly-related issues later on.
Fixing Common Inventory Assembly Syncing Problems
Even with a well-organized setup, syncing inventory assemblies in QuickBooks can sometimes hit bumps. These issues often arise from timing errors, data inconsistencies, or conflicts with location tracking. Below are steps to tackle these problems and keep your assembly syncing on track.
Resolving Negative Component Quantities
Negative inventory happens when sales are recorded before the necessary build transactions. A common mistake is invoicing an assembly item without first completing a Build Assembly transaction. When this happens, QuickBooks reduces your finished goods count but doesn’t adjust the component inventory, leading to negative quantities once you eventually build the assembly.
To resolve this, backdate your purchases or builds. Check the Inventory Valuation Detail report to locate the first bill for the affected component and adjust its date to precede the earliest invoice. If invoicing before building is unavoidable, use Sales Orders instead of invoices, or mark the invoice as Pending (Edit > Mark Invoice as Pending) until the build is complete.
Another issue arises when new inventory items are created without entering an initial cost or quantity on hand. QuickBooks assigns a $0.00 cost, which can skew your Cost of Goods Sold reporting if the item goes negative. To prevent this, use the Adjust Qty/Value on Hand tool to set starting quantities and costs for new components before they’re used in assemblies.
Fixing Assembly Quantities That Won't Update
Non-updating assembly quantities often require addressing pending build statuses and ensuring data integrity.
If builds are stuck in pending status, restock the missing components and remove the pending flag to update quantities. Use the Show Shortage button to pinpoint which components are missing and holding up the build.
In some cases, data corruption may block updates. Run Verify Data (File > Utilities > Verify Data) followed by Rebuild Data to fix these issues. For stubborn problems, open the QuickBooks Tool Hub and select Quick Fix my Program to address syncing or performance glitches. Also, ensure your QuickBooks Desktop is updated to the latest version, as older releases may have bugs affecting inventory calculations.
For nested assemblies, enable the Automatically Build Required Subassemblies option to ensure QuickBooks automatically builds the necessary sub-components.
Correcting Multi-Location Sync Errors
Multi-location tracking adds another layer of complexity, requiring you to specify both the Assembly Inventory Site and Assembly Location for every build. Errors often occur when components are available but assigned to the wrong site in QuickBooks, leading to "Not enough components on hand" messages despite having the parts.
To fix this, run the Quantity on Hand by Site or Inventory Stock Status by Site reports to spot discrepancies. Then, use the Transfer Inventory tool (Inventory > Transfer Inventory) to move components to the correct locations before building. The Show Shortage button can help identify which specific site is short on parts. For better tracking, click the Inventory Site Info button on individual assembly items to set specific build points and monitor quantities at each location independently.
Improving Assembly Syncing with Rapid Inventory
QuickBooks Desktop can handle the basics of inventory assemblies, but when it comes to managing complex builds across multiple locations, its limitations become clear. That’s where Rapid Inventory steps in, offering tools tailored specifically for assembly workflows. Let’s explore how it simplifies and improves the syncing process.
Two-Way Sync for Real-Time Updates
Rapid Inventory’s two-way sync eliminates syncing delays by keeping QuickBooks Desktop (Enterprise, Pro, and Premier) and Rapid Inventory in constant communication. Whenever an assembly is built in Rapid Inventory, the finished goods counts are automatically updated in QuickBooks - no manual input required. Thanks to the web connector, any changes in either platform are reflected in QuickBooks within seconds. This real-time syncing ensures accurate inventory counts, even during high-demand production periods, reducing the risk of timing errors.
Advanced Features for Assembly Management
Rapid Inventory doesn’t just stop at syncing. It offers advanced tools like lot, serial, and batch tracking, which allow you to trace specific component lots used in each assembly. This is especially important for quality control and managing recalls. The platform also supports FIFO (First In First Out) and FEFO (First Expiration First Out) picking strategies, helping your team use the oldest inventory first.
Using mobile barcode scanning, workers can confirm items, quantities, and locations during assembly builds, improving accuracy and efficiency. Plus, the system tracks inventory across unlimited warehouses and even within specific locations inside those warehouses. This data syncs seamlessly with QuickBooks Desktop inventory sites, keeping everything aligned.
Free Training and Support
To ensure a smooth transition, Rapid Inventory provides free onboarding and data migration. Their structured seven-day implementation plan includes setup and team training, making it easy to get started.
"My team was up and running in a few days. Very straightforward and easy to use." - Jacob, CEO
With over 17 years of experience and a 5-star rating from more than 400 customers, Rapid Inventory is known for its excellent technical support. All plans include ongoing training sessions, so your team can stay confident in using the two-way web connector and assembly management tools as your business evolves.
Summary
Start by setting up inventory tracking, defining component items, and creating detailed Bills of Materials (BOMs). Once everything is configured, QuickBooks Enterprise's Build Assemblies feature takes over, automatically reducing component quantities and increasing finished assembly counts, eliminating the need for manual tracking.
To avoid common issues, enable the "Don't allow negative inventory quantities" preference in QuickBooks Enterprise. This helps maintain data accuracy. If you encounter a build error, the "unbuild" feature allows you to restore the components to their original state.
For more advanced functionality, consider using Rapid Inventory. This tool offers features like two-way syncing, lot tracking, FIFO/FEFO strategies, and mobile barcode scanning, which extend the capabilities of QuickBooks Desktop.
With the right setup, you can ensure accurate assembly builds, set build point alerts, and quickly address errors. This not only keeps your financial reports accurate - reflecting true production costs and inventory values - but also provides clear insights into manufacturing expenses and the value of finished goods. Properly mapping Asset, COGS, and Income accounts is key to achieving this clarity. Regularly monitoring pending builds and component shortages will help you stay on top of vendor reorders and keep production schedules running smoothly.
FAQs
How can I set up and track inventory assemblies in QuickBooks Desktop?
To set up inventory assemblies in QuickBooks Desktop, start by creating an inventory assembly item to represent your finished product. Here's how to do it:
- Open the Item List from the Lists menu, then click New from the Item dropdown.
- Select Inventory Assembly and enter the product name or build number.
- If you purchase this assembly from a vendor, check the box to indicate that. Leave it unchecked if you build the assembly yourself.
- Enter the Cost, which should include the total cost of all components and any related expenses.
- Fill in the appropriate accounts and other details to complete the setup.
After that, create a bill of materials (BOM) by listing all the components required to build the assembly. Each component should be defined as either an inventory part or a non-inventory part, depending on whether you track its quantity. Once everything is configured, QuickBooks will handle inventory tracking for you as you build assemblies.
How do I fix negative component quantities in QuickBooks Desktop?
Negative component quantities in QuickBooks Desktop often occur when sales are recorded before related purchases or due to mistakes in data entry. To address this, carefully review the transactions responsible for the negative quantities, such as sales entries or inventory adjustments, and correct or remove any errors.
There are a few ways to fix these issues. You can unbuild assemblies, make inventory adjustments, or manually update stock levels. If the problem stems from timing, ensure that your records are updated in the proper sequence. Accurate inventory tracking is crucial for reliable reporting and management, so take the time to review and adjust your records as needed.
Can I track inventory across multiple locations in QuickBooks Desktop?
Yes, QuickBooks Desktop can handle inventory tracking across multiple locations, but only if you're using QuickBooks Desktop Enterprise with the Advanced Inventory feature enabled. This feature allows you to manage stock levels for different sites or warehouses, ensuring accurate and organized inventory management.
With Advanced Inventory, you can simplify tasks like transferring stock between locations, setting reorder points for individual sites, and gaining better oversight of your inventory. It's a helpful solution for businesses managing inventory across various locations.


