
Barcode label placement in warehouses is more than just sticking labels on shelves - it’s about ensuring speed, accuracy, and efficiency in your operations. Poor placement can lead to scanning errors, wasted time, and costly inventory mistakes. Here’s what you need to know to get it right:
- Proper Placement Saves Time and Money: Correctly placed barcode labels can reduce operational errors by 39% and improve scanning times to under 2 seconds.
- Standardization is Key: Use a logical labeling system (e.g., Aisle > Section > Shelf > Bin) to streamline navigation and inventory tracking.
- Choose the Right Materials: Match label materials to your warehouse environment (e.g., freezer-grade adhesive for cold storage, laminated labels for high-traffic areas).
- Test Before Full Deployment: Validate barcode placement under actual warehouse conditions to avoid disruptions.
This guide covers everything from assessing your layout to integrating barcodes with your Warehouse Management System (WMS). You can try Rapid Inventory for free to see how it integrates with your existing setup. Whether you manage a small facility or a 200,000-square-foot warehouse, these tips ensure every scan counts.
How To Label Your Warehouse Bin Locations
sbb-itb-19ed50f
Planning Your Barcode Labeling System

Barcode Types Comparison for Warehouse Management
Before diving into barcode labeling, take the time to map out your warehouse setup. Skipping this step can lead to duplicate codes, confusing layouts, and scanning issues down the line. A solid labeling system starts with understanding your space, creating a logical hierarchy, and choosing barcode formats that fit your needs.
Assessing Your Warehouse Layout
Begin by walking through your warehouse and taking note of its layout. Identify key elements like racks, shelves, aisles, doors, and fixed structures. Pay attention to how goods flow - from receiving and storage to picking, packing, and shipping. Also, track the paths used by forklifts and pallet jacks to ensure labels are scannable without blocking traffic.
Environmental factors are just as important. For example, areas like freezers, cold storage, or outdoor docks may need labels that can handle extreme temperatures or moisture. Rack heights and aisle widths also play a role - labels placed too high or low can make scanning difficult. Even the type of surface matters; painted metal, plastic, or cardboard each require specific adhesives, and surfaces should be cleaned before applying labels.
In larger warehouses, which can span 50,000 to 200,000 square feet, having a consistent labeling system is crucial to avoid navigation headaches.
Once you’ve assessed your space and its specific needs, it’s time to build a unified labeling structure.
Creating a Standard Labeling Scheme
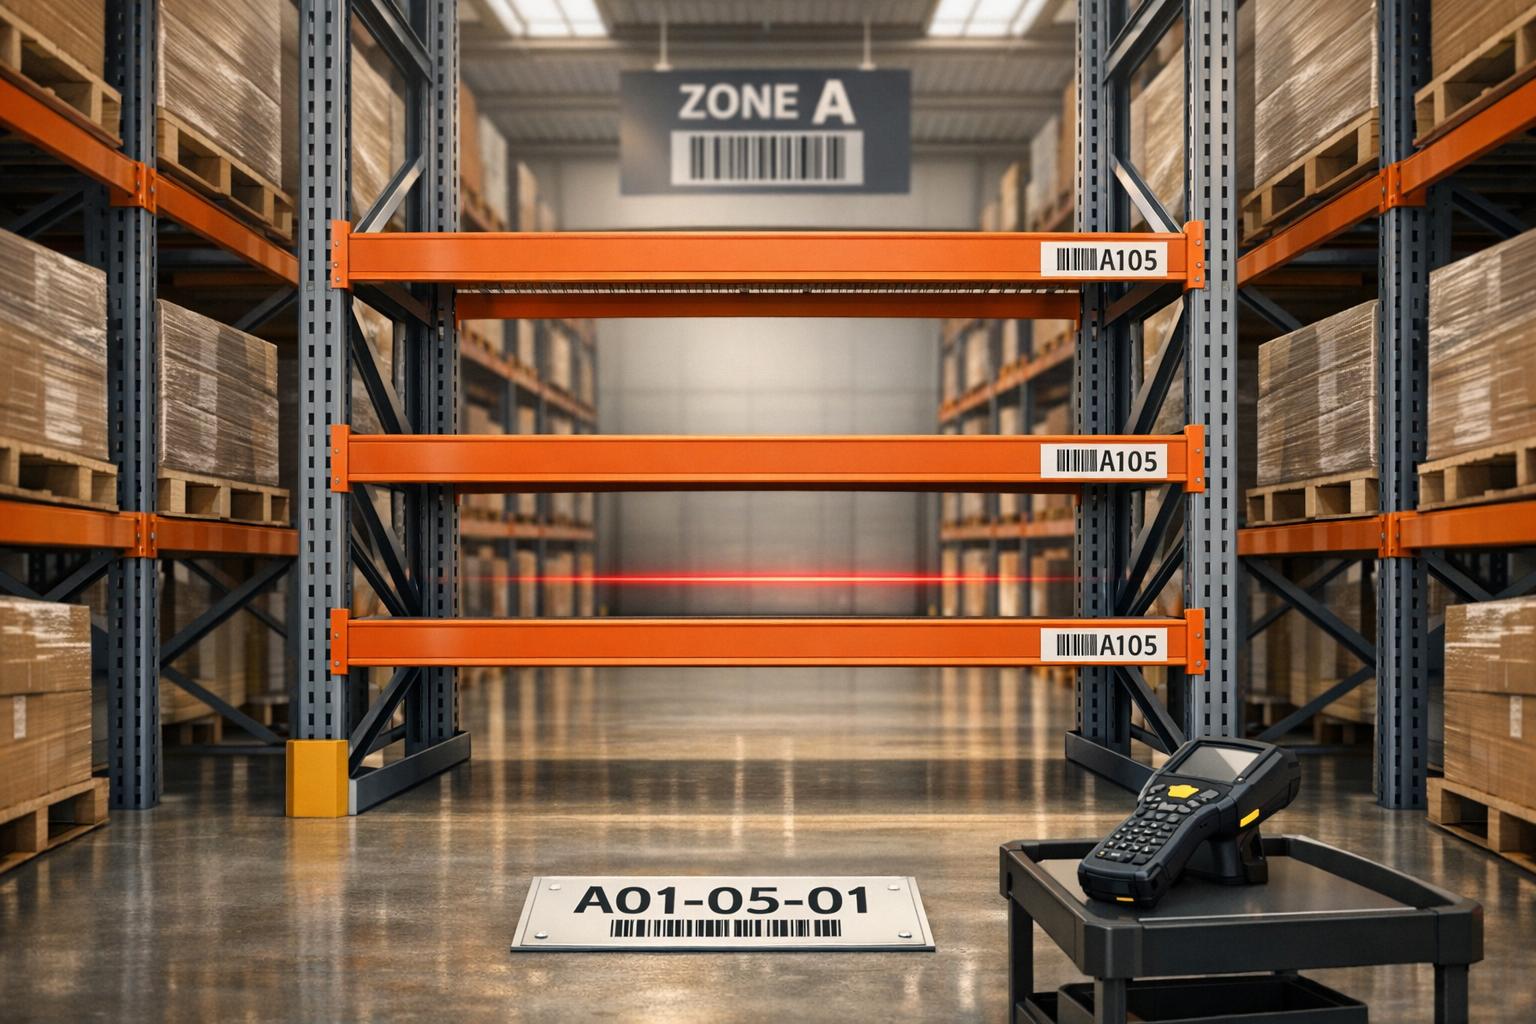
A clear, logical labeling scheme is essential. Use a hierarchical structure like Aisle > Bay/Section > Level/Shelf > Position/Bin to create unique addresses for every storage location. For instance, a label like A01-02-C-03 makes it easy for workers to locate items quickly. Combining letters and numbers improves readability and reduces errors during data entry.
To ensure proper sorting in your Warehouse Management System, use leading zeros (e.g., 01, 02 instead of 1, 2). Number vertical levels starting from the floor for consistency, even if you add more levels later. Research shows that warehouses with detailed labeling systems can achieve inventory accuracy rates of up to 99%, compared to just 70–80% with manual tracking. Proper labeling can also reduce picking errors by as much as 50%.
Choose a layout style that works best for your warehouse. A "Serpentine" layout, where numbers flow up one side of the aisle and down the other, can cut down on travel time. Alternatively, a "Standard" layout, where numbers increase in the same direction on both sides, might be easier for new employees to understand. Leave gaps in your numbering sequence to allow for future expansion without having to renumber everything. For rack labels, a size of at least 4×6 inches ensures reliable scanning from distances of 3–5 feet.
With your labeling structure in place, the next step is to choose the right barcode formats.
Selecting Barcode Types and Formats
Your barcode format should align with your tracking requirements. For basic tracking and SKUs, 1D barcodes like UPC, Code 39, or Code 128 are affordable and work with most standard scanners. These barcodes typically hold 20–25 characters. If you need to store more data, 2D barcodes like Data Matrix or QR codes are better options. For example, QR codes can store up to 2,509 numeric characters, making them ideal for serialized items or high-volume SKUs.
| Barcode Type | Best For | Data Capacity | Scanning Method |
|---|---|---|---|
| 1D (Linear) | SKUs, retail packaging, basic tracking | Low (20–25 characters) | Line-of-sight laser/imager |
| 2D (Data Matrix) | Serialized items, small components | Medium/High | 2D imager |
| QR Code | Tools, bins, mobile-based tracking | High (up to 2,509 characters) | Smartphone or 2D imager (any angle) |
The label material should also match the environment. For high-bay storage, retro-reflective labels enable long-range scanning. In cold storage, synthetic facestocks with freezer-grade adhesives can handle temperatures between –20°F and 32°F. For heavy-traffic areas like staging lanes, laminated floor labels or metal plates can withstand forklift wear and tear. Before rolling out your labeling system, test it in a high-traffic zone to ensure the labels are durable and scan accurately.
Barcode Label Placement Standards and Best Practices
Once your barcode system is set up, the next step is ensuring labels are placed correctly. Proper placement isn’t just about aesthetics - it’s crucial for smooth scanning, avoiding damage, and minimizing worker frustration. Here’s how to get it right.
Positioning for Visibility and Accessibility
Stick to flat, smooth surfaces. Barcodes placed on seams, curves, corners, or textured areas can warp, peel, or become unreadable. For cylindrical objects like drums, position the barcode vertically to minimize distortion caused by the curve.
Maintain a quiet zone - a clear space around the barcode - of at least 4mm on all sides. For 1D barcodes, this zone should be at least 10 times the width of the narrowest bar. Also, keep labels at least 0.25 inches away from edges to avoid peeling or interference during scanning.
Place labels at ergonomic heights, such as eye level or the lower edge of rack beams, to make scanning easier. On multi-level shelving, align all labels at the same height, and use arrows to indicate which level the barcode applies to - arrows pointing up for higher levels. For pallets, dual labeling (placing labels on both a short and long side) ensures they’re accessible from any aisle.
Proper placement can improve scanning efficiency dramatically, cutting scan times by up to 75%. To maintain consistency, use tools like jigs or visual guides to ensure labels are applied at the same height and position across the warehouse. Always scan labels immediately after application to check for any visibility issues.
Ensuring Label Durability
Prepare the surface before applying labels. Clean it with isopropyl alcohol to remove dust, grease, or oil that might weaken adhesion. Most adhesives need 24 to 72 hours to fully bond, so allow for this "dwell time".
Choose label materials based on the environment they’ll be used in:
- Cold storage (–20°F to 32°F): Freezer-grade polypropylene or polyester with cold-temperature adhesive.
- Outdoor areas or near windows: UV-resistant polyester or vinyl to prevent fading.
- High-traffic floors: Laminated decals or metal plates to withstand forklifts and pallets.
- Chemical exposure: Polyester labels with resin ribbon to resist oils, solvents, and cleaning agents.
- Standard warehouse racking: Semi-gloss paper or polypropylene for a balance between cost and durability.
| Environment | Recommended Material | Key Considerations |
|---|---|---|
| Cold Storage | Freezer-grade Polypropylene/PE | Moisture and frost resistance; cold-temperature adhesive |
| High-Traffic Floors | Laminated Decals or Metal Plates | Durable against forklifts and pallet abrasion |
| Outdoor Yards | Polyester or Vinyl | UV resistance to prevent fading; weather durability |
| Chemical Exposure | Polyester with Resin Ribbon | Resistant to oils, solvents, and cleaning agents |
| Standard Racking | Semi-gloss Paper or Polypropylene | Cost-effective with moderate abrasion resistance |
Regular audits - ideally every quarter - can help identify any wear or damage before it becomes a problem.
Maintaining Consistency Across Zones
Consistency is key. A standardized approach to label placement ensures smooth operations and accurate scans across all zones. Labels should always be positioned at the same height and orientation throughout the warehouse. Adding color-coded zones to labels can also help reduce picking errors by up to 30%.
"The primary point we like to stress is that consistency of barcode placement is critical to successful scanning – with manual scanning, variation of barcode/symbol placement makes it difficult for the scanning operator to predict where the bar is located." – Insight Works
For high-bay storage, retro-reflective labels mounted on angled placards can make scanning from the floor much easier. Before rolling out your labeling system, test it with the actual equipment your team will use to ensure it meets scan distance and lighting requirements. These steps lay the groundwork for a reliable and efficient labeling system across your entire operation.
Label Placement in Different Warehouse Zones
Each warehouse zone has its own challenges, and label placement plays a crucial role in overcoming them. Tailoring label strategies to specific zones ensures smoother operations and better accuracy.
Rack and Shelf Labeling
For racks and shelves, a consistent hierarchical labeling system is key. Start numbering shelf levels from the floor upward (e.g., 01, 02, 03) to maintain uniformity and allow for vertical expansion in the future.
Labels should be placed consistently, either on the right side or the lower edge of racks, to minimize the time it takes for pickers to locate them. Ideally, they should be positioned at eye level or slightly below for easy scanning. In high-bay storage areas, retro-reflective labels mounted on angled placards can be scanned from the floor, even at distances of up to 45 feet.
For readability, use bold, sans-serif fonts with a minimum size of 18 points and high-contrast colors like black on white. Every rack label should be placed so it can be scanned within two seconds. Adding human-readable check digits beneath barcodes helps workers confirm they are in the correct location before scanning.
Aisle-End and Entryway Labeling
Aisle-end labels act as critical navigation tools in warehouses. These should have large, high-contrast characters that are easy to see from a distance. Mount them on angled placards facing the aisle to improve visibility for operators approaching from different directions.
"A label is the operator's guide, the system's handshake, and the warehouse's signpost all at once." – Elan Europe
In more complex layouts, include arrows or visual markers on aisle-end signs to clearly indicate flow direction. For entryways and staging lanes, place floor labels just outside the main traffic paths. This ensures clear scanning lines while minimizing wear and tear. Always include human-readable text below the barcode so that, in case of barcode damage, data can still be entered manually.
While these labels guide overall navigation, areas with heavy activity require even more durable solutions.
High-Traffic and Specialty Zones
High-traffic zones demand labels with added protection. Laminates, rigid plates, or metal frames can shield labels from scratches and damage caused by forklifts and other equipment. Thermal transfer printing, which uses a ribbon, provides better resistance to fading and smudging, making it ideal for these demanding areas.
Floor labels in these zones should be placed just outside the main traffic flow to avoid direct tire contact while ensuring easy scanning. Regular audits - ideally every quarter - are essential to replace worn or damaged labels before they lead to scanning issues.
Color-coded labels can also improve efficiency. Bright colors like yellow, orange, or green make it easier for workers to visually confirm locations, reducing picking errors by as much as 30%. Facilities with well-organized labeling systems often achieve inventory accuracy rates of 99% or higher, a stark improvement over the 70–80% accuracy seen with manual methods.
Testing and Validating Barcode Label Placement
Thorough testing is essential before rolling out your barcode labeling system across the warehouse. This step helps you avoid costly disruptions and ensures your labels perform as expected under realistic conditions. By validating your placement standards through systematic testing, you can confirm that every label functions reliably in the environment it’s designed for.
Pre-Deployment Scanning Tests
To ensure your labels work seamlessly, test them using the actual production hardware your team will rely on daily. Avoid using office-grade scanners or smartphone apps for these tests, as they might not reveal the same issues that production equipment could encounter. Simulate real-world conditions by scanning labels from various angles, distances, and under different lighting.
It’s also important to verify label performance in their final positions - whether on racks, bins, or pallets. Even if a label appears fine during tabletop tests, obstructions like beams, plastic covers, or tight corners can interfere with scanner visibility. A simple way to confirm that your hardware correctly decodes data is to scan the barcode into a text editor like Notepad. This ensures the full data string is captured before integrating it with your warehouse management system.
If scanning issues arise, use the "known-good" method to troubleshoot. Test a reliable label with the problematic scanner, then test the problematic label with a reliable scanner. This approach helps pinpoint whether the issue lies with the label, hardware, or software. Identifying and resolving these problems during testing can prevent operational delays. For instance, VF Corporation improved its inventory accuracy to 100% and reduced labor time by over 50% after upgrading its barcode scanning system.
"A non-scanning barcode is rarely a simple issue. It requires a methodical, objective, and comprehensive troubleshooting approach across the entire data capture ecosystem." – Advanced Automation Inc.
Once scanning tests confirm that everything works, move on to rigorous quality assurance to ensure long-term reliability.
Quality Assurance for Labels
Scanning a barcode once isn’t enough to guarantee its quality. Use ISO/IEC standards (15416 for 1D barcodes and 15415 for 2D barcodes) to verify parameters like symbol contrast, modulation, and decodability. These metrics ensure your barcodes are universally readable. Many major retailers require a minimum grade of B (2.5 out of 4.0), while GS1 compliance typically requires at least a grade C (1.5).
Another critical factor is the quiet zone - the blank space surrounding the barcode. This margin should be at least 0.125 inches (3 mm) on each side. Without it, scanners might struggle to detect the barcode’s boundaries.
To maintain quality, fine-tune your printer settings. Adjust the thermal printer’s darkness and speed to produce sharp bar edges. Too much heat can cause bleeding, while too little can make the barcode too faint to scan. Regularly verify print quality every 500–1,000 labels or after any material change to catch issues early.
Coordinating with Equipment and Software
Compatibility with your hardware is just the beginning. Your labels must also integrate with your warehouse management system to ensure accurate data capture and real-time tracking. Set clear synchronization parameters (real-time or batch), define data validation rules to avoid duplicates, and create workflows to handle unreadable codes.
For warehouses using Rapid Inventory, test whether scanned data syncs properly with QuickBooks Desktop and whether location hierarchies match your physical layout. Validate mobile barcode scanning workflows to ensure processes like receiving and cycle counting update inventory records correctly in real time. This alignment establishes a reliable system for inventory accuracy, which depends heavily on precise label placement.
Using physical jigs or visual guides during label installation helps maintain consistency in height and angle across aisles, improving first-read rates.
"Catching visibility or scanning issues during deployment is far easier than discovering them when you are in the middle of a busy wave." – Electronic Imaging Materials
Integrating Barcode Labels with Warehouse Management Systems
Barcode labels work best when they’re fully connected to your warehouse management system (WMS). This integration creates a seamless link between physical inventory and digital records, ensuring real-time updates. For example, when a worker scans a barcode using a mobile device, the system instantly updates inventory levels, triggers automated tasks like replenishment alerts, and provides visibility across all locations. With proper implementation, these systems can deliver inventory tracking accuracy as high as 97%.
"A warehouse barcode system is the key to transforming chaos into a smooth, efficient operation." – RFgen
Implementation requires careful timing and planning. The process usually takes 6 to 12 weeks, covering everything from setup to training. A key tip: choose your inventory software first before buying hardware. This ensures scanners and printers are compatible with your system, avoiding expensive mismatches.
Assigning Location-Based Label Hierarchies
A well-structured location hierarchy is essential for an efficient WMS. By mapping every product’s exact location, the system enables faster picking and optimized routes. The hierarchy typically follows this structure: Aisle → Rack/Section → Shelf/Level → Bin/Position.
For example, serpentine labeling - a zigzag picking path through aisles - can save time by minimizing backtracking. This method is especially effective for high-volume and wave picking operations.
| Hierarchy Level | Description | Example Code |
|---|---|---|
| Aisle | The walking space between racks | 01 |
| Rack/Section | A specific vertical unit in the row | AA |
| Shelf/Level | Horizontal space (counted from ground up) | 02 |
| Bin/Position | The most specific slot for a product | 05 |
| Full String | Combined location code | 01-AA-02-05 |
"Number shelves from the ground up. This way, if you add height to your shelves as you grow, you don't have to relabel your shelves." – Matt Kenyon
To ensure smooth scanning, place labels at consistent heights and angles, making them easy to locate and scan within two seconds. Use simple tools or guides to position labels uniformly, saving time and reducing strain for workers.
Using Mobile Barcode Scanning
Mobile barcode scanning takes warehouse operations to the next level by creating a connected environment where workers can instantly access and update inventory data. The flexibility of using rugged handhelds, tablets, or smartphones allows teams to choose devices that suit their tasks.
Real-time synchronization ensures inventory records are updated immediately, eliminating delays caused by end-of-shift batch uploads. This constant connection helps prevent errors from outdated information and keeps everyone on the same page.
For businesses using Rapid Inventory, mobile scanning integrates seamlessly with QuickBooks Desktop. Data from receiving, picking, and cycle counting flows directly into the accounting system, cutting down on manual entry. The platform also supports advanced workflows like FIFO/FEFO picking, lot tracking, and partial shipping - all accessible through mobile devices.
Another time-saving tool is License Plate Numbering (LPN). By assigning an SSCC or license plate number at the receiving dock, you can track entire pallets with a single scan. This simplifies receiving and put-away processes dramatically.
Before rolling out mobile scanning across your warehouse, start with a pilot program in a high-traffic area. This helps identify any bottlenecks or technical issues, such as network stability or hardware performance, before scaling up.
Real-Time Tracking and Reporting
Real-time tracking replaces periodic inventory counts with continuous updates, giving you an always-current view of stock levels, locations, and movements. Each scan instantly updates the system, eliminating the lag that often leads to discrepancies.
The advantages go beyond accuracy. Real-time data powers automated workflows that respond instantly to warehouse activity. For example, your system can send low-stock alerts, trigger replenishment tasks, or generate live dashboards showing key metrics. These features reduce the manual effort managers traditionally spend monitoring inventory.
With Rapid Inventory, real-time reports let you track inventory across multiple locations, verify accuracy through cycle counting, and sync seamlessly with QuickBooks Desktop. This alignment ensures your financial records stay up-to-date without extra effort.
To maintain the integrity of real-time systems, build in regular maintenance. Clean scanners weekly, inspect labels bi-weekly, and schedule monthly reconciliations to catch discrepancies early. These steps prevent issues like fading labels or scanner failures that could disrupt your data flow.
"Labels act as the bridge between physical movement and system updates." – Electronic Imaging Materials
Finally, robust network coverage is critical. Place wireless access points strategically to eliminate dead zones, ensuring workers can scan and sync from anywhere in the warehouse. Testing your network during the pilot phase will help ensure reliable connectivity throughout your facility.
Conclusion and Key Takeaways
Getting barcode placement right is the backbone of a smooth and accurate warehouse operation. When labels are positioned consistently and thoughtfully, workers can scan them faster, cutting down search time and reducing errors like mispicks or incorrect shipments. A standardized approach also simplifies employee training and makes scaling up operations much easier.
But the benefits don’t stop at faster scans. Properly placed barcodes can push accuracy levels above 99% and slash data entry mistakes by up to 99%. This leads to fewer stockouts, better throughput, and lower labor costs. On top of that, strategic placement can improve ergonomics by keeping labels at consistent, worker-friendly heights, reducing physical strain.
Here’s what the experts have to say:
"Proper labeling of warehouse racks can enhance supply chain efficiency, product visibility, and productivity." – Speedrack West
To ensure long-term success, follow a few key practices: label shelves from the ground up so you can expand vertically without renumbering, clean surfaces thoroughly before applying labels to ensure they stick properly, and test your setup in a high-traffic area before rolling it out across the warehouse. These steps can save you from costly rework and keep your system adaptable as your operation grows.
The physical setup also ties seamlessly into digital workflows. For example, businesses using QuickBooks Desktop can streamline operations with Rapid Inventory. This tool connects mobile barcode scanning directly to your accounting system, syncing data in real time and eliminating manual entry. Features like multi-location tracking, FIFO/FEFO picking, and cycle counting ensure your physical labels stay aligned with digital records. Plus, Rapid Inventory includes free training and support to help you get started.
FAQs
What’s the best label height for fast scanning?
For efficient and dependable barcode scanning, a label height of approximately 1.02 inches (25.91 mm) is ideal for standard UPC-A codes. This dimension helps ensure swift and precise scans, reducing the chances of errors.
When should I use 1D vs 2D barcodes in a warehouse?
When it comes to barcodes, 1D barcodes are perfect for straightforward tasks like tracking inventory, printing shipping labels, or identifying locations. They're easy to use, budget-friendly, and compatible with nearly all standard scanners.
On the other hand, 2D barcodes - like QR codes - are better suited for storing more detailed information. Whether it’s batch tracking or providing in-depth product details, 2D barcodes can handle it. While they require specialized scanners, they’re ideal for boosting accuracy and streamlining processes in more complex or high-volume settings.
How do I prevent barcode labels from peeling or fading?
To keep barcode labels intact and readable, opt for durable, weather-resistant materials with protective coatings or lamination. These features shield labels from moisture, wear, and other external factors. Make sure to apply labels on clean, flat surfaces, steering clear of seams or areas frequently handled. Regular inspections can help catch any early signs of damage, and adding protective overlays can extend their lifespan. Using high-quality materials and thoughtful placement is essential for ensuring barcode labels hold up in demanding warehouse conditions.


