
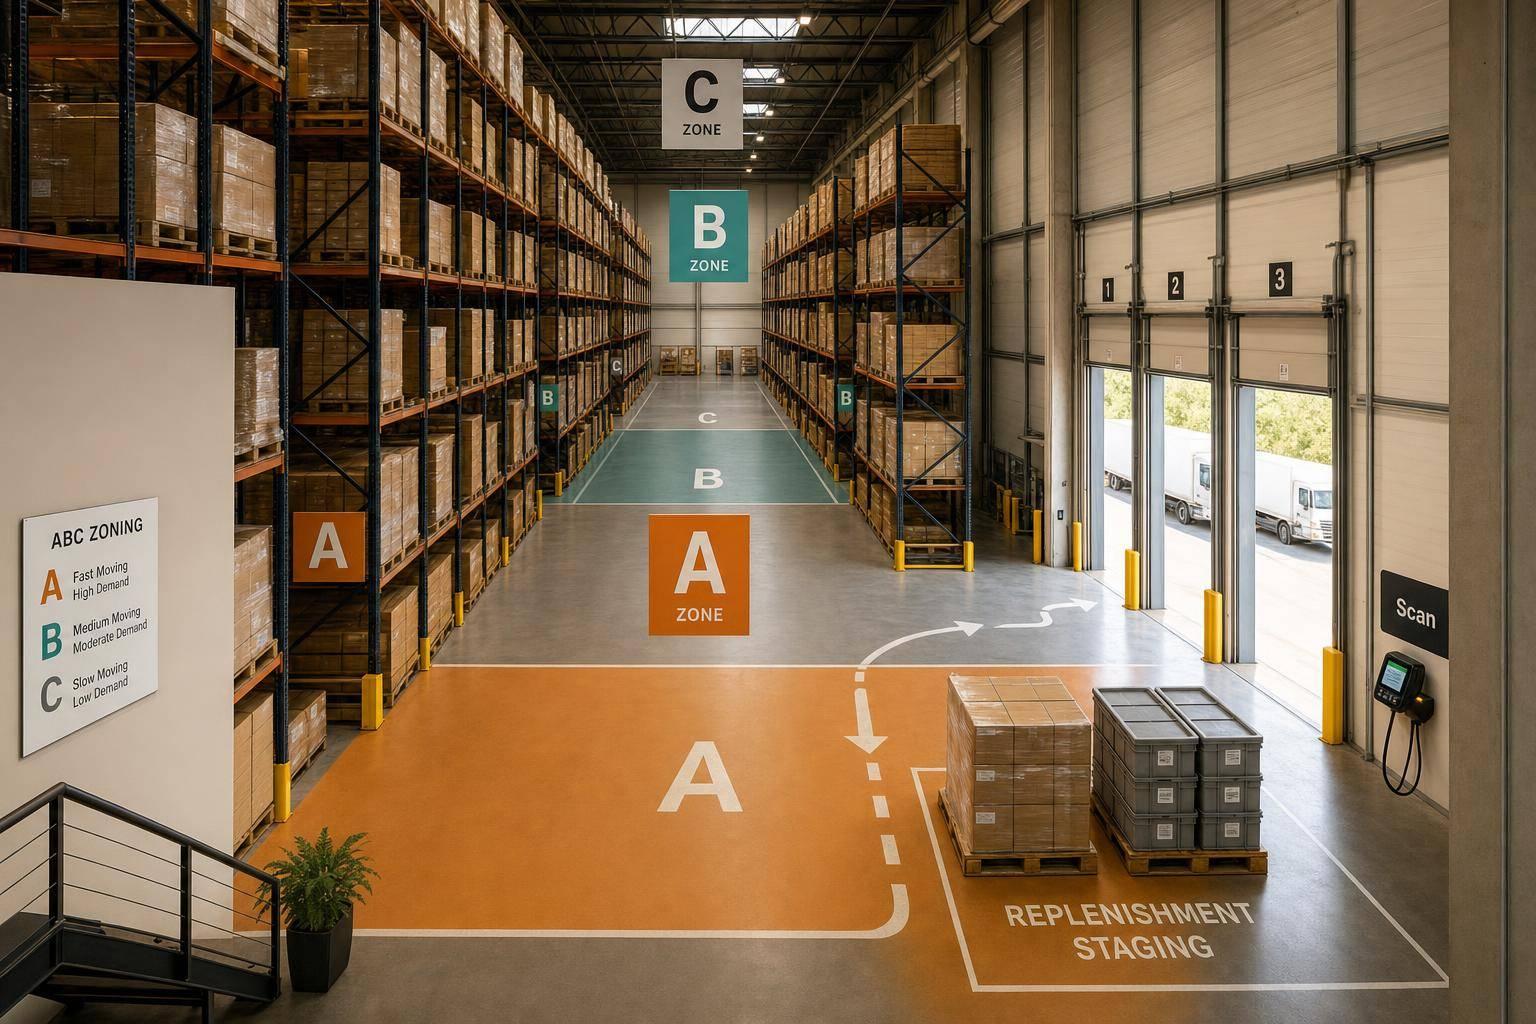
If your team spends most of the shift walking, ABC zoning can cut that waste fast. The core idea is simple: put your fastest-moving SKUs closest to packing, keep medium movers in the middle, and move slow sellers to the back, upper racks, or dense storage.
I’d sum up the process like this:
- Classify SKUs into A, B, and C using 6–12 months of demand and movement data
- Place A items near shipping because they drive most picks
- Use B zones for mid-volume stock and C zones for low-movement inventory
- Set rules for replenishment, FIFO/FEFO, scanning, and pick paths
- Review classes every quarter or every 6–12 months so the layout stays aligned with demand
- Track results with lines picked per hour, walk distance, mis-picks, stockouts, and count accuracy
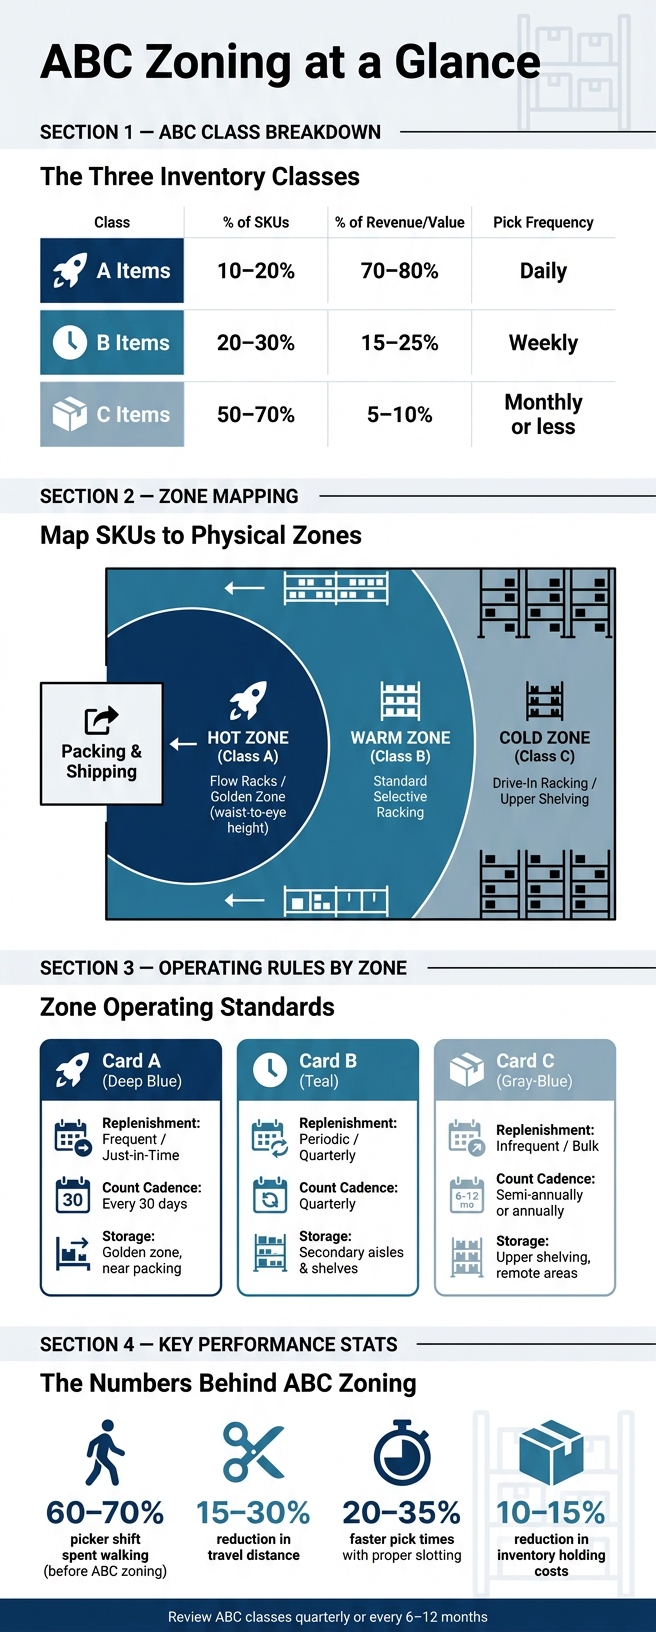
The numbers are hard to ignore: pickers often spend 60–70% of their shift walking, and ABC zoning can cut travel by 15–30%. In some cases, pick times drop by 20–35% when slotting matches item velocity.
Here’s the simple breakdown:
- A items: top movers, often 10–20% of SKUs and 70–80% of value
- B items: middle group, often 20–30% of SKUs
- C items: slow movers, often 50–70% of SKUs
ABC zoning works best when I treat it as a floor-layout project and a rules project. The bins, labels, scans, count cadence, and replenishment plan all need to match the new zones. Otherwise, the layout changes, but the day-to-day work does not.
Below, I’ll walk through how to classify inventory, map zones, slot SKUs, train the team, and keep the setup accurate over time.
ABC Zoning: SKU Classification, Zone Rules & Warehouse KPIs
How Does ABC Analysis Optimize Warehouse Layout For Picking? - Smart Logistics Network
sbb-itb-19ed50f
1. What ABC zoning is and what you need before you start
ABC zoning sorts SKUs into A, B, and C groups based on demand and value, then places them by how often they move. Put simply, it uses demand data to shorten pick paths. Once you’ve set the classes, use movement data to decide which SKUs belong in each group.
Before you change anything on the floor, pull together 6–12 months of solid SKU history, make sure every location is labeled clearly, and map any fixed storage limits. That includes hazardous storage, temperature control, ergonomics, and FIFO/FEFO rules.
Define A, B, and C inventory classes
Use this table as a starting point. The exact cutoffs depend on your product mix.
| Class | Typical % of SKUs | % of Revenue/Value | Pick Frequency |
|---|---|---|---|
| A Items | 10–20% | 70–80% | Daily |
| B Items | 20–30% | 15–25% | Weekly |
| C Items | 50–70% | 5–10% | Monthly or less |
A items are your fastest movers and highest-value SKUs. B items move at a middle pace. C items move slowly and usually account for most of your SKU count.
Set goals and success measures before changing the layout
Before the layout shift, track lines picked per hour, average walk distance per wave, and mis-pick rate. Then track the same numbers after the change. That’s how you tell if the new layout is cutting travel time and reducing errors, instead of just looking better on paper.
If you use QuickBooks Desktop, Rapid Inventory can help keep SKU data and warehouse locations in sync through two-way QuickBooks sync and multi-location tracking.
2. Classify inventory using demand and movement data
Now that your goals are set, it’s time to rank SKUs by movement and value. Start by exporting SKU, units sold, and unit cost or price. Then remove obsolete items and one-time transfers. Those oddball records can skew the results and push actual fast-movers into the wrong class.
Choose your classification metric: annual usage value or movement volume
The metric you pick changes how SKUs get grouped. Use annual usage value when you want tighter financial control. Use order lines or units moved when the main goal is better pick efficiency.
There’s also a practical exception. If you have critical spare parts or regulated items, move them into Class A when business risk matters more than raw volume.
Once you choose the metric, stick with the same calculation method every time. That keeps your classes consistent and easier to use.
Calculate ABC classes step by step
- Gather data: Create columns for SKU, Annual Demand (Units), and Unit Cost/Value.
- Calculate annual usage value per SKU: Multiply Annual Demand by Unit Cost (
=B2*C2). - Sort descending: Sort the entire sheet from highest to lowest by the total value column.
- Calculate each SKU's percentage of total value: Divide each item's value by the grand total (
=D2/SUM($D$2:$D$100)). - Build a cumulative percentage column: Create a running total (
=SUM($E$2:E2)). - Tag the class: Use an IF statement to automate it -
=IF(F2<=0.8,"A",IF(F2<=0.95,"B","C")).
That formula assigns A to the top 80% of cumulative value, B to the next 15%, and C to the last 5%.
This is the Pareto Principle in action. In many warehouses, 10–20% of SKUs account for 70–80% of total value.
Use those class labels in the next step to set storage zones and picking rules. From here, the classes guide zone placement, storage type, and pick-path rules.
3. Map ABC classes to physical warehouse zones
Once each SKU has a class label, the next move is to turn that label into an actual floor plan. Fast movers should be easier to reach. Slow movers can sit in space that’s less convenient.
Assign hot, warm, and cold storage areas
Map each class to travel distance, shelf height, and storage density. A simple setup is to use three zones: hot, warm, and cold.
- Class A items go in the hot zone, closest to packing and shipping.
- Class B items belong in the warm zone, where travel distance is moderate.
- Class C items should sit in the cold zone - usually slower-moving or seasonal stock kept in remote areas, upper rack levels, or other high-density locations where space use matters more than pick speed.
The same class data should also help size each zone, not just assign item locations.
A 2025 HVAC distributor moved A items closer to packing and shifted C items to upper shelving. The result: picking time fell 27% and carrying costs dropped 15% within six months.
High-velocity A-items should usually sit in the ergonomic golden zone at waist-to-eye height. But there’s a catch. If an item is very heavy, safety wins, so it should stay at ground level instead of being pushed into the golden zone. Flammable goods need compliant, sprinkler-equipped areas and must stay away from ignition sources and incompatible chemicals. Those are hard rules. No slotting plan gets to bend them.
Match storage type to each zone
Storage type should line up with pick speed and space use. Flow racks or carton flow systems are a strong fit for A-items because they support high throughput. Standard selective shelving or pallet racking works well for B-items, giving you a middle ground between access speed and storage density. Drive-in racking or deep-lane bulk storage makes sense for C-items, where cubic space matters more than fast retrieval.
Aisle layout should follow the same logic. Zone boundaries need to fit natural workflow patterns so pickers don’t backtrack or run into dead ends.
Use a consistent Zone–Aisle–Bay–Shelf–Bin format with barcode-ready labels so pickers can find any location fast. It also helps to leave gaps in bin numbers for future expansion.
Match each zone to the storage format that supports its pick rate.
| Location Type | Best-Fit ABC Class | Strengths | Operational Tradeoffs |
|---|---|---|---|
| Flow rack / carton flow | Class A | Maximum pick speed; continuous product feed | Requires frequent replenishment; higher setup cost |
| Standard selective racking | Class B | Balanced access and density | Needs quarterly review as velocities shift |
| Drive-in / deep-lane racking | Class C | High-density; efficient use of vertical space | Slowest retrieval; may require lift equipment |
| Ground-level / floor storage | Heavy Class A or B | Safe for heavy items; easy pallet access | Consumes more floor space |
| Upper shelving / back zones | Class C / Bulk | Low-cost; frees prime space for fast movers | Longest travel time; lowest visibility |
These zone choices feed straight into slotting and replenishment rules.
4. Slot SKUs, update picking rules, and train the team
With zones mapped and storage types assigned, the next move is simple on paper and a little messier in practice: put SKUs into their new homes, then make sure day-to-day work supports that layout. If the rules stay the same while the warehouse changes, people drift back into old habits fast.
Set replenishment and picking rules by zone
Zone assignments only stick when replenishment lines up with pick velocity. A-items need short review windows and larger forward-pick slots. B-items can run on periodic replenishment. C-items usually fit min-max controls. Once the zones are in place, turn them into daily slotting and picking rules people can follow without guessing.
Build pick paths by zone, not by order number. When pickers move through zones in a clean flow instead of bouncing across aisles, travel time goes down.
For dated, lot-controlled, or serialized inventory, FIFO or FEFO rules need to sit on top of the zone plan. The zone decides where stock lives. FIFO or FEFO decides which unit gets picked first. You need both. Otherwise, a layout that looks compliant can still send newer stock out before older stock. If you're running QuickBooks Desktop, Rapid Inventory supports FIFO/FEFO workflows alongside lot and serial number tracking, plus mobile barcode scanning and real-time location tracking.
Train staff on location standards and scanning steps
Train staff on three things:
- How to read the zone map
- How to follow the standard pick path
- How to confirm each location with a barcode scan
At every put-away and every pick, scan the bin barcode and the item barcode. That step keeps physical inventory lined up with system records. Skip scans now and then, and counts can drift until a cycle count finally shows the mismatch.
Exceptions need a clear process too. If a picker finds stock in the wrong bin or runs into a damaged barcode, they should know exactly how to flag it instead of working around it. Use scans and location checks to catch those issues right away. That kind of discipline makes the next cycle count worth something.
Use this table as the operating standard by zone:
| Zone | Picking Frequency | Replenishment Frequency | Storage Type | Count Cadence |
|---|---|---|---|---|
| A (Hot) | Very high | Frequent / just-in-time replenishment | Golden zone (waist-to-eye height, near packing) | Weekly or monthly |
| B (Warm) | Moderate | Periodic / quarterly | Secondary aisles and shelves | Quarterly |
| C (Cold) | Low | Infrequent / bulk | Upper shelving, remote areas | Semi-annually or annually |
Flag operationally critical C-items for tighter control, even when their dollar value is low.
5. Keep ABC zoning accurate with regular reviews and cycle counts
ABC zoning doesn't stay correct on its own. Demand moves. Product lines shift. And an item that flew off the shelf six months ago can slow to a crawl before anyone notices. When that happens, you can end up giving prime floor space and extra attention to SKUs that no longer earn it.
Once your zones, slotting rules, and team training are set, keep ABC classes current with a fixed review cadence. Review ABC classes quarterly in fast-moving operations, or every 6–12 months in more stable ones. Base those reviews on a rolling 12–18 months of demand data. If seasonality, promotions, or other demand changes affect item velocity, reclassify sooner.
Reclassify inventory on a quarterly or annual schedule
Cycle counts help confirm that class assignments still line up with what is happening on the floor. Put simply, they show whether the zone plan still matches actual movement.
A common cycle count schedule looks like this:
- Count A-items every 30 days
- Count B-items quarterly
- Count C-items once or twice a year
A-item cycle counts often keep inventory accuracy above 98%.
Track results with cycle counts and warehouse KPIs
After each review, compare the same operating measures against the prior period. That gives you a clean way to see whether the zoning plan is still doing its job or starting to drift.
Track:
- Inventory record accuracy
- Travel time or distance
- Mis-pick rate
- Stockout rate by class
Proper SKU stratification and zoning can cut average pick times by 20% to 35% and reduce inventory holding costs by 10% to 15%. Those are the kinds of gains you want to keep an eye on.
If you use QuickBooks Desktop, Rapid Inventory supports cycle counting, real-time reports, and multi-location tracking, which helps drifting SKUs show up early.
FAQs
How do I choose the best ABC cutoffs for my warehouse?
Choose cutoffs based on your main goal.
Most warehouses start with annual usage value (unit cost × annual units sold) because it shows the impact on cash flow. If your goal is to cut congestion or reduce travel time, use pick frequency instead.
A common starting point is the 80/20 rule:
- Classify the top 10% to 20% of items as A
- Put the next 20% to 30% into B
- Group the remaining 50% to 70% into C
Review those cutoffs quarterly.
What should I do with seasonal or fast-changing SKUs?
Avoid static classifications for seasonal or fast-changing SKUs. If you leave categories untouched for too long, teams can put time, space, and budget in the wrong places. Review and reclassify inventory every quarter or twice a year so your categories match current demand.
Seasonality matters here. Look at rolling data instead of relying only on last year’s totals, then use that view to adjust slotting, purchasing logic, and safety stock. If you use Rapid Inventory, its real-time reporting can help you keep up with those shifts.
How can I start ABC zoning without disrupting daily picking?
Use a phased approach instead of changing the whole facility at once. Start with a pilot in one section or zone so you can test your slotting strategy without disrupting day-to-day work.
To keep disruption low, make moves during off-peak hours and keep the layout flexible. It also helps to match zoning boundaries to natural workflow patterns so you don't create bottlenecks. Rapid Inventory can help maintain accurate stock visibility during the transition.



