
Your warehouse layout directly affects efficiency, safety, and customer satisfaction. A poor design can waste time, increase errors, and reduce productivity, while a thoughtful layout optimizes space, minimizes travel distance, and ensures smooth workflows.
Key Highlights:
- Impact of Layout: Poor layouts can lower efficiency by up to 25%. Clear, logical pathways and zones improve productivity and safety.
- Goals: Maximize space, reduce bottlenecks, and position high-turnover items near packing areas. Plan for future growth and align with OSHA standards.
- Zones: Key areas include receiving, staging, storage, picking, packing, and shipping. Specialized zones may handle overstock, returns, or hazardous materials.
- Layout Types:
- U-Shaped: Efficient for smaller spaces; shared dock infrastructure but prone to congestion.
- I-Shaped: Ideal for high-volume operations; clear workflow but requires more space.
- L-Shaped: Suits irregular spaces; separates docks but increases travel distance.
- Zone-Based: Divides inventory by type; improves order accuracy but adds complexity.
- Steps to Plan:
- Assess operational needs (e.g., inventory type, growth plans).
- Map and audit the space (consider vertical storage and aisle widths).
- Design safe, efficient aisles and workflow paths.
- Choose a layout type that fits your operations.
- Test and refine the layout based on performance and feedback.
A well-planned layout improves fulfillment speed, reduces errors, and supports business growth. Use tools like inventory management software to monitor performance and make data-driven adjustments.
How To Layout Your Warehouse Locations | Warehouse Management
sbb-itb-19ed50f
Key Components of a Warehouse Layout
Warehouse Layout Types Comparison: U-Shaped, I-Shaped, L-Shaped, and Zone-Based
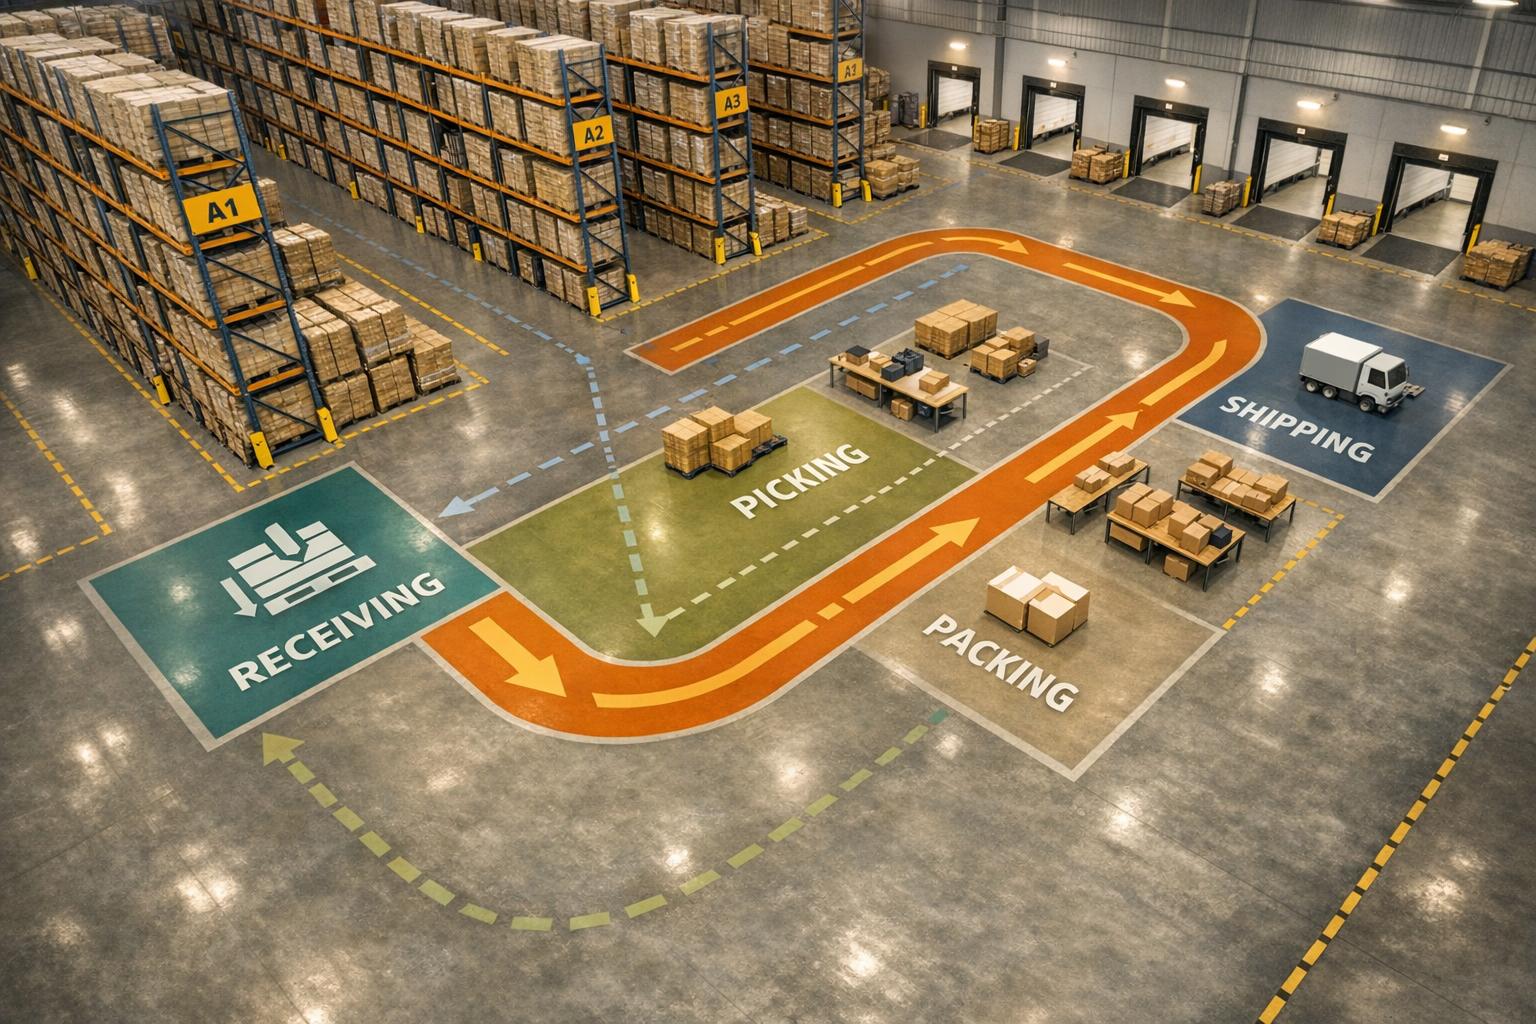
A well-organized warehouse layout ensures that inventory moves efficiently from arrival to shipment. Each zone in the warehouse plays a specific role, tailored to the operational demands of the facility.
Main Warehouse Zones
Every warehouse is divided into key zones to handle different stages of the fulfillment process. The receiving area is the starting point, where staff unload and document incoming shipments. Placing this zone near dock doors reduces the time spent on inbound processing. From there, items often move to a staging area, which serves as a temporary spot for unboxing and identifying items or preparing outgoing materials for shipping.
The storage area can be split into two types: static and dynamic. Static storage involves fixed locations, often using racks, while dynamic storage keeps frequently accessed items closer to packing areas for quicker retrieval. The picking zone is where employees gather items to fulfill orders. Positioning fast-moving products at the front of this area can significantly reduce travel time. Next is the packing zone, where items are prepared for shipment. For efficiency, this zone should be located adjacent to the picking area to minimize unnecessary movement. Finally, the shipping area is where completed packages are loaded onto trucks for delivery.
Many warehouses also include an overstock zone for replenishing inventory in the picking area. Additional specialized zones may handle quality control, returns, damaged goods, or compliance-specific items like hazardous materials.
"Think of layout as your warehouse's operating system. If it's messy or mismatched to your demand profile, every workflow - receiving, put-away, picking, packing, shipping - pays a penalty." - Ashley Taylor, Product Manager, Cleverence
Once these zones are defined, the next step is choosing a layout type that effectively integrates them.
Common Layout Types
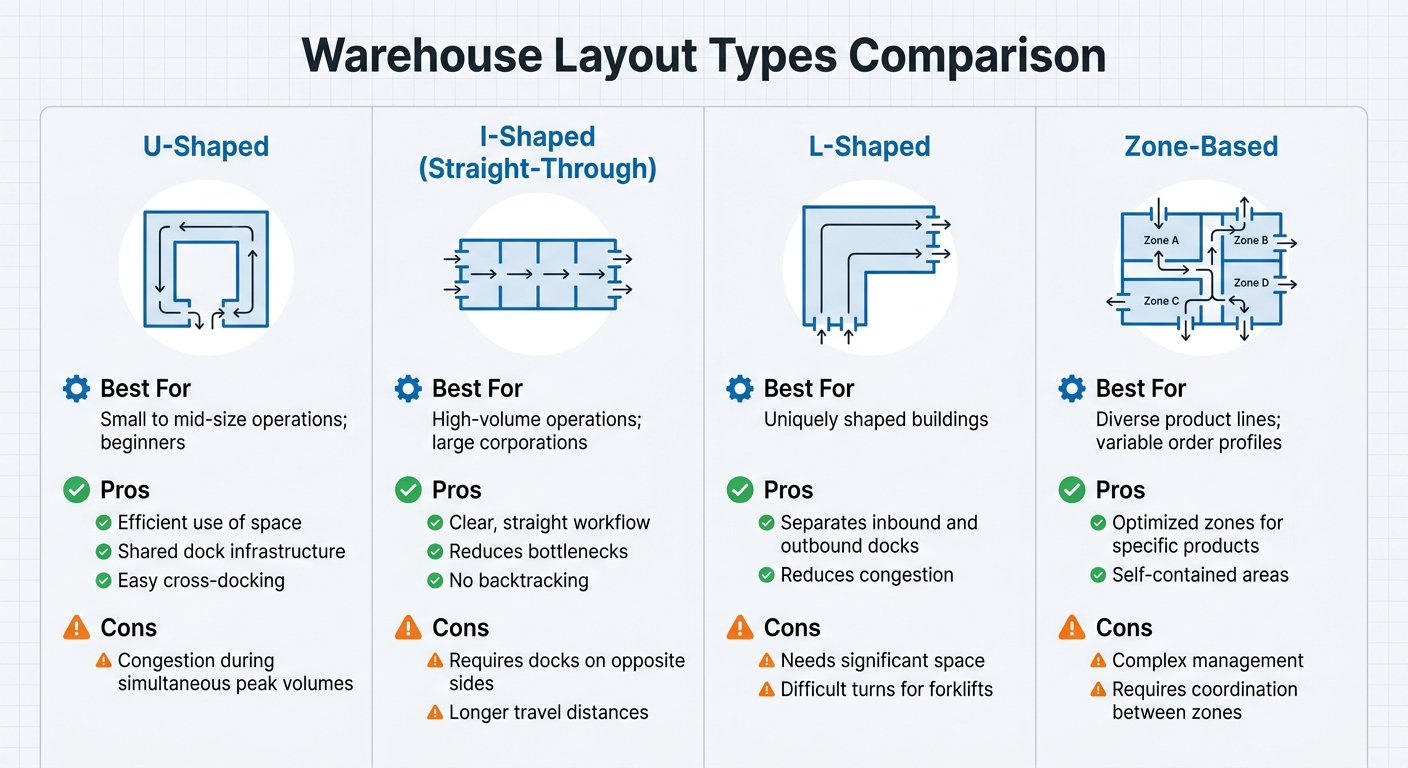
Warehouse zones can be arranged in several ways, depending on the size and needs of the operation. U-shaped layouts are popular with small to mid-size businesses and those just starting out. They make efficient use of space by placing receiving and shipping docks on the same side of the building, which simplifies cross-docking. However, this setup may lead to congestion during peak inbound and outbound periods.
I-shaped (straight-through) layouts are ideal for high-volume operations and larger companies. This design creates a straightforward workflow, moving goods from one end of the warehouse to the other without backtracking. The downside is that it requires docks on opposite sides of the building, and goods may need to travel longer distances. L-shaped layouts work well in buildings with unusual shapes, with receiving and shipping docks placed at a 90-degree angle. This reduces congestion but requires more space and may create challenges for forklift navigation.
For businesses with diverse product lines and varying order profiles, zone-based layouts are a practical option. Each zone is optimized for specific types of products, such as separating bulky items from smaller ones. While this setup can improve efficiency within individual zones, it adds complexity to overall management and requires careful coordination between zones.
Here’s a quick comparison of these layout types:
| Layout Type | Best For | Pros | Cons |
|---|---|---|---|
| U-Shaped | Small to mid-size operations; beginners | Efficient use of space; shared dock infrastructure; easy cross-docking | Congestion during simultaneous peak volumes |
| I-Shaped | High-volume operations; large corporations | Clear, straight workflow; reduces bottlenecks; no backtracking | Requires docks on opposite sides; longer travel distances |
| L-Shaped | Uniquely shaped buildings | Separates inbound and outbound docks; reduces congestion | Needs significant space; difficult turns for forklifts |
| Zone-Based | Diverse product lines; variable order profiles | Optimized zones for specific products; self-contained areas | Complex management; requires coordination between zones |
"The winning layout is the one that meets your specific service levels at the lowest stable operating cost while leaving room to scale." - Ashley Taylor, Product Manager, Cleverence
Step-by-Step Guide to Planning a Warehouse Layout
Designing a warehouse layout is all about creating a space that runs efficiently while leaving room for future growth. The steps below outline how to build a layout that cuts down on wasted motion and boosts productivity.
Step 1: Assess Your Operational Needs
Start by analyzing what your warehouse will store and how goods will flow through the space. For instance:
- Perishables may need cold storage.
- Bulky items often require extra floor space.
- Fragile goods might call for specialized shelving.
Use an ABC analysis to prioritize inventory based on turnover rates. Place your high-turnover "A" items - your most important revenue drivers - near packing stations to minimize unnecessary movement. Match your order volumes with the right amount of space for receiving, staging, and shipping. For example, high shipment volumes may require larger staging areas.
Don’t forget to plan for growth by including flexible zones and modular racking systems. Lastly, take into account your material handling equipment and building details like ceiling height, column spacing, and floor load limits to ensure everything operates safely and efficiently.
Step 2: Map and Audit Your Space
Create a map of your warehouse using CAD software or even a simple sketch. Include all key areas such as docks, storage zones, offices, and break rooms. Make sure to distinguish between static storage (fixed locations for items) and dynamic storage (flexible spaces for high-demand inventory).
Measure your usable space by subtracting non-storage areas from the total square footage. Walk through the facility to spot underused spaces or bottlenecks. Don’t overlook vertical space - installing mezzanines or high-density racking can significantly increase capacity.
Check your aisle widths to ensure they meet OSHA and industry standards. Aisles should be wide enough for your largest equipment, with room to spare for safety. Regular audits and input from staff can help pinpoint inefficiencies that a simple blueprint might miss.
Step 3: Design Aisles and Workflow Paths
Well-designed aisles and workflow paths are critical for safety and productivity. Aisles should be at least 3 feet wider than your largest forklift or pallet jack to prevent accidents and delays. This is especially important considering that around 160,000 truck accidents occur annually.
Use clear floor markings like painted lines, arrows, and stop boxes to guide movement. Separate lanes for forklifts and pedestrians can help reduce collision risks. Install LED or motion-detecting lights to improve visibility, and design pick routes to minimize travel distances.
If you use zone picking, assigning workers to specific areas can cut down on unnecessary cross-warehouse travel. The ultimate goal is to streamline movement and reduce wasted effort.
Step 4: Select and Customize Your Layout Type
Choose a layout type that complements your operations. Options include U-shaped, I-shaped, L-shaped, or zone-based layouts. Your dock arrangements and overall volume will play a big role in determining the best fit.
Customize your layout by placing high-turnover "A" items near packing stations and shipping docks. Tools like Rapid Inventory can help streamline inventory tracking with features like multi-location tracking and QuickBooks integration.
"A well-thought-out warehouse layout is essential for optimizing operations, enhancing safety, and increasing efficiency within a distribution center or storage facility." - Kaela Carpenter, Senior System Design Analyst, AutoStore
Step 5: Implement and Test the Layout
Once your design is ready, test it out in stages. Instead of overhauling the entire warehouse at once, start with one section or product category. This phased approach lets you identify and fix any issues early on.
Run simulations to spot bottlenecks before making permanent changes. Use inventory management software like Rapid Inventory to monitor performance in real time. Features like FIFO/FEFO picking, mobile barcode scanning, and detailed inventory reports can help you track metrics like pick rates, dock-to-stock times, order accuracy, and space usage.
Gather feedback from your warehouse staff - they often notice problems that aren’t obvious on paper. Regular cycle counts and backorder tracking can also help maintain accuracy and keep customers happy. Adjustments based on real-world performance and staff input will ensure your layout works as intended.
Examples of Warehouse Layouts
Making the most of warehouse space isn’t just about theory - it’s about putting it into practice. Real-world layouts show how specific designs can improve both efficiency and safety.
U-Shaped Layout Example
The U-shaped layout places receiving and shipping docks on the same wall, creating a seamless flow. Goods come in through the receiving area, move into central storage, and exit through the shipping zone. This setup works especially well for 3PL providers handling fast-moving consumer goods.
A key benefit of this layout is shared resources - personnel, forklifts, and dock space can serve both inbound and outbound operations, cutting costs. Managers also gain better oversight, as the central position allows them to monitor activities easily. However, managing traffic flow is crucial to avoid congestion during peak receiving and shipping times. This layout is particularly effective for cross-docking operations, where inventory moves quickly from receiving to shipping with minimal storage. It’s also a smart choice for facilities with limited floor space.
If space constraints vary, an L-shaped layout might be a better fit.
L-Shaped Layout Example
The L-shaped layout positions receiving and shipping docks on adjacent walls at a 90-degree angle, making it ideal for warehouses with irregular shapes or corner spaces. Typically, one leg of the "L" handles receiving and bulk storage, while the other focuses on picking and shipping. Storage areas are placed centrally and at the rear to maximize capacity.
This design works well for medium-sized warehouses managing mixed product types that require different handling conditions. For instance, temperature-sensitive goods might occupy one section, while standard inventory is stored elsewhere. The right-angle design also makes efficient use of corner spaces. While flexible and expandable, this layout can lead to longer travel distances compared to straight-through designs. To address this, implementing a warehouse management system to streamline picking routes is essential.
For operations with diverse inventory and specialized picking needs, a zone-based layout offers even greater control.
Zone-Based Picking Example
Zone-based layouts divide the warehouse into specific areas tailored to different types of SKUs. For example, small parts might be stored in flow racks, while larger items are kept in zones with wider aisles. This setup reduces training time and improves accuracy, as pickers focus only on their assigned zones. Orders are passed between zones using conveyors or carts, eliminating the need for a single picker to cover the entire facility.
This layout is particularly effective for warehouses managing a wide range of SKUs or complex orders. By optimizing item placement in dedicated zones, fulfillment speeds up significantly. It also supports FIFO (First In, First Out) and FEFO (First Expired, First Out) picking strategies, with specific zones for perishable or date-sensitive goods. Barcode scanning is a must - using a scan-confirm workflow can boost pick accuracy from 99.3–99.5% to as high as 99.8–99.95%. Tools like Rapid Inventory enhance this setup with mobile scanning and real-time tracking, ensuring precise control over inventory flow across multiple zones.
Conclusion
Planning your warehouse layout isn’t just about organizing shelves - it’s about shaping how efficiently your entire operation runs. From improving pick rates to boosting order accuracy, a well-thought-out layout can make a huge difference. With warehouse costs running $13.50 to $13.75 per square foot in 2023, making the most of your space isn’t just a good idea - it’s a financial necessity.
Start by evaluating your operational needs, and don’t stop once the layout is in place. Whether a U-shaped design for shared resources, an L-shaped setup for tricky spaces, or a zone-based approach for managing complex inventories, the right layout depends on your workflow.
Technology can be a game-changer here. Tools like mobile barcode scanners help reduce errors, while real-time tracking ensures you know exactly where your inventory is. For example, Rapid Inventory provides features like multi-location tracking, FIFO/FEFO picking, and mobile scanning to keep inventory moving smoothly.
As your business grows, your layout should grow with it. Successful layouts aren’t set in stone - they adapt to new challenges like adding SKUs, seasonal spikes, or integrating automation. Regular audits, clear procedures, and data-driven tweaks ensure your warehouse stays efficient. Aligning your layout with your operations and leveraging technology paves the way for scalable success. Test, adjust, and refine to keep everything running smoothly.
FAQs
How do I choose the right layout type for my warehouse?
Choosing the best warehouse layout hinges on factors like the size of your facility, how products move through it, and your operational objectives. Popular options include U-shaped, I-shaped (straight-through), and L-shaped layouts, each catering to different needs. For instance, straight-through layouts are ideal for high-volume operations, while U-shaped layouts offer greater flexibility and make supervision easier. To get the most out of your space, consider your product flow, storage requirements, and any automation systems in place to streamline zones, traffic, and overall efficiency.
What KPIs should I track to prove a layout change worked?
To gauge the success of a layout change, focus on tracking efficiency, accuracy, and performance. Key metrics to monitor include:
- Productivity: Are tasks being completed faster or with fewer delays?
- Order Accuracy: Has the precision of order fulfillment improved?
- Asset Utilization: Are resources being used more effectively?
These metrics offer a clear picture of how well the new layout supports operations and whether resources are being optimized.
How can I reduce picker travel time without expanding space?
To cut down on picker travel time without needing more warehouse space, focus on optimizing pick paths. This can be done by reorganizing the sequence of pick lists, arranging inventory in smarter ways, and grouping orders based on their locations. These strategies can slash walking distances, boosting productivity by as much as 40%. It’s like gaining the efficiency of several full-time employees - without expanding your warehouse.


