

You can get inventory software live with QuickBooks Desktop in about 7 days if you keep the rollout tight and follow the right order. The core job is simple: clean your QuickBooks data, test the sync in a separate file, run a small pilot, do a short cutover, and then watch logs and inventory value after launch.
If I were doing this, I’d focus on five things right away:
- Clean item, customer, and vendor records
- Check Inventory Asset, COGS, and Income account mappings
- Test two-way sync before touching the live file
- Reconcile opening quantities and inventory value at cutover
- Set clear rules for who does what in QuickBooks vs. the inventory system
A few numbers stand out:
- Small businesses spend 13.7 hours per week on inventory work
- About 70% still rely on spreadsheets or basic accounting tools
- A short pilot often runs 2–4 weeks
- Many teams can keep cutover to 2–4 hours
- Review mismatches over $5.00
- If the gap is above 1–2% of Inventory Asset, have accounting review it before go-live
Here’s the article in one plain view:
| Step | What I’d do | Main goal |
|---|---|---|
| 1 | Prep QuickBooks and clean records | Stop bad data from moving over |
| 2 | Connect in a test file and check mappings | Make sure sync posts to the right places |
| 3 | Run a small pilot | Catch issues with a small group first |
| 4 | Cut over during a slow window | Go live with low disruption |
| 5 | Watch logs, counts, and value after launch | Keep books and stock in line |
The big idea: don’t start with setup screens - start with data, mapping, and a test run. That’s what keeps the launch short and keeps your QuickBooks file clean.
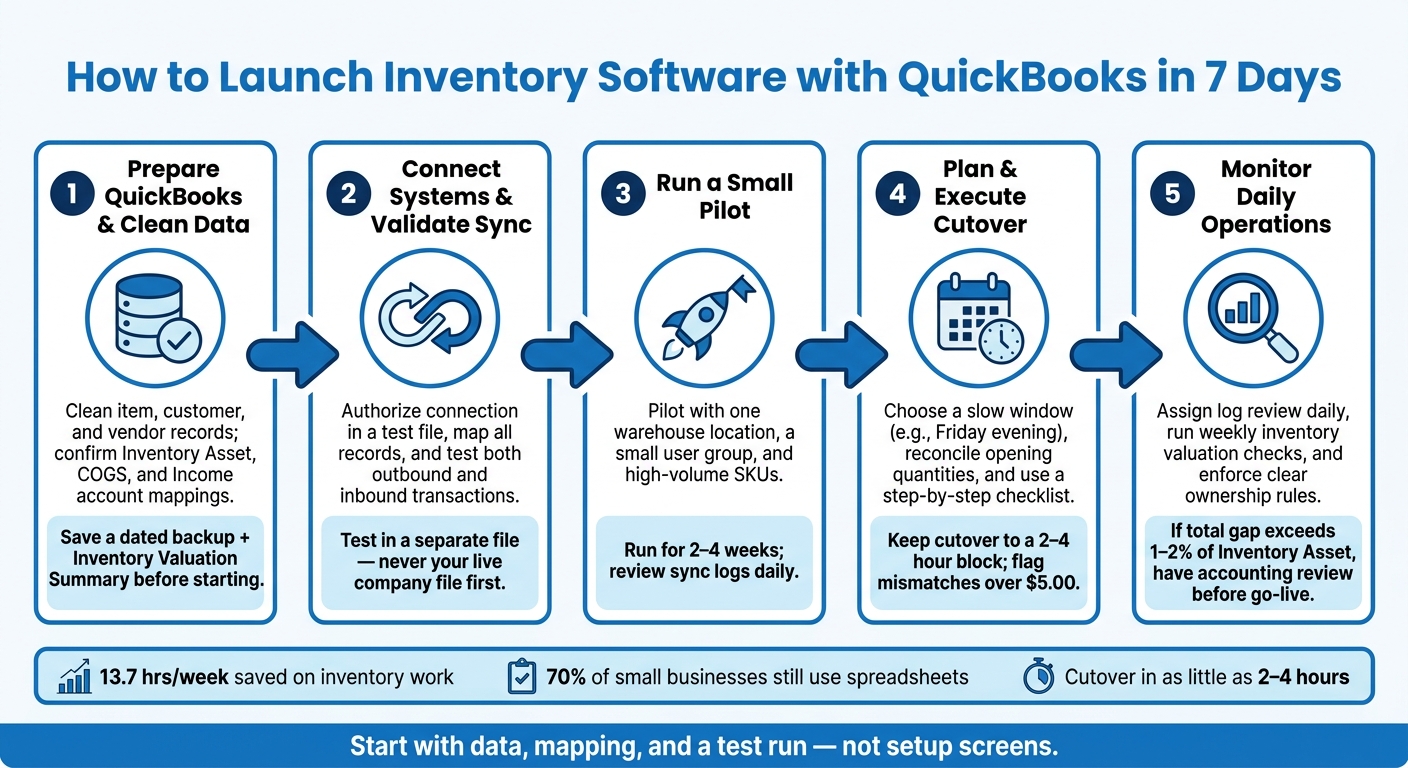
How to Launch Inventory Software with QuickBooks in 7 Days
How to set up inventory in QuickBooks Desktop
sbb-itb-19ed50f
1. Prepare QuickBooks Desktop and Inventory Data
Before the first sync, check your QuickBooks accounts, records, and warehouse rules. That upfront work helps you avoid a messy import later.
Confirm QuickBooks Inventory Settings and Accounts
First, make sure Inventory and Purchase Orders are turned on in QuickBooks Desktop Company Preferences.
Next, review each inventory item and confirm that it points to the right Inventory Asset, COGS, and Income accounts. QuickBooks creates the Inventory Asset and COGS accounts when inventory tracking is enabled. But older items can still be tied to the wrong accounts, like an expense account or Undeposited Funds.
A simple way to spot problems is to run an Item List report, add these columns, and export the report to Excel:
- Income Account
- COGS Account
- Asset Account
That gives you a clean view of account mismatches before sync.
Also save a dated backup of the company file. Along with that, save a current Inventory Valuation Summary and your open purchase orders.
Once your accounts and backups are set, move on to your item, customer, and vendor records.
Clean Item, Customer, and Vendor Records Before Migration
Export your item, customer, and vendor lists to Excel or IIF. Then clean them in one pass so you’re not fixing the same mess twice.
- Standardize SKUs and item names.
- Fix units of measure. Keep U.S. usage consistent, such as pieces (ea), pounds (lb), and gallons (gal). Keep the decimal precision you need, like 0.25 lb.
- Remove duplicates. Use Excel’s Remove Duplicates tool or a
=COUNTIF(A:A,A2)>1formula to flag duplicate SKUs or vendor names. Keep one main record and inactivate the rest. - Inactivate obsolete records. Mark discontinued items, closed customers, and inactive vendors as inactive in QuickBooks instead of deleting them.
After that cleanup, set up the same warehouse structure inside your inventory software.
Set Up Locations, Bins, and Workflows in the Inventory Software
Start by mapping the warehouse on paper. Then build that same layout in the software with location, aisle, and bin codes like 01-01-01.
At the item level, decide which SKUs need lot tracking and which need serial tracking. A food distributor might use lot numbers and expiration dates. An electronics reseller, on the other hand, may assign serial numbers to each unit.
You’ll also want to set your picking rules. Use FIFO for general stock and FEFO for date-sensitive items so pick tickets show the right stock at the right time.
Rapid Inventory supports multi-location tracking, lot and serial tracking, FIFO/FEFO picking, and barcode scanning.
Once the warehouse structure is in place, you’re ready to connect QuickBooks Desktop and test the sync.
2. Connect the Systems and Validate Two-Way Sync
Connect the two systems with care. Start in a test setup, not your live books. Then check every mapping before you let anything post.
Authorize the QuickBooks Desktop Connection and Map Records
Don’t connect to your live company file first. Restore a recent backup into a separate test file and use that for the first connection. You get a dataset that looks like day-to-day activity, but your production balances stay untouched.
When it’s time to connect, open the test company file in QuickBooks Desktop as the Admin user and switch to Single-user Mode. That part matters. A non-admin user can’t approve the application certificate prompt, which may cause the connection to fail or give only partial access. When QuickBooks asks whether to allow the external application, approve ongoing access.
After authorization, pause before posting anything. Review the record mappings first. Each active inventory item in the inventory system should match one QuickBooks item by Item Name/Number. Even a small name mismatch can lead to duplicate vendor records. Also confirm that each transaction type points to the right GL account before sync. It’s smart to review those mappings with your bookkeeper before you move ahead.
Test Outbound and Inbound Transactions
Test both directions before go-live. The goal is simple: make sure posting, syncing, and account impact all line up before real transactions start flowing.
| Direction | Test Case | What to Verify in QuickBooks Desktop |
|---|---|---|
| Outbound | Create a PO, receive items against it, and generate a bill or item receipt | Inventory Asset increases; landed cost per unit and total extended amount match |
| Outbound | Post an inventory adjustment (e.g., damage) | Adjustment hits the correct variance account, not an expense |
| Outbound | Run a cycle count for a subset of bins | Inventory Adjustment entry is created; on-hand quantities update |
| Inbound | Add a new inventory item in QuickBooks | Item appears in the inventory software with correct cost and accounts |
| Inbound | Edit an existing item's description in QuickBooks | Change syncs without duplicating the item |
| Inbound | Add a new vendor in QuickBooks | Vendor is available for receipts in the inventory software |
Here’s a clean example. If a test receipt adds 100 units at $10.00 each, QuickBooks should show a $1,000 increase in the Inventory Asset account and nothing odd hitting expense accounts. Check the transaction journal or audit trail in QuickBooks to confirm it. If the posting doesn’t match, you’re likely looking at a mapping issue that needs to be fixed now, not later.
For inbound tests, pay close attention to duplicates. Many two-way sync tools store QuickBooks’ internal IDs inside the inventory system so they can update an existing record instead of making a new one. If your test creates new items when it should update old ones, review the item ID mapping before you continue.
Run a Short Pilot Before Full Rollout
If the tests post the way they should, move into a short pilot. Run a 2–4 week pilot with a tight scope: one warehouse location, a small user group like your receiving team and one inventory coordinator, and a set of high-volume SKUs. During that pilot, route all receiving and cycle counting for that scope through the inventory software only, then check the postings and balances in QuickBooks.
During the pilot, review sync logs every day or at least several times a week. Watch for:
- failed connections
- missing or unmapped items, customers, or accounts
- slow sync times
- rejected transactions, such as a cycle count adjustment for a non-inventory item
Keep a simple issue tracker with the error, the root cause, and the fix. That log gives you a plain view of what keeps breaking and what still needs cleanup before full rollout.
It also helps to get feedback from both warehouse staff and accounting while the pilot is running. Warehouse users may point out rough spots, like sync confirmation steps that aren’t clear. Your bookkeeper may spot odd postings to suspense accounts. That’s exactly what this phase is for: catching the friction while the scope is still small.
3. Plan the Cutover and Go Live With Low Disruption
Once your pilot shows the sync is clean, it’s time to move from test to production. That switch is your cutover. The goal is simple: keep it short, do it during a slow period, and control each step closely.
Choose the Cutover Date and Freeze Key Changes
Pick a time when sales and warehouse work are naturally quiet. For many small teams, Friday evening after shipping is done or early Sunday morning before work starts back up is a solid fit. Check the last few weeks of QuickBooks sales reports to see which days and hours are slowest. Stay away from payroll, month-end close, and big promotions.
Set aside a 2–4 hour block just for cutover. During that time, pause new items, manual quantity changes, and outside imports. Let the team know at least a week in advance so no one gets caught off guard.
After the window is locked in, reconcile your opening balances before production goes live.
Reconcile Opening Quantities and Inventory Value
Before cutover, pull an Inventory Valuation Summary and an item quantity report from QuickBooks Desktop as of the cutover timestamp. Export item quantities and inventory asset values to a spreadsheet, then compare them line by line with the inventory software’s opening stock. Mark every quantity mismatch or valuation gap over $5.00. Those are the items you need to fix.
Most gaps come from item naming issues, unit differences, or entries posted late. For each mismatch, post a one-time inventory adjustment with a clear memo, such as "Cutover adjustment 09/09/2026 8:00 AM – reconcile to inventory system counts". That gives you a clean audit trail from the start. If the total gap is more than 1–2% of your Inventory Asset balance, have a CPA or controller review it before you proceed.
Those figures are your last checkpoint before you open the live system.
Use a Simple Cutover Checklist
Keep the checklist short. Give each task to one person and assign a target time. That way, nothing slips through the cracks.
| Step | Task | Owner | Cutover Time |
|---|---|---|---|
| 1 | Back up QuickBooks Desktop company file and confirm it is stored securely | Accounting lead | 09/09/2026 8:00 AM |
| 2 | Confirm item, customer, and vendor mappings are final | Implementation lead | 09/09/2026 8:15 AM |
| 3 | Lock prior periods and block back-dated transactions | Accounting lead | 09/09/2026 8:20 AM |
| 4 | Post one small live receipt and shipment to verify sync | Operations lead | 09/09/2026 9:00 AM |
| 5 | Review sync logs and confirm no errors or unmapped records | Implementation lead | 09/09/2026 9:30 AM |
| 6 | Hold a brief go-live huddle; give team the all-clear | Team lead | 09/09/2026 10:00 AM |
If you want a dry run first, Rapid Inventory's training and onboarding can help your team practice a mock cutover before go-live.
Once cutover is done, you can move into phased receiving, counting, picking, and shipping.
4. Start Daily Operations and Keep QuickBooks in Sync
With cutover done and the all-clear in place, the job changes. You're no longer setting things up. You're running the day-to-day. And those first two weeks matter a lot because that's when people settle into habits, for better or worse. So keep the rollout tight, simple, and easy to repeat.
Roll Out Receiving, Counting, Picking, and Shipping in Phases
The first two weeks set the pace, so don't try to do everything at once.
In week 1, send new purchase orders through the software. Receive against POs with barcode scanners, confirm quantities and bin locations, and post receipts to QuickBooks Desktop. Keep shipping limited to straightforward orders, and keep picking simple too - single-order picks from easy-to-find locations. The goal here is plain: let the team get used to the screens and scanners without adding extra friction.
In week 2, start daily cycle counts for high-value or fast-moving SKUs. Reconcile any variances the same day. If the basics are running cleanly, then add FIFO/FEFO or wave picking. Not before.
For each workflow, keep a short SOP - about 1 to 2 pages - with screenshots posted near the workstation. That saves time and cuts down on avoidable mistakes.
Once these workflows are running cleanly, move attention to daily log review and weekly valuation checks.
Monitor Reconciliations, Sync Logs, and Ownership Rules
Assign one person to review sync logs every day for failed, skipped, or duplicated transactions. When something breaks, fix the root cause first, then run the batch again. If duplicates hit QuickBooks, reverse them right away so the books stay clean. Common causes are inactive customers, missing item mappings, closed QuickBooks periods, or network interruptions during sync.
Pair that with a weekly inventory valuation check. Confirm that the total inventory asset in QuickBooks matches the valuation in the inventory software, while allowing for timing differences from open POs or undeposited receipts. Rapid Inventory's cycle count variance reports can help tie physical counts back to system quantities and send approved adjustments into QuickBooks. It also helps to keep a simple reconciliation log with the date, items checked, issues found, and corrections made. That way, recurring problems - like repeat receiving errors - stand out fast.
Steady daily operations need clear ownership. Keep financial and master data in QuickBooks Desktop. Keep warehouse transactions in the inventory software.
A simple split looks like this:
- Create new items, base pricing, account mappings, and classes in QuickBooks first, then sync them to the inventory tool.
- Handle receiving, transfers, picking, shipping, and cycle counting in the inventory software, then push those transactions back to QuickBooks.
- Base quantity adjustments on physical counts, and for high-value items, get approval from someone with accounting responsibility before posting them.
- Make location and bin changes in the inventory system.
- If someone enters a transaction in QuickBooks by mistake, fix it there right away.
Conclusion: 5 Steps That Make Launch Smoother
- Prepare QuickBooks and clean data.
- Connect and map carefully.
- Test two-way sync with real workflows.
- Plan a controlled cutover.
- Use simple daily controls after go-live.
FAQs
What should I do if sync creates duplicate items or vendors?
Start by auditing both platforms so names, spaces, and initials match exactly. Even a small mismatch can trip things up. If you spot duplicates, rename the conflicting records in the external platform so they line up with QuickBooks. In some cases, that change may trigger a merge.
For document number conflicts, use the Transaction ID from your error log to locate the duplicate record in QuickBooks and remove it. Before you merge or delete anything, double-check the details to avoid losing data.
How do I decide which transactions belong in QuickBooks versus the inventory system?
Use QuickBooks Desktop for accounting and top-level inventory data. Use Rapid Inventory for detailed, real-time warehouse work.
With two-way sync, actions in Rapid Inventory - like receiving, picking, barcode scanning, and multi-location transfers - update QuickBooks Desktop automatically. That means your warehouse team can work in the tool built for day-to-day floor activity, while accounting still stays current.
For mixed orders, split the workflow in QuickBooks like this:
- Use Sales Receipts for items that are in stock
- Use Sales Orders for items that are backordered
It’s a simple setup: QuickBooks Desktop handles the books, and Rapid Inventory handles what’s happening in the warehouse right now.
What should I check first if inventory value doesn’t match after go-live?
First, run the Inventory Valuation Summary report in Reports > Inventory and compare the QuickBooks numbers with your actual stock on hand.
Then make sure your QuickBooks settings line up with the setup requirements. After that, review activity logs for sync errors or failed transactions, and check for common problems like:
- Negative quantities on hand
- Incorrect journal entries
- Mapping errors



