

If you use QuickBooks Desktop Enterprise with Advanced Inventory, you can track each lot from receipt to sale, check what is on hand by site, and flag lots near expiration. That is the core answer.
Here’s the short version:
- I need QuickBooks Desktop Enterprise Platinum or Diamond
- I must turn on Advanced Inventory and Lot Numbers
- I need to enter lot numbers on bills, item receipts, invoices, sales orders, builds, and adjustments
- QuickBooks includes 5 built-in lot reports
- Those reports help with recalls, expiry checks, and warehouse stock checks
That matters because lot tracking is only useful when data is entered the same way every time. If even one step is skipped, reports can come up blank, partial, or wrong.
If you need more robust features than the built-in tools, you can try Rapid Inventory for free to see how it handles complex workflows. A few points stand out:
- 5 built-in reports sit under Reports > Inventory
- Expiration reporting only works if expiration dates are turned on
- Site-based lot reporting depends on multi-site inventory setup
- A custom LOT field is only a label, not quantity tracking
QuickBooks Enterprise: How to Setup and Use Lot Numbers for Advanced Inventory Tracking Like a Pro!

sbb-itb-19ed50f
Quick Comparison
| Report | What I use it for | Main fields |
|---|---|---|
| Inventory Stock Status by Lot Number | Check on-hand, committed, and open stock | Qty On Hand, Sales Order Qty, Qty Available |
| Lot Numbers in Stock | See which lots are still in stock | Item, Lot Number, Quantity, Expiration Date |
| Lot Numbers in Stock by Site | Check stock by warehouse or site | Site, Bin, Lot Number, Quantity |
| Transaction List by Lot Number | Trace every transaction for one lot | Date, Type, Ref No., Item, Lot Number |
| Inventory Expiration Status | Find expired or near-expired lots | Expiration Date, Days Left to Expire |
In plain terms: if I want clean lot reports in QuickBooks Desktop, I first turn on tracking, then enter lot numbers on every inventory move, then use the report that matches the job.
Set Up QuickBooks Desktop for Lot Number Reporting
How to Set Up & Run Lot Number Reports in QuickBooks Desktop
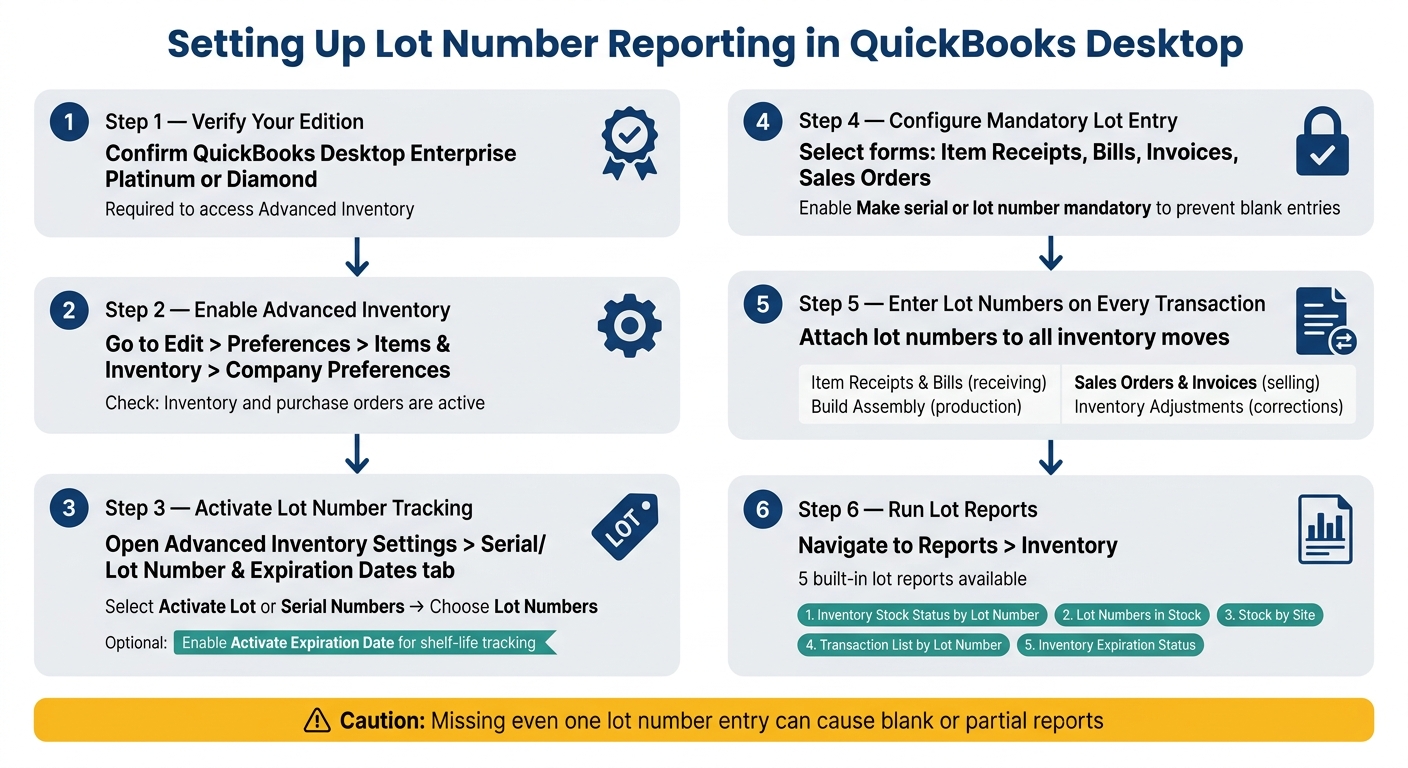
Lot reports only work if two things happen: tracking is turned on and lot numbers are entered the same way every time. Miss either one, and your reports may show up blank or only partly filled in. After tracking is on, each inventory transaction needs the correct lot number attached to it.
Turn On Advanced Inventory and Lot Number Tracking
Go to Edit > Preferences > Items & Inventory > Company Preferences. First, make sure Inventory and purchase orders are active is checked. Then open Advanced Inventory Settings and click the Serial/Lot Number & Expiration Dates tab. Select Activate Lot or Serial Numbers, and then choose Lot Numbers.
Next, pick the forms that should display the lot number field, like Item Receipts, Bills, Invoices, and Sales Orders. You can also switch on Make serial or lot number mandatory. That setting stops users from saving a transaction without lot data, which helps keep reports accurate. If you also track shelf life, turn on Activate Expiration date in that same tab.
If Advanced Inventory Settings is grayed out even though you have Platinum or Diamond, go to Help > Manage my License > Sync License Data Online to refresh your subscription status.
Enter Lot Numbers on Purchasing, Sales, and Adjustment Transactions
Lot reports are only as good as the entries behind them. You need to enter lot numbers on Item Receipts and Bills when stock comes in, on Invoices and Sales Orders when items are sold, during Build Assembly transactions, and in inventory adjustments when you fix counts or assign lots to stock already on hand.
| Transaction Type | Where to Enter the Lot # | Key Data for Reports |
|---|---|---|
| Item Receipts and Bills | At receiving | Qty, Cost ($), Lot #, Date (MM/DD/YYYY) |
| Sales Orders and Invoices | At point of sale | Qty, Rate ($), Lot #, Date (MM/DD/YYYY) |
| Build Assembly transactions | During production | Component Lot #s, Finished Good Lot # |
| Inventory Adjustment | Set Adjustment Type to Lot Number | New Count, Lot #, Adjustment Date |
If you already had inventory on hand before lot tracking was turned on, use Adjust Quantity/Value on Hand and set Adjustment Type to Lot Number. That gives you a way to assign lot numbers to existing stock so it shows up the right way in Lot Numbers in Stock reports.
With clean lot data in place, the report section can now show stock, site, and expiration status.
Run the Main Lot Number Reports in QuickBooks Desktop
Once your lot numbers are entered the right way, these reports help you check stock, trace movement, and stay on top of expiration. You’ll find all five built-in lot reports under Reports > Inventory. Each one does a different job, so it helps to pick the report that fits what you’re trying to check.
| Report Name | Primary Purpose | Best Use Case |
|---|---|---|
| Inventory Stock Status by Lot Number | Review on-hand, committed, and available quantity by lot | Daily fulfillment planning |
| Lot Numbers in Stock | Confirm lots currently on hand | Quick on-hand lot lookup |
| Lot Numbers in Stock by Site | See on-hand lots by warehouse site | Multi-site inventory checks |
| Transaction List by Lot Number | Shows every transaction tied to a selected lot | Recalls and audit trails |
| Inventory Expiration Status | Identify expired and lots nearing expiration | Expiration control and FEFO decisions |
Inventory Stock Status by Lot Number
Go to Reports > Inventory > Inventory Stock Status by Lot Number to view inventory grouped by lot. This is the report to use when you want to compare what’s on hand, what’s already committed, and what’s still open for new orders.
The key columns are Qty On Hand, Sales Order Qty, and Qty Available. Together, they show how much stock is still available to sell or allocate.
If you also track expiration dates, you can add columns like Expiration Date and Site to get a better view of both timing and location.
Lot Numbers in Stock, Lot Numbers in Stock by Site, and Transaction List by Lot Number
Lot Numbers in Stock is the quick-check report. Use it to confirm which lots are still on hand and to verify inventory adjustments. It includes Item, Lot Number, Quantity, and Expiration Date.
Lot Numbers in Stock by Site builds on that view by adding Site, Bin Location, and Expiration Date. That makes it easier to see exactly where each lot is stored, which matters a lot when you’re checking stock across more than one warehouse.
Transaction List by Lot Number is your trace-back report. Pick an item and a lot number, and QuickBooks shows every linked transaction, including bills, invoices, adjustments, and assemblies. You’ll see columns such as Date, Transaction Type, Ref No., Item, Lot Number, and Quantity.
This report is especially useful for recalls and audit work because it helps you confirm which supplier lot ended up on which customer order. If you need more detail, double-click any row to open the original transaction.
Inventory Expiration Status
If expiration dates are turned on, check aging lots before you plan shipments. Open Reports > Inventory > Inventory Expiration Status to find expired lots and lots that are getting close to expiration.
The report shows Expiration Date and Days Left to Expire, which helps you move the right stock first under FEFO.
If the report comes up blank, check two things: Activate Expiration date must be turned on in the Serial/Lot Number & Expiration Dates tab of Advanced Inventory Settings, and expiration dates must already be entered for those lots.
Customize Reports and Extend Lot Visibility with Rapid Inventory
Use custom reports when the built-in lot reports don't go far enough for a traceability or planning task.
Build Custom Lot Reports with Filters, Columns, and Excel Exports
Start at Reports > Custom Reports > Transaction Detail. In the Display tab, add the Lot Number and Item columns. Then open the Filters tab and narrow the results by item, lot number, date range, or transaction type.
For example, if you're tracing a manufactured batch, filter for Build Assembly transactions. That gives you a tighter view of what happened to that lot.
When the report is set up the way you want, click Memorize so you can use it again later. If you need quantity rollups across lots or sites, export the report to Excel.
Use Custom Fields When Native Lot Tracking Is Not Available
If Advanced Inventory isn't available, create a custom field called LOT and enter lot identifiers by hand. This works for labeling, but that's the catch: a LOT custom field does not track lot quantities.
Use Rapid Inventory for Web-Based Lot Reporting and Warehouse Execution
If you need reporting that connects straight to warehouse activity, Rapid Inventory gives you live lot visibility.
| Option | Purpose | Update Timing | Location Detail | Operational Use |
|---|---|---|---|---|
| QuickBooks Desktop built-in lot reports | Financial and inventory reporting inside QuickBooks Desktop | Updates as transactions are entered | Site-level detail based on QuickBooks setup | Reporting, traceability, stock review |
| Rapid Inventory lot dashboards | Web-based lot visibility and warehouse execution tied to QuickBooks Desktop | Real-time visibility within Rapid Inventory with two-way QuickBooks sync | Multi-location and warehouse-level detail | Barcode-driven receiving, picking, cycle counts, and lot-level operational control |
Rapid Inventory adds web-based lot dashboards, barcode-driven warehouse workflows, and two-way sync with QuickBooks Desktop.
Use Lot Reports for Recalls, Expiration Control, and Multi-Site Planning
Pick the report based on the job at hand: recalls, expiration control, or multi-site planning.
Once these reports are set up, you can use them for three common inventory decisions.
Recall and Customer Trace-Back Workflow
When a recall hits, time is everything. Go to Reports > Inventory > Transaction List by Lot Number, select the affected item and lot, and follow that lot from receiving through shipment. If the lot was used in a finished good, Build Assembly entries show which final products include it.
Expiration and Fulfillment Workflow
If the stock isn’t under recall, the focus shifts to expiry planning. Use Inventory Expiration Status to find the lots that will expire first. Then check Inventory Stock Status by Lot Number to see what’s available and what’s already committed.
Used together, these reports help your team push near-expiry stock out first, before it turns into waste.
Rapid Inventory adds FEFO picking, mobile barcode scanning, and live inventory reporting. That makes it easier for warehouse teams to pull the soonest-to-expire lot first instead of stopping to check a manual report.
Multi-Warehouse Inventory Planning Workflow
When location matters more than timing, move to site-level planning. Use Lot Numbers in Stock by Site to spot imbalances between sites, then transfer stock before it expires.
Rapid Inventory also adds web-based multi-location and warehouse tracking with two-way QuickBooks sync, so lot visibility stays current across sites.
FAQs
Why are my lot reports blank?
Blank lot reports usually mean lot number tracking wasn’t turned on or wasn’t used when those transactions were entered.
Check that Lot Number tracking is enabled in Edit > Preferences > Items & Inventory > Advanced Inventory Settings.
If items were added without lot numbers, they won’t show up in lot reports. In that case, you can update your current inventory with the Adjust Quantity/Value on Hand tool.
Can I add lot numbers to existing inventory?
Yes. In QuickBooks Desktop, go to the Inventory menu and use Adjust Quantity/Value on Hand. Then choose Lot Number as the Adjustment Type.
From there:
- Select the item
- Enter the existing lot number
- Add the quantity on hand
- Save the adjustment
After that, run the Lot Numbers in Stock report to make sure the entry appears correctly.
Which lot report should I use?
Choose the report that matches what you need:
- Inventory Stock Status by Lot Number: shows current availability, expiration dates, and lets you filter items
- Transaction List by Lot Number: useful for recalls, assembly usage, purchasers, and suppliers
- Lot Numbers in Stock or Lot Numbers in Stock by Site: shows current on-hand quantities, including amounts by location
- Inventory Expiration Status: shows expired lots, lots that will expire soon, and the number of days until expiration



