
QuickBooks Desktop Enterprise (Platinum and Diamond editions for 2023 and 2024) offers tools to track lot numbers and expiration dates, helping businesses in industries like food, pharmaceuticals, and chemicals manage inventory efficiently. These features ensure compliance, reduce errors, and support better inventory management with reports like Inventory Expiration Status and Inventory Stock Status by Lot Number. Here's how it works:
- Lot Numbers & Expiration Dates: Enable tracking to monitor batches and avoid selling expired items.
- Setup Requirements: Use Advanced Inventory with an active subscription. Choose between lot or serial number tracking.
- Customizable Settings: Configure forms (e.g., invoices, receipts) to display and require lot numbers and expiration dates.
- Assigning Details: Add lot and expiration data when receiving inventory or update existing stock.
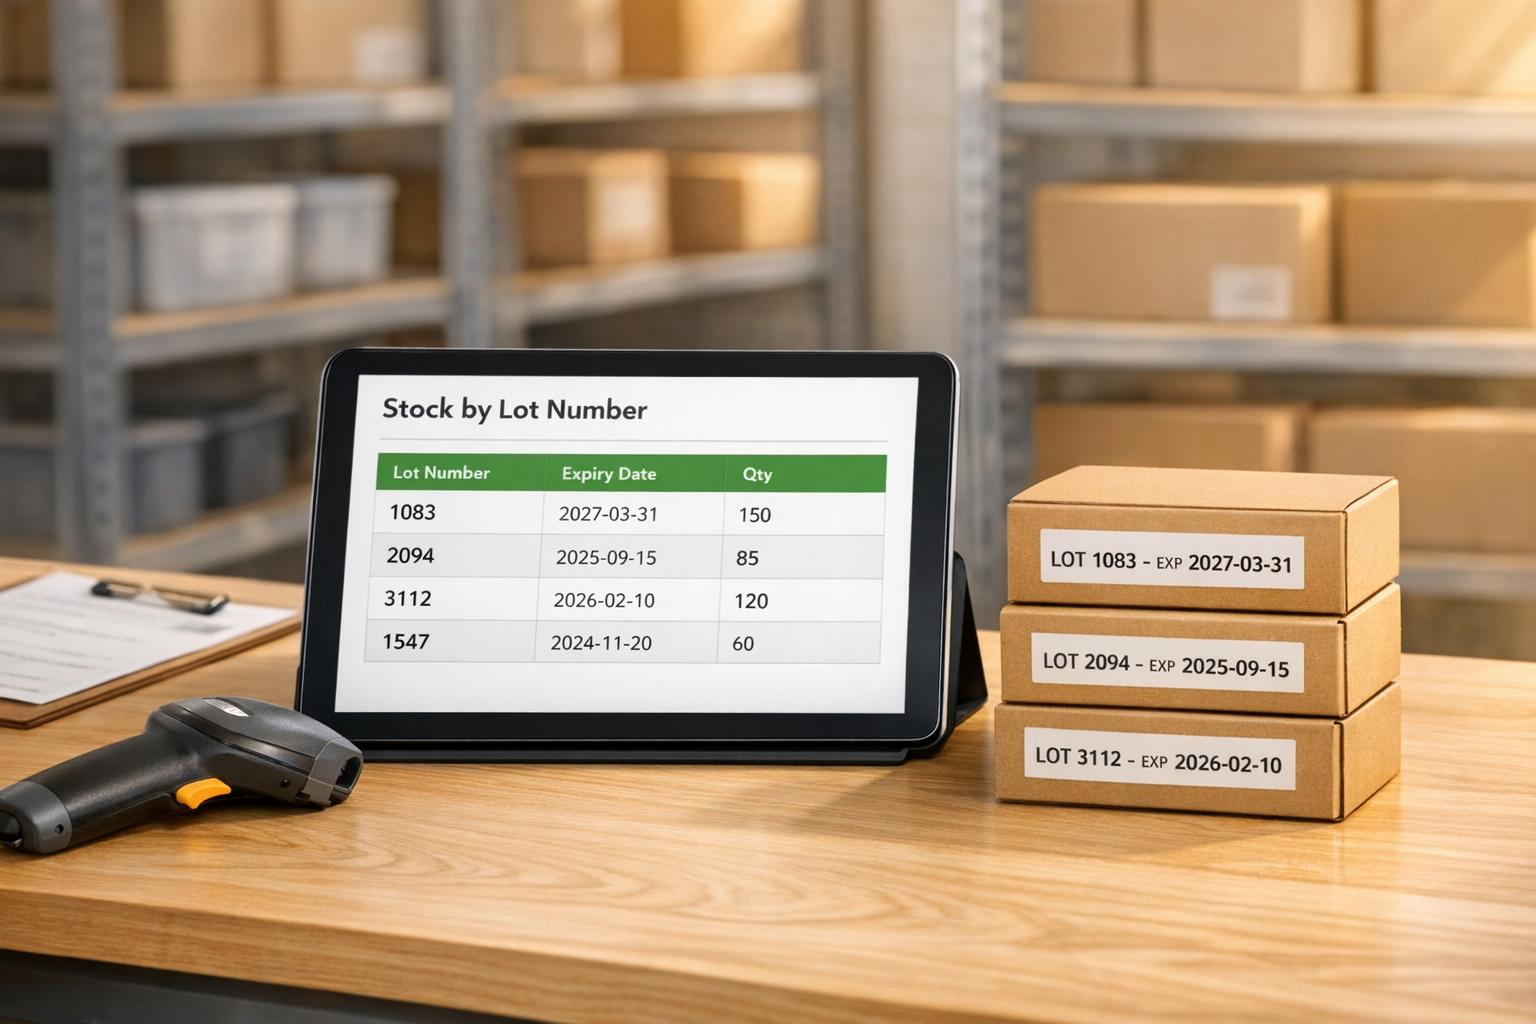
- Reports: Use tools like the Inventory Expiration Status report to track expiring items and prioritize sales.
For businesses with complex needs, Rapid Inventory integrates advanced features like barcode scanning, FEFO/FIFO strategies, and multi-location tracking, syncing seamlessly with QuickBooks Desktop.
This combination simplifies inventory management, ensuring accuracy and reducing waste.
QuickBooks Enterprise: How to Setup and Use Lot Numbers for Advanced Inventory Tracking Like a Pro!
sbb-itb-19ed50f
How to Set Up Lot Number and Expiration Date Tracking in QuickBooks Desktop
QuickBooks Lot Number and Expiration Date Tracking Setup Guide
What You Need Before Starting
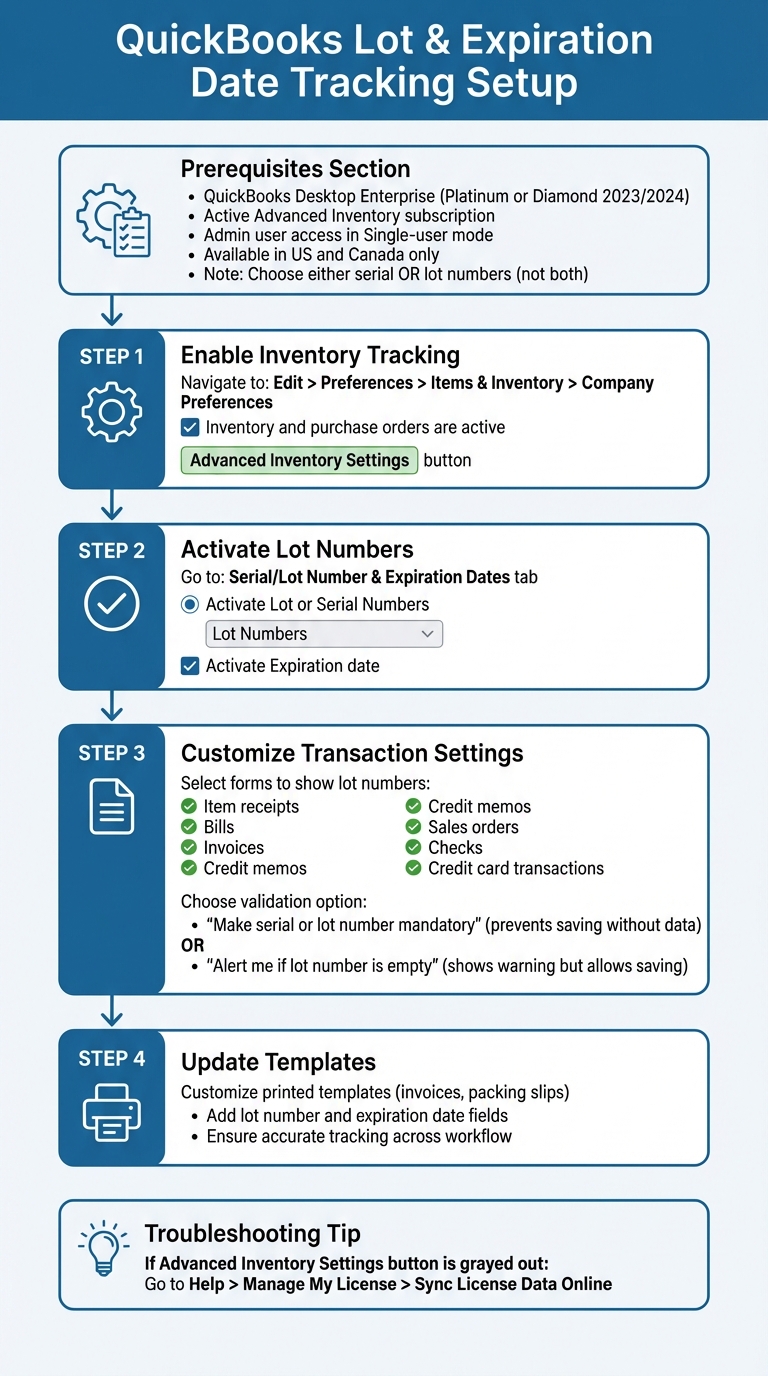
To begin tracking lot numbers and expiration dates, you'll need QuickBooks Desktop Enterprise with an active Advanced Inventory subscription. This feature is available only in the Platinum or Diamond editions (2023 and 2024).
Currently, expiration date tracking is supported for users in the US and Canada. Keep in mind, QuickBooks allows tracking of either serial numbers or lot numbers - not both. For batch-based products like food or pharmaceuticals, choose lot numbers.
Before making changes, log in as the Admin user and switch to Single-user mode. If the Advanced Inventory Settings button is grayed out, go to Help > Manage My License > Sync License Data Online to refresh your license.
The steps below assume you've met these initial requirements.
How to Turn On Lot and Expiration Date Tracking
Once you're ready, follow these steps to enable inventory tracking with inventory management software for QuickBooks Desktop:
- Go to Edit > Preferences > Items & Inventory > Company Preferences.
- Check the box for "Inventory and purchase orders are active".
- Click the Advanced Inventory Settings button.
- In the Serial/Lot Number & Expiration Dates tab, select "Activate Lot or Serial Numbers" and choose "Lot Numbers" from the dropdown menu.
- Enable expiration date tracking by checking the box for "Activate Expiration date".
How to Customize Transaction Settings
Once tracking is activated, you can customize how lot numbers and expiration dates appear on your transactions. In the Advanced Inventory Settings window:
- Under "Show serial or lot number in," select the forms where these fields should appear, such as item receipts, bills, invoices, credit memos, sales orders, checks, and credit card transactions.
- To ensure accuracy, select "Make serial or lot number mandatory" for critical transaction types. This prevents users from saving transactions without the required details. Alternatively, you can choose "Alert me if lot number is empty" to display a warning while still allowing the transaction to be saved.
After saving these settings, update your printed templates - like invoices and packing slips - to include lot numbers and expiration dates. This ensures accurate inventory tracking across your entire workflow.
How to Assign Lot Numbers and Expiry Dates to Your Inventory
With lot and expiration date tracking turned on, you can assign detailed information to both new and existing inventory.
Adding Lot Numbers and Expiry Dates to New Stock
When receiving new inventory, you can assign lot numbers and expiration dates directly. Go to Inventory > Receive Items, and input the lot number and expiration date in the designated columns on the transaction form. This step helps you track your inventory accurately from the start.
Updating Lot Numbers for Existing Inventory
For inventory already in your system, you can update or add lot details using the Adjust Quantity/Value on Hand tool. Set the Adjustment Type to Lot Number, select the item, and input the lot number along with the updated quantity . If you need to modify an expiration date for an existing lot, open the adjustment window, choose the lot number, and enter the new expiration date. Confirm your changes by selecting Yes, update.
If you need to fix an incorrect lot number, adjust the old lot quantity to zero, then create a new entry with the correct lot number and quantity. Once your changes are complete, run the Lot Numbers in Stock report to ensure your records align with your physical inventory .
How to Use Lot Numbers and Expiry Dates in Transactions
When you enable lot tracking, fields for lot numbers and expiration dates automatically show up on purchase and sales forms. This feature helps you track inventory from the moment it’s received until it’s sold.
Entering Lot Numbers When Purchasing Inventory
When you receive new inventory, make sure to enter the lot details in the transaction form. Here’s how:
- Navigate to Inventory > Receive Items > Bill Received.
- In the Items tab, select the items you’re receiving, input the quantity, and fill in the Lot Numbers and Expiration Dates columns.
QuickBooks integrates these fields into various transaction types, including Item Receipts, Bills, Checks, and Credit Card Transactions. This ensures your lot tracking stays consistent across all inventory-related activities.
Choosing Lots When Creating Sales Transactions
Once your inventory is recorded, you’ll need to assign specific lots during sales transactions. Here’s what to do:
- When creating an Invoice, Sales Order, or Sales Receipt, select the lot you want to sell.
- In the Item column, choose your inventory item, enter the quantity, and use the Lot Number dropdown to pick from the available lots.
This process is particularly helpful for managing stock that’s close to its expiration date. QuickBooks emphasizes:
You can pick specific serial or lot numbers based on expiration and sell the stock that's soon to expire. As you get items, you can stop stock from going bad.
Before completing sales transactions, it’s a good idea to run the Inventory Stock Status by Lot Number report. This will confirm the available quantities for each lot. If you want lot numbers to appear on printed invoices or sales orders, customize your transaction templates to include the Lot Number column.
How to Track and Report on Lot Numbers and Expiry Dates
Keeping tabs on lot numbers and expiration dates is crucial for managing inventory effectively. QuickBooks Desktop Enterprise simplifies this process with specialized reports that provide a clear view of expiring products and current stock levels. To access these features, you'll need QuickBooks Desktop Enterprise Platinum or Diamond (2023 or later) with Advanced Inventory turned on.
Using the Inventory Expiration Status Report
The Inventory Expiration Status report is your go-to tool for monitoring expiration dates across your inventory. It lists all lots or serial numbers, their expiration dates, and the remaining days before they expire. You can find this report by navigating to Reports > Inventory > Inventory Expiration Status.
Filters make this report even more actionable. Options like "All items," "Already expired items," "Yet-to-expire items," or a "Custom date range" allow you to tailor the data to your needs. The "Yet-to-expire items" filter is especially useful for pinpointing products that need to be sold soon to avoid waste.
For accurate reporting, ensure the "Make serial or lot number mandatory" setting is enabled. This ensures all expiration data is recorded and included in your reports.
Using the Inventory Stock Status by Lot Number Report
For a detailed look at inventory levels tied to specific lot numbers, the Inventory Stock Status by Lot Number report is invaluable. Access it through Reports > Inventory > Inventory Stock Status by Lot Number.
This report provides a breakdown of your inventory by lot number, displaying key details such as Item name, Lot number, Quantity on Hand, Quantity on Sales Order, and Quantity Available. You can also use the "Customize Report" filter to locate specific lot numbers quickly. This is particularly helpful when verifying stock availability before processing sales or organizing stock rotation.
| Report Name | Purpose | Key Data |
|---|---|---|
| Inventory Expiration Status | Tracks expiration timelines | Lot/Serial Number, Expiration Date, Days Left to Expire |
| Inventory Stock Status by Lot Number | Monitors stock levels by lot | Item, Lot Number, Qty on Hand, Qty on Sales Order, Qty Available |
These reports make it easier to verify inventory and plan for efficient stock rotation, ensuring your business stays on top of its inventory management game.
Advanced Lot and Expiration Date Tracking with Rapid Inventory
Rapid Inventory takes QuickBooks Desktop's lot and expiration tracking capabilities to the next level, offering advanced tools tailored for businesses with complex inventory needs. These tools streamline operations and provide greater control over inventory management.
Lot and Expiry Tracking Features in Rapid Inventory
Rapid Inventory integrates FEFO (First Expired, First Out) and FIFO (First In, First Out) strategies, ensuring stock is prioritized correctly. FEFO is especially critical for industries like food, supplements, and chemicals, where selling items before they expire is essential.
With mobile barcode scanning, manual errors during receiving, picking, and transferring are significantly reduced. Staff can easily verify lot numbers, items, and quantities. The system also creates optimized pick lists, guiding employees through the warehouse efficiently while pinpointing the exact location of lot-numbered inventory.
The platform syncs seamlessly with QuickBooks Desktop (Enterprise, Pro, and Premier) through a web connector. This two-way synchronization keeps items, orders, and inventory actions updated in real time, enabling multi-location tracking and detailed reporting.
For businesses managing inventory across multiple warehouses, Rapid Inventory's multi-location tracking feature is a game-changer. It allows precise monitoring of lot-controlled inventory across various warehouses and even specific areas within those facilities. Real-time reports provide clear insights into inventory levels, value, and activity logs that include lot and expiration details.
"Rapid Inventory helps us run our warehouse operations. Easy to use and reliable. Using it since 2015, we especially love the barcode scanning and mobile picking and we've implemented it for all our warehouse operations" - Fernanda C, Director of Operations
The onboarding process is straightforward and typically completed in just 7 days. It includes professional services valued at $2,100, covering setup, data migration, and staff training. With over 17 years of experience and more than 400 customers, Rapid Inventory has built a strong reputation for reliability.
Rapid Inventory Pricing Plans
Rapid Inventory offers flexible pricing to match the needs of businesses of different sizes.
- The Pro Plan costs $90/user/month and is designed for teams of 1–9 users. It includes lot, serial, and expiration tracking, barcode scanning, real-time reporting, and white-glove onboarding services.
- For larger teams, the Unlimited Plan is priced at $900/month. This plan includes all Pro Plan features and adds unlimited users, custom inventory reports (valued at $2,000), a dedicated account manager, and priority support.
Both plans support unlimited warehouse and location tracking, with no cap on the number of items managed, ensuring scalability as your business grows.
Conclusion
Efficient lot and expiration tracking in QuickBooks Desktop, combined with Rapid Inventory, can reshape how you handle inventory management.
QuickBooks Desktop provides basic tools for tracking inventory, including lot numbers and expiration dates. However, achieving smooth and efficient operations often demands more advanced warehouse management.
That’s where Rapid Inventory comes in. While QuickBooks Desktop focuses on accounting, Rapid Inventory enhances warehouse workflows with features like mobile barcode scanning, automated FEFO/FIFO strategies, and smarter routing. Its automatic two-way sync ensures that data is entered once and updated across the system, cutting down on duplicate entries.
For businesses dealing with perishable goods or managing lot-tracked inventory across multiple locations, this integration offers real-time visibility and 100% picking accuracy. It seamlessly connects accounting and warehouse processes, ensuring accurate lot selection and better stock management.
With over 17 years of experience and more than 400 satisfied customers, the integration of QuickBooks Desktop - whether you use Enterprise, Pro, or Premier - and Rapid Inventory has proven dependable for businesses needing both financial accuracy and operational efficiency. This partnership simplifies processes and helps reduce errors.
The outcome? Better control, fewer mistakes, and smoother operations.
FAQs
Can I track lot numbers and serial numbers at the same time?
QuickBooks Desktop Enterprise with Advanced Inventory allows you to track lot numbers, serial numbers, or expiration dates, but it’s important to note that you can only enable one tracking method at a time. To set this up, navigate to Preferences > Items & Inventory > Company Preferences, and then activate your preferred tracking method under Advanced Inventory Settings.
If you need to manage both types of data simultaneously, consider using third-party tools designed to handle this effectively.
What should I do if the Advanced Inventory Settings button is grayed out?
If the Advanced Inventory Settings button is grayed out in QuickBooks Desktop, you might need to sync your license data. Here's how:
- Navigate to Help > Manage My License > Sync License Data Online.
- Once the sync is complete, close QuickBooks and reopen it to see if the issue is fixed.
If the problem continues, double-check that your license includes the Advanced Inventory feature and that your version of QuickBooks supports it.
How do I rotate inventory by expiration date in QuickBooks?
If you're using QuickBooks Desktop Enterprise (Platinum or Diamond versions for 2023/2024), you can track inventory by expiration date. Here's how:
- Enable Expiration Date Tracking: Make sure this feature is turned on in your system.
- Assign Expiration Dates: When you receive or sell items, assign expiration dates to keep everything organized.
- Use Reports for Management: Reports like Inventory Stock Status by Lot Number let you group items by lot and expiration date, making it easier to prioritize older stock.
For added efficiency, consider using tools like Rapid Inventory. It integrates barcode scanning and real-time updates, simplifying the entire process.


