
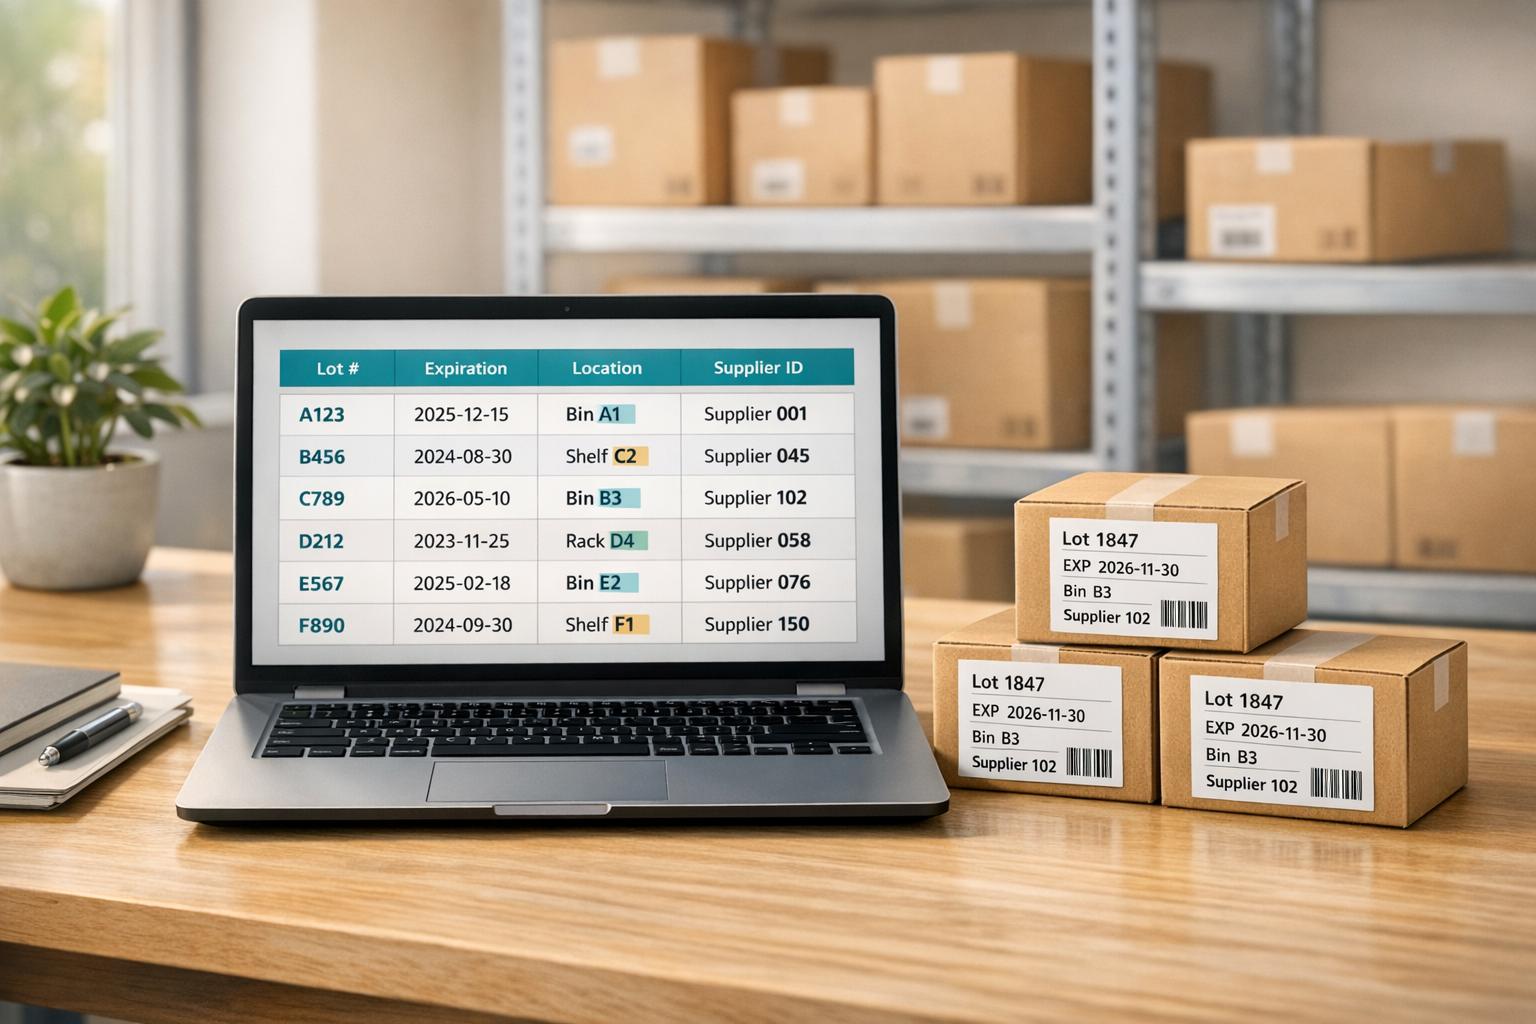
QuickBooks Desktop’s custom fields can transform your inventory tracking. They let you store and use details like lot numbers, expiration dates, storage locations, supplier IDs, and more - data that standard fields don’t cover. These fields integrate into sales forms and reports, giving you better organization and accuracy in managing stock. Whether you’re tracking perishable goods, managing supplier relationships, or organizing inventory by storage bins, custom fields offer flexible options to streamline workflows and improve decision-making.
Key takeaways:
- Lot numbers and expiration dates: Helps industries like food and supplements manage stock rotation and reduce waste.
- Storage locations: Enables precise tracking of items across aisles, shelves, or bins.
- Supplier IDs: Simplifies vendor management and improves ordering processes.
- Advanced reporting: Custom fields enhance reports, allowing targeted insights like filtering by product categories or expiration status.
- Integration with tools: Sync with systems like Rapid Inventory for barcode scanning and advanced workflows.
QuickBooks Desktop Enterprise users benefit from built-in features like serial/lot tracking and expiration date workflows, while Pro and Premier users can manually create fields for similar functionality.

QuickBooks Desktop Custom Fields Comparison: Pro/Premier vs Enterprise Features
Customize QuickBooks With Items Custom Fields
sbb-itb-19ed50f
How Custom Fields Improve Inventory Tracking
Custom fields turn QuickBooks Desktop into more than just an accounting tool - they make it a inventory management system for QuickBooks Desktop. These fields let you record details that standard fields can't, such as which warehouse stores specific products, supplier IDs, or batch-specific expiration dates.
But the benefits go beyond just storing extra data. Custom fields supercharge your reporting capabilities. On Windows, you can use them as searchable columns in the Report Center's Display tab, while on Mac, they work as report filters. This means you can quickly narrow down transaction lists to focus on specific values, like a product category or a batch number.
When added to sales forms like invoices or purchase orders, custom fields enhance transaction visibility by including key inventory details. For industries like food or supplements, tracking expiration dates for the same SKU helps ensure proper stock rotation and minimizes waste.
Custom fields also make it easier to categorize products. You can group items by manufacturer, material type, or other attributes unique to your business. This not only makes your Item List easier to navigate but also speeds up decision-making when analyzing or locating specific inventory segments.
Common Uses for Custom Fields in Inventory Management
Custom fields offer tailored solutions for inventory challenges across various industries, enhancing both tracking and reporting. For instance, food distributors and supplement manufacturers often use custom fields to manage expiration dates for specific batches. This ensures that products are sold before they expire, especially when the same SKU is received in multiple shipments, each requiring separate expiry monitoring.
Another popular application is lot and serial number tracking. With QuickBooks Desktop Enterprise 2023 or later, Advanced Inventory features allow businesses to track inventory using serial numbers, lot numbers, and expiration dates. As Trish_T from the QuickBooks Team explains, "Before you can track inventory with serial numbers, lot numbers, and expiration dates you'll need to turn on Advanced Inventory". Companies rely on custom fields to manage batches or individual units, which is crucial for quality control and product recalls.
Custom fields are also essential for tracking product attributes like color, size, or material type when standard fields fall short. For example, a clothing retailer might use custom fields to distinguish between different colors of the same shirt style, while a hardware supplier could track material composition or weight specifications.
When it comes to supplier information, custom vendor fields help businesses organize details like Supplier IDs or vendor-specific codes. This simplifies ordering processes and allows for quick identification of which suppliers provide specific products. Filtering reports by supplier or identifying preferred vendors becomes much easier with this setup.
Custom fields also streamline operations by addressing storage locations, minimum stock levels, and reorder points. For example, fields can specify warehouse locations, making it easier for staff to locate items quickly. In Enterprise versions, these fields can be configured as "Text and number", "Number only", "Date", or "Dropdown lists", ensuring consistent data entry. For businesses managing complex inventory workflows, tools like Rapid Inventory can integrate with these custom fields to enable advanced tracking across multiple locations.
1. Custom Field for Lot Numbers
Improves Inventory Tracking Accuracy
Tracking lot numbers takes inventory management to the next level by offering batch-level visibility instead of just SKU-level. This means you can identify not only what items are in stock but also which specific batches they came from. For industries like food, supplements, or chemicals, this level of detail is crucial for maintaining quality standards and staying compliant with regulations.
QuickBooks Desktop makes it easy to enforce lot number tracking by allowing you to require lot number entry on transactions like invoices, sales receipts, item receipts, and inventory transfers. By making this a mandatory field in Advanced Inventory Settings, you eliminate the risk of missing data. Employees can't complete a transaction without entering the lot number, ensuring your inventory records remain accurate and complete.
Supports Better Organization and Reporting
Lot number tracking proves invaluable when you need to manage recalls. It provides detailed reports that can pinpoint the affected batches, identify impacted customers, and show how much stock remains.
QuickBooks integrates lot numbers directly into forms like item receipts, bills, invoices, sales orders, and credit memos, keeping everything organized. You can also generate the "Serial/Lot Numbers in Inventory" report to regularly check for discrepancies or confirm that all entries are accurate. For inventory already in your system, you can use the "Adjust Quantity/Value on Hand" tool to assign lot numbers retroactively. This level of precision ensures your data stays reliable and supports other custom field features throughout your inventory process.
Works with QuickBooks Desktop

Lot tracking is available in QuickBooks Desktop Enterprise Platinum and Diamond editions. To enable it, navigate to Edit > Preferences > Items & Inventory > Company Preferences > Advanced Inventory Settings and select Activate Lot or Serial Numbers under the Serial/Lot Number & Expiration Dates tab. If you're using Enterprise 2023 or later, you can also pair lot numbers with expiration dates to implement FEFO (First Expired, First Out) workflows, helping reduce waste. This feature highlights how QuickBooks Desktop's custom fields provide advanced tools for precise inventory management.
2. Custom Field for Expiration Dates
Enables Advanced Inventory Management Workflows
Tracking expiration dates revolutionizes how you handle perishable inventory by introducing the FEFO (First Expired, First Out) method. With FEFO, items nearing their expiration date are prioritized for sale, helping to minimize waste and spoilage. QuickBooks Desktop Enterprise 2023 and later versions make this process seamless by letting you select serial or lot numbers based on expiration dates.
The system even calculates the remaining days until expiration automatically, streamlining warehouse operations and ensuring smoother inventory management. This feature not only optimizes workflows but also ensures accurate data in every transaction.
Improves Inventory Tracking Accuracy
To maintain precise inventory records, QuickBooks Desktop requires the expiration date field to be filled out. If left blank, the system generates an error, ensuring no transaction - whether it's an invoice, sales receipt, item receipt, or inventory transfer - proceeds without this crucial information.
Supports Better Organization and Reporting
Accurate tracking paves the way for better organization and insightful reporting. The Inventory Expiration Status report offers a consolidated view of all expired and soon-to-expire items. You can filter the report to focus on specific categories such as "Already expired items", "Yet-to-expire items", or even set custom date ranges to keep a close eye on stock health. Expiration date details are also integrated into key forms like item receipts, bills, credit card transactions, invoices, and sales orders, ensuring this critical data remains visible throughout your processes.
Works with QuickBooks Desktop
Expiration date tracking is available in QuickBooks Desktop Enterprise Platinum and Diamond editions (2023–2024). Activating this feature is straightforward: go to Edit > Preferences > Items & Inventory > Company Preferences > Advanced Inventory Settings, then enable Expiration Date under the Serial/Lot Number & Expiration Dates tab. Before activating, you'll need to decide whether to track serial numbers or lot numbers. For inventory already in stock, you can retroactively assign expiration dates using the Adjust Quantity/Value on Hand tool.
3. Custom Field for Supplier IDs
Custom Supplier IDs take your inventory management to the next level by seamlessly integrating supplier-specific data into your system. This feature builds on advanced lot and expiration tracking, giving you even more precision and control.
Improves Inventory Tracking Accuracy
Adding a Supplier ID field connects every sales transaction directly to its supplier. This makes it easier to manage recalls and conduct quality investigations. Once you assign a Supplier ID to a vendor profile, QuickBooks Desktop automatically fills in this information on expense forms, purchase orders, and bills. This reduces the need for manual data entry and helps avoid reconciliation errors.
Additionally, the Supplier ID field allows your accounts receivable team to cross-check invoices against payables, streamlining the verification process.
Supports Better Organization and Reporting
Supplier ID fields make it easier to analyze vendor performance and track inventory sourcing. When you add this field as a column in QuickBooks reports - like Sales by Customer Detail or Purchases by Supplier Detail - you can filter and sort transactions by supplier identifiers. This level of detail helps you quickly identify which suppliers are driving your sales or consistently delivering high-quality products.
The Supplier ID field appears across key forms, enabling accurate supplier tracking in reports. If your business uses third-party apps to manage payables or inventory, maintaining a dedicated Supplier ID field ensures consistency across systems.
Works with QuickBooks Desktop
To create a Supplier ID field for items, follow these steps:
- Open the Item List from the Lists menu.
- Double-click an item and go to Custom Fields > Define Fields.
- Enter "Supplier ID" as the label and check the Use box.
For vendor-level tracking, edit the vendor profile in the Vendor Center under the Additional Info tab. In QuickBooks Desktop Enterprise 2024 and newer versions, a built-in "Supplier" field is available on sales forms. You can access it through the Formatting tab under Customize Data Layout. If you're using Pro, Premier, or older Enterprise versions, you can manually create a custom field. To include Supplier IDs in reports, go to Customize Report, navigate to the Display or Columns section, and select the relevant field.
4. Custom Field for Storage Locations
Improves Inventory Tracking Accuracy
Adding custom fields for storage locations allows businesses to track inventory with pinpoint accuracy. These fields can include specific details like aisle, shelf, or bin numbers - information that standard QuickBooks versions don’t offer. With such precise data, warehouse staff can quickly locate items, minimizing errors and speeding up the fulfillment process.
This feature is particularly helpful for companies managing large inventories, often spread across multiple zones. By knowing exactly where each SKU is stored, your team can significantly improve efficiency.
Supports Better Organization and Reporting
Custom location fields seamlessly integrate with QuickBooks reports, giving managers the ability to filter stock levels by specific storage zones. For example, you can add your custom field to a report by clicking Customize Report, navigating to the Display or Columns section, and selecting the field. Once added, you can sort and organize inventory counts based on this column.
QuickBooks Desktop for Windows supports up to 15 custom fields, while the Mac version allows for seven. This capability not only enhances organization but also aligns well with advanced inventory management workflows.
Enables Advanced Inventory Management Workflows
Storage location fields complement other inventory details, such as lot numbers and supplier IDs, to further streamline operations. For those using QuickBooks Desktop Enterprise Platinum or Diamond, the Advanced Inventory module includes a built-in "Track bin Locations" feature. This tool uses a structured hierarchy of rows, shelves, and bins, enabling automated inventory transfers and offering specialized reports like "Items by Bin Location".
However, users of Pro or Premier editions can still achieve effective inventory organization by setting up custom item fields. While these require manual input, they provide a solid alternative for businesses not ready to upgrade to Enterprise.
| Feature | QuickBooks Pro/Premier | QuickBooks Enterprise (Advanced Inventory) |
|---|---|---|
| Location Tracking Method | Manual Custom Fields | Built-in "Row, Shelf, Bin" Tracking |
| Reporting | Custom Column in Standard Reports | Specialized "Items by Bin Location" Report |
| Workflow | Manual Entry | Automated Bin Transfers and Site Management |
Works with QuickBooks Desktop
To set up a custom storage location field, navigate to the Item List from the Lists menu, double-click on an item, and go to Custom Fields > Define Fields. Enter a label like "Warehouse Bin" or "Shelf ID" and check the Use box. You can also adjust the field's visibility by selecting the Formatting tab, choosing Customize Data Layout, and enabling the Screen or Print options.
For Enterprise users who prefer the native bin tracking feature, go to Edit > Preferences > Items & Inventory > Company Preferences > Advanced Inventory Settings and enable Track bin Locations within Inventory Sites. This setup ensures that your inventory management is both detailed and efficient.
5. Custom Field for Minimum Stock Levels
Managing minimum stock levels through custom fields is a practical way to improve inventory oversight.
Supports Better Organization and Reporting
Adding a custom field for minimum stock levels sets clear inventory benchmarks. This field allows you to define specific product thresholds that aren't available in QuickBooks Desktop's standard options. Once you've created the field, you can add it as a column in your inventory reports. To do this, go to the Report Center, select Customize Report, and find your custom "Min Stock" field in the Display tab. After refreshing the report, you'll see current stock quantities compared to the minimum levels you've defined. For QuickBooks for Mac users, there's an added benefit: you can filter reports to show only items nearing their minimum levels, making it easier to spot potential issues.
Enables Advanced Inventory Management Workflows
While this feature requires manual input, it helps establish stock thresholds that QuickBooks' default fields don't support. Including the minimum stock field on sales forms, like invoices or purchase orders, ensures that critical inventory details are visible during transactions. To do this, use the Customize Data Layout option in the Formatting tab. For those using QuickBooks Enterprise, the built-in Reorder Point feature offers automated alerts for global or location-specific minimums, reducing the need for manual tracking. As Raeann Salter, a QuickBooks Advanced ProAdvisor, explains:
"Manual accounting processes remain one of the most expensive inefficiencies in growing businesses".
Works with QuickBooks Desktop
Setting up this field is straightforward. Open the Item List, double-click an item, and navigate to Custom Fields > Define Fields. Enter "Min Stock" as the field name, check the Use box, and save your changes. To make this field visible on transaction templates, update the template settings accordingly. For existing transactions, you'll also need to adjust the template settings to display the new field. This method integrates seamlessly with the broader custom field capabilities in QuickBooks Desktop, ensuring consistency across your inventory management practices.
6. Custom Field for Reorder Points
Improves Inventory Tracking Accuracy
Reorder points are essential for keeping your stock levels in check. By setting up a custom field for reorder points in QuickBooks Desktop, you can determine exactly when to restock each product. Raeann Salter, a QuickBooks Advanced ProAdvisor, emphasizes the importance of this feature:
"Reorder points ensure that your inventory levels never fall below the minimum required to fulfill demand. You can set different individual reorder points for an item at each inventory site without affecting the total global reorder point for that item."
If you're using QuickBooks Enterprise with Advanced Inventory, you can take it a step further by setting both global reorder points and specific thresholds for each location. This allows you to tailor your restocking strategy to match the unique demand patterns of different sites. Plus, this functionality integrates seamlessly with reporting tools, helping you stay ahead of stock shortages.
Supports Better Organization and Reporting
Once you've created a custom reorder point field, you can incorporate it into your inventory reports for a more organized view of your stock. To do this, head to the Report Center, open an inventory report, and click on Customize Report. Under the Display tab, search for your custom "Reorder Point" field and add it as a column. This setup makes it easy to compare stock levels and identify items that need replenishment.
For QuickBooks Desktop for Mac users, the Filters tab adds another layer of convenience. You can filter your report to show only the items that have fallen below their reorder points, making it quicker to spot what needs restocking.
Works with QuickBooks Desktop
To set up a custom reorder point field in QuickBooks Desktop for Windows, follow these steps: go to Lists > Item List, double-click the item, select Custom Fields, click Define Fields, add "Reorder Point" as the label, and check the Use box. For Mac users, navigate to Lists > Items, click the Pencil icon, then select Custom Fields > Define Fields.
If you're a QuickBooks Enterprise user, the built-in reorder point feature is already available in the "Inventory Information" section of an item record. This feature supports both global and site-specific reorder points, eliminating the need to create additional custom fields.
7. Custom Field for Serial Numbers
Improves Inventory Tracking Accuracy
Serial numbers provide a way to track individual items, not just overall quantities. This level of detail ensures that every item sold matches your records precisely. For businesses dealing in high-value products like electronics or equipment, this accuracy is essential for maintaining reliable inventory data.
QuickBooks Desktop Enterprise simplifies this process by allowing you to enforce serial number entry for transactions. As AlexV from the QuickBooks Team explains:
"With the Advanced Inventory, you can make the serial number mandatory so that the system will ask you to enter one before you save the transaction".
This feature prevents users from saving transactions - such as invoices, sales receipts, or item receipts - without entering the required serial number, significantly reducing potential errors.
Additionally, the system issues warnings or blocks transactions if a serial number is missing or incorrect, safeguarding the integrity of your inventory records. This functionality is especially helpful for creating a verifiable history of items, which is critical for managing warranties, processing returns, and addressing customer service needs.
Enables Advanced Inventory Management Workflows
Serial number tracking offers more than just accuracy - it also supports crucial business processes. For instance, if a customer contacts you about a warranty issue, you can trace the complete history of that specific item - from its original purchase from your supplier to its final sale. This capability proves invaluable during product recalls or when addressing quality concerns, as it helps identify which customers purchased affected units.
To activate these workflows in QuickBooks Desktop Enterprise, go to Edit > Preferences > Items & Inventory > Company Preferences and enable Advanced Inventory Settings. In the Serial/Lot Number settings, select Make serial or lot number mandatory for specific transactions, ensuring every unit in your inventory has a unique identifier. You can further customize sales forms by adding the serial number field to both screen and print layouts through the Formatting > Customize Data Layout menu, making the information easily accessible to staff and customers alike.
Works with QuickBooks Desktop
QuickBooks Desktop Enterprise’s Platinum and Diamond versions (2023 and 2024 releases) come equipped with Advanced Inventory features specifically designed for serial number tracking. As Intuit highlights:
"QuickBooks adds a serial or lot number field to most purchase and sales forms including: Item receipts, Bills, Credit card transactions, Checks, Invoices, Credit memos, Sales orders and pending invoices".
For existing inventory, you can streamline the setup process by copying and pasting serial numbers from Excel or CSV files into the Adjust Quantity/Value on Hand screen. This bulk import feature not only speeds up the process but also minimizes the risk of manual entry errors, making it easier to get your system up and running efficiently.
8. Custom Field for Product Categories
Custom category fields can make a big difference in how inventory reporting works in QuickBooks Desktop. By assigning a specific category field, item names stay short - perfect for scanner displays - and reports like the Inventory Valuation Summary become easier to sort, making tasks like product grouping and warehouse counts more efficient. As QuickBooks Community member FSFence pointed out, long item names can create confusion: "the warehouse doesnt know what to pull due to the length of the characters" when using scanners. Keeping things organized this way also helps maintain accurate inventory records.
Improves Inventory Tracking Accuracy
Using custom category fields ensures consistency and clarity during data entry, cutting down on errors caused by inconsistent naming. QuickBooks Desktop Enterprise even supports a hierarchical system with up to four levels of subcategories. That said, Murphy offers a word of caution:
"Just because you can have four levels of hierarchy doesn't necessarily mean you should use four levels"
The key is to create a classification system that makes reporting easier without making your inventory structure overly complex.
Enables Advanced Inventory Management Workflows
Category fields also come in handy for speeding up workflows. For example, they enable the "Find & Select" filter in transaction windows like invoices and sales receipts, helping your team locate items quickly and avoid mistakes. If you're using QuickBooks Desktop Enterprise (2023 or later), the built-in "Item Categories" feature adds even more functionality. You can assign categories to multiple items at once using the "Add/Edit Multiple List Entries" window. Plus, these categories work seamlessly with Advanced Pricing rules, allowing you to apply discounts or markups to entire product groups in one go.
9. Custom Field Integration with Rapid Inventory
Works with QuickBooks Desktop
Rapid Inventory seamlessly integrates with QuickBooks Desktop through an automatic two-way sync, keeping items and orders updated in real time. It’s compatible with QuickBooks Enterprise, Pro, and Premier, as well as hosted solutions like Rightworks, Swizznet, and Visory. This connection allows custom fields - such as lot numbers, serial numbers, and expiration dates - created in QuickBooks Desktop to sync directly with Rapid Inventory, eliminating the need for manual data entry.
Improves Inventory Tracking Accuracy
This integration takes accuracy to the next level by removing the reliance on spreadsheets and manual input, which are prone to errors. Mobile barcode scanning ensures precision by verifying locations, items, and quantities during receiving, picking, and counting. According to Rapid Inventory:
"No more inventory mistakes. Scan barcodes to verify locations, items, quantities, shipments during receiving, picking, counting, moving and transferring."
The platform also optimizes picking routes and pinpoints exact inventory locations, helping to avoid mispicks and streamline operations.
Enables Advanced Inventory Management Workflows
Beyond improving accuracy, Rapid Inventory supports advanced workflows like FIFO and FEFO picking strategies, making it easier to manage products with varying expiration dates. The system includes batch-specific management, which is especially important for industries like food and supplements where tracking expiration dates by lot is critical. Additionally, custom fields synced from QuickBooks can be used to filter reports and generate lists of items nearing expiration, helping businesses stay proactive with stock rotation.
10. Adding Custom Fields to Sales Forms and Reports
Supports Better Organization and Reporting
Adding custom fields to your sales forms and reports can streamline inventory tracking and improve data accuracy. Once you’ve set up custom fields for your items, you can include them in sales forms like invoices and receipts. This ensures that critical details are visible when entering orders.
Steps to add custom fields to sales forms:
- Windows: Open a sales form → click on the Formatting tab → select Customize Data Layout → check Screen for internal visibility or Print for customer-facing forms.
- Mac: Use the Current template dropdown → choose Edit Current Template → enable the custom field through the Layout Designer.
Steps to add custom fields to reports:
- Windows: Open a report in the Report Center → click Customize Report → go to the Display tab → locate your custom field name in the columns section.
- Mac: Use the Filters tab in the Customize panel to apply custom fields as filters, allowing you to narrow reports by values like batch numbers or product categories.
This approach not only organizes your forms but also helps prevent errors during data entry.
Improves Inventory Tracking Accuracy
Custom fields on sales forms can reduce data entry mistakes by displaying key details like supplier IDs, lot numbers, or storage locations. Use the Screen checkbox for internal tracking purposes, and the Print checkbox for information that customers need to see.
If you notice that custom field data isn’t appearing on an invoice after updating your template, try switching to the new template, removing the inventory item from the line, and re-adding it. This refreshes the data. For ongoing issues where fields remain empty despite being filled, run the Verify/Rebuild Data utility under File > Utilities to resolve potential company file damage.
Enables Advanced Inventory Management Workflows
Custom fields also play a vital role in advanced inventory management. By integrating them into reports, you can gain deeper insights. For example, filter reports by expiration dates to identify items nearing their shelf life, or analyze sales performance based on product attributes like color or size. This is particularly valuable for businesses handling batch-specific inventory, such as food distributors or supplement manufacturers, as it helps maintain compliance and reduce waste.
QuickBooks Desktop Enterprise offers additional flexibility by allowing custom fields with specific data types, such as dates, phone numbers, or numeric formats. This ensures consistency and minimizes entry errors across your inventory system. Always use the Define Fields button in the Item List to label custom fields consistently, making sure the same data point is tracked uniformly across all forms and profiles.
Best Practices for Setting Up Custom Fields
Setting up custom fields effectively can improve how you track inventory and generate accurate reports.
Plan Your Fields Before You Create Them
Before diving in, figure out which inventory details are most important for your business. QuickBooks Desktop Pro and Premier allow up to 15 custom fields for items, while the Mac version limits you to seven per list. Adding too many fields can slow down your system and increase the chances of errors during data entry. Stick to fields that are critical for your inventory process.
Use Data Types to Prevent Entry Errors
If you're using QuickBooks Desktop Enterprise, take advantage of specific data types like Date, Number, or Phone Number instead of the generic Any text option. This ensures consistency and reduces formatting mistakes. For instance, setting a field to "Date" ensures expiration dates are entered uniformly, making your reports more dependable. However, Pro and Premier editions only allow unrestricted text fields, so you'll need to enforce clear data entry rules with your team.
Activate Fields Properly and Check Visibility Settings
To activate a custom field, make sure to check the Use box in the Define Fields window. Once activated, use the Customize Data Layout tool to confirm the field’s visibility settings. You can decide if a field should appear on the Screen (for internal use) or on Print (visible to customers). This is especially useful for keeping sensitive information, like supplier IDs, hidden from customer-facing documents.
Maintain Consistency Across Your System
Consistency is key. Use clear naming conventions and standardized data entry practices throughout your system. Always pick the correct customized template before adding line items on sales forms. Since custom name fields in QuickBooks accept free-form text, even minor typos or inconsistent capitalization can disrupt filtered reports. On QuickBooks for Mac, renaming a custom field will automatically update it across all past transactions and reports.
Conclusion
Custom fields in QuickBooks Desktop are a powerful way to record essential inventory details like lot numbers, expiration dates, supplier IDs, and storage locations. These fields not only help create targeted reports but also support better inventory management by reducing waste and enabling smarter decision-making. As Trish_T from the QuickBooks Team highlights:
"QuickBooks Desktop 2023 offers expiration dates, so you can manage your inventory with peace of mind."
However, while custom fields are excellent for capturing static data, they don't address workflow automation. This is where Rapid Inventory steps in, building on the functionality of QuickBooks. It automates tracking, supports FIFO/FEFO strategies with real-time synchronization, and offers mobile barcode scanning for accurate inventory management. Plus, its web access makes monitoring across multiple warehouses seamless.
With a 5-star rating from over 400 customers, Rapid Inventory has a proven record of success. The onboarding process takes just seven days, and users consistently praise its reliability and ease of use. Fernanda C., Director of Operations, shared her experience:
"Rapid Inventory helps us run our warehouse operations. Easy to use and reliable, with standout mobile barcode scanning and picking features."
For those looking to move beyond manual entry and streamline inventory workflows, Rapid Inventory's Pro plan starts at $90 per user/month for teams of 1–9 users. This plan includes features like unlimited warehouse management, lot and serial number tracking, and barcode scanning.
FAQs
Which QuickBooks Desktop versions support lot, serial, and expiration tracking?
QuickBooks Desktop Enterprise Platinum and Diamond editions for 2023 and 2024 include features for tracking lot numbers, serial numbers, and expiration dates when Advanced Inventory is activated. These tools simplify inventory management and improve tracking processes, making it easier for businesses to stay organized.
How do I make custom fields appear on invoices and purchase orders?
To include custom fields on invoices and purchase orders in QuickBooks Desktop, start by creating and setting them up under Settings > Custom fields. Add the fields you need and make sure they’re part of the form layout when customizing templates. Use the layout designer to adjust their placement. Once configured, these fields will appear on your forms, designed to suit your business requirements.
Can Rapid Inventory sync QuickBooks custom fields for barcode scanning?
Yes, Rapid Inventory integrates seamlessly with QuickBooks custom fields, including those designed for barcode scanning. This allows for precise tracking and real-time inventory updates, helping to simplify and improve your operations.


