
Managing inventory across multiple locations can be complex, but QuickBooks Desktop Enterprise, paired with the Advanced Inventory add-on, simplifies the process. Here's what you need to know:
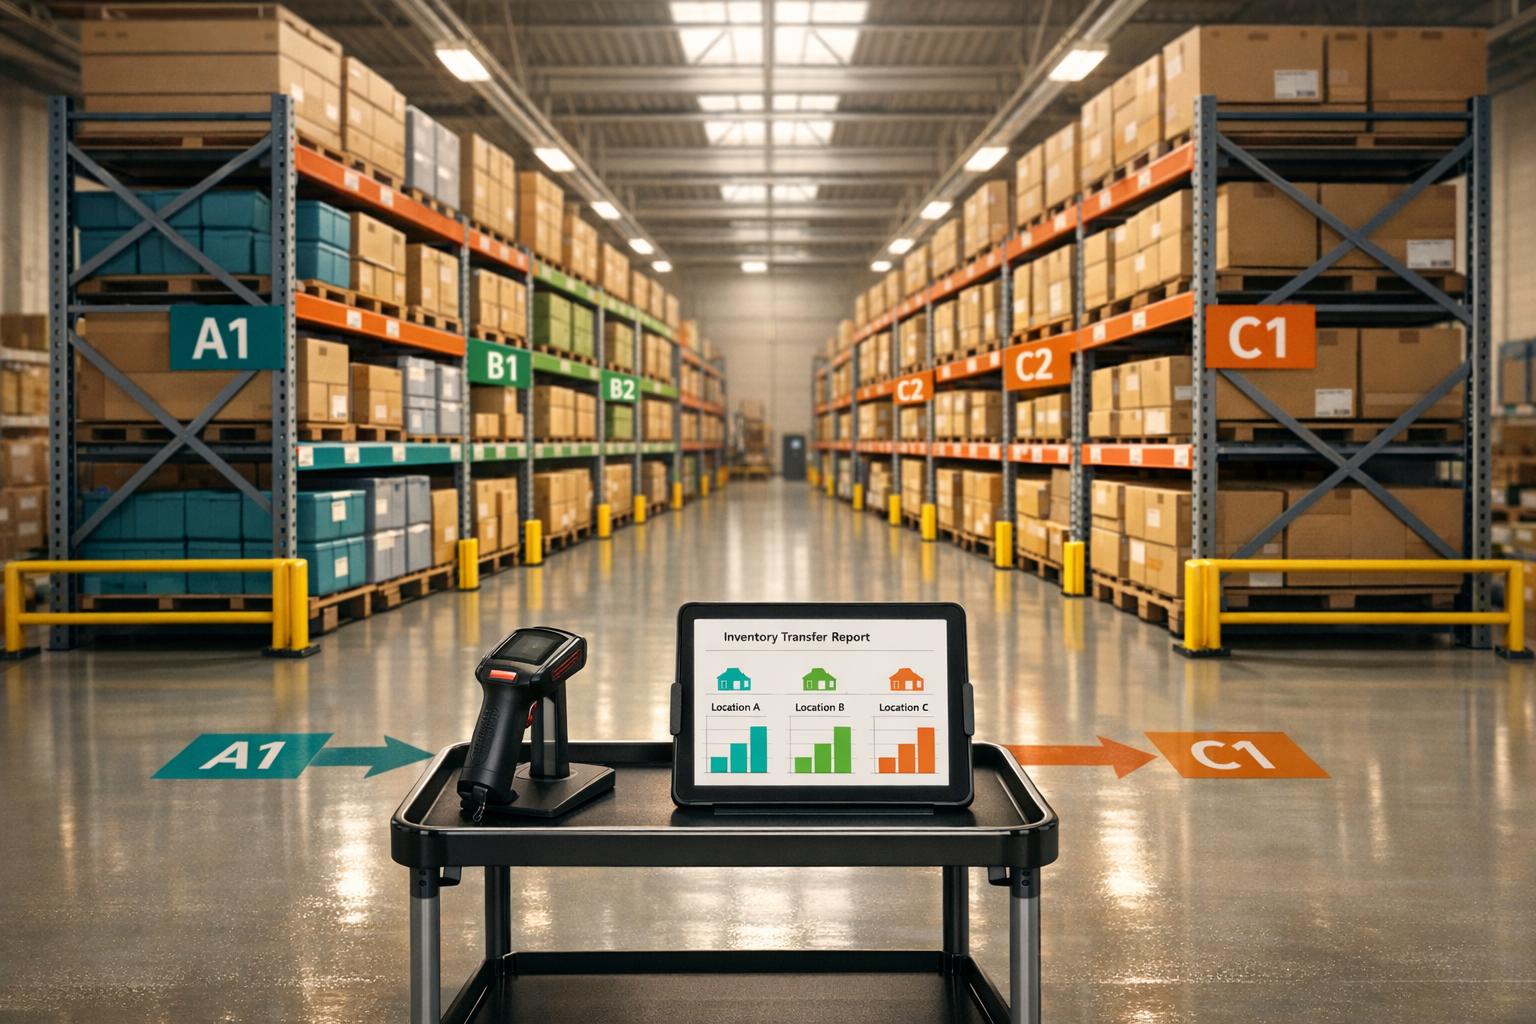
- Multi-Location Tracking: Monitor inventory across warehouses, retail stores, or job sites with location-specific reorder points and bin-level tracking.
- Setup Essentials: Consolidate duplicate item records, enable Advanced Inventory, and configure sites and bins for accurate tracking.
- Key Features: Site-specific purchase orders, inventory transfers, and cycle counts ensure precision and efficiency.
- Enhanced Tools: Rapid Inventory adds mobile barcode scanning, real-time updates, and advanced workflows like FIFO/FEFO picking.
- Reports for Insights: Use reports like Inventory Stock Status by Site and Inventory Valuation Summary to make informed decisions and optimize stock levels.
Set Up Multiple Inventory Locations | QB Enterprise Advanced Inventory | QuickBooks Demo 2025
sbb-itb-19ed50f
Setting Up Multi-Location Inventory in QuickBooks Desktop


QuickBooks Desktop Multi-Location Inventory Setup: Step-by-Step Guide
Getting QuickBooks Desktop Ready for Multi-Location Inventory
To start, clean up your item records. If you've been using duplicate item names to represent different warehouse locations - like "Widget-WH1" or "Widget-WH2" - you'll need to consolidate these. Adjust their quantities to zero and merge everything under a single item name, such as "Widget." This is because Advanced Inventory uses a dedicated site column to track locations, and duplicate records can cause unnecessary confusion.
Next, switch to Single-User Mode by going to the File menu. Then navigate to Edit > Preferences > Items & Inventory > Company Preferences. Make sure "Inventory and purchase orders are active" is checked. From there, click Advanced Inventory Settings and enable Multiple Inventory Sites. If the Advanced Inventory Settings button is grayed out, it might be due to a subscription issue. To resolve this, go to Help > Manage My License > Sync License Data Online to refresh your subscription - this is a common issue for Platinum and Diamond users.
Once your item list is streamlined and settings are enabled, you're ready to set up inventory sites and bins.
How to Configure Inventory Sites and Bins
With Advanced Inventory enabled, go to Lists > Inventory Site List to add your locations. Each site can represent a warehouse, service van, staging area, or any physical space where inventory is stored. Click the Inventory Site button, choose New, and fill in the details for each location.
Initially, QuickBooks assigns all inventory to a temporary starting site when you enable multiple sites. You'll need to use the Transfer Inventory form to move stock from this temporary site to its actual locations. Similarly, if you enable "Track Bin Locations within Inventory Sites" in Advanced Inventory Settings, all items are automatically placed in a default bin labeled "Unassigned." You'll need to transfer these items to their correct bins, shelves, or rows using the same Transfer Inventory form.
"When you select Bin Location Tracking, QuickBooks will move all items to unassigned until bins are created. You will need to transfer to the correct bins, using the Transfer Inventory form." - Beverly Lang, QuickBooks ProAdvisor
To create a bin, go back to the Inventory Site List, click New, and select the "is a bin within site" option. Then, choose the parent location from the dropdown menu. For businesses managing multiple sites with similar inventory profiles, the Duplicate Inventory Transfer feature in the Edit menu can save a lot of time during setup.
Once your sites and bins are configured, you can further refine your workflow with additional tools.
Adding Tools to Support Multi-Location Workflows
While QuickBooks Desktop provides essential tools for setup, managing fast-moving inventory often requires additional features for real-time updates and mobile data entry. Manual processes can lead to errors, especially in busy warehouse environments.
One tool to consider is Rapid Inventory. This solution integrates with your existing QuickBooks setup, offering mobile data entry and real-time visibility. Being web-based, it allows warehouse staff to access it from any device without needing direct access to the QuickBooks Desktop file. Features like mobile barcode scanning make tasks like receiving, transfers, and cycle counts faster and more accurate. Plus, its two-way sync with QuickBooks ensures your accounting records stay updated without manual re-entry. For businesses managing inventory across multiple bins or warehouses, Rapid Inventory's multi-location and lot/serial number tracking can enhance your system without requiring a complete overhaul of your workflows.
Running Multi-Location Inventory Workflows in QuickBooks Desktop
Purchasing and Receiving Inventory by Location
When managing purchases, make sure your forms align with your configured sites and bins. Purchase Orders (POs) are restricted to one site at a time. QuickBooks automatically adds the inventory site to the "Ship To" address on the PO. If you're ordering for multiple warehouses, you'll need to create separate POs for each one. For receiving inventory, bills and checks include a "Site" and "Location" column on the Items tab, allowing you to receive stock at multiple locations using a single form.
To keep inventory valuation accurate, use Landed Cost to allocate expenses like freight, duties, and insurance when you receive purchases. This step helps avoid margin errors that might otherwise go unnoticed until the end of the month.
Tracking Sales, Order Fulfillment, and Stock Transfers
QuickBooks supports multi-location fulfillment for sales orders, invoices, and sales receipts. You can assign each line item to a specific site and bin. However, keep in mind that sales orders only reserve inventory - they don't adjust your quantity on hand or Cost of Goods Sold (COGS). These figures are updated once the sales order is converted into an invoice.
"Treating each touchpoint with intention preserves data integrity and prevents stock discrepancies." - Fourlane Inc
If you don't see the "Site" or "Bin" fields on your invoices or sales orders, go to the Formatting tab and use Customize Data Layout to add these fields to both the screen and printed forms. For stock transfers between locations, use the Transfer Inventory form under the Inventory menu. Specify the "Transfer From" and "Transfer To" sites. If you're moving items between bins within the same warehouse, keep the site unchanged and specify the bins for each line.
Pay attention to negative inventory warnings, as they can signal potential issues with fulfillment and COGS. QuickBooks flags when a sales order tries to reserve more stock than is available at a site. Investigate these warnings promptly to avoid errors.
These processes highlight the importance of regular and accurate cycle counts.
Performing Cycle Counts and Inventory Adjustments
To maintain inventory accuracy, perform cycle counts regularly. This feature is part of the Advanced Inventory module in QuickBooks Desktop Enterprise and requires a Platinum or Diamond subscription. Rolling cycle counts allow you to avoid shutting down operations while keeping inventory records up to date. Each cycle count is limited to 5,000 tasks, and if this limit is exceeded, the system splits the count into smaller groups of 200 tasks. For items stored in multiple bins, QuickBooks generates a separate count task for each bin to ensure precision.
You can perform cycle counts using one of two methods:
- Mobile workflows: Use supported Android devices like the Zebra TC21 or TC26 to scan items directly on the warehouse floor. This method syncs data in real time.
- Manual workflows: Export inventory data to Excel, print the sheet, and re-import the counted results. If you choose this method, hide the "Quantity on Hand" and "Difference" columns before printing to ensure counters record unbiased figures.
Post-count, QuickBooks assigns statuses to each task. Items with discrepancies are marked as "Pending Review", while matches are labeled as "Complete". To finalize adjustments, use Batch Actions > Adjust Quantity/Value on Hand. Select the "Quantity and Total Value" adjustment type and assign discrepancies to a specific account, such as "Inventory Shrinkage" or "Damage & Loss." This keeps your profit and loss statement clean and ensures a clear audit trail.
"QuickBooks can automatically adjust your inventory account and values for you for any count discrepancies." - Intuit
Improving Multi-Location Inventory Management
Using QuickBooks Desktop Reports for Location-Level Visibility
Once your workflows are running smoothly, the next step is ensuring clear visibility across all your locations. QuickBooks Enterprise offers a robust set of reports designed specifically to help manage multi-site operations.
For day-to-day management, two reports stand out: Inventory Stock Status by Site and Quantity on Hand by Site. The Stock Status report is particularly helpful for purchasing managers, as it compares available quantities against site-specific reorder points. This way, you’ll know exactly which warehouse needs restocking. To avoid stockouts and maintain accurate financial tracking, base your reorder decisions on "Available" quantities, which exclude inventory already committed to orders.
The Inventory Valuation Summary by Site provides insights into the asset cost and retail value of inventory at each location, helping you identify where your capital is tied up. Meanwhile, the Items by Bin Location report offers detailed bin-level data, which is invaluable for precise financial reconciliation. Make it a habit to review the Inventory Adjustment History report monthly. This can help you spot patterns in shrinkage or write-offs at specific locations. Frequent adjustments at one site might signal a training issue or a process that needs improvement.
"Advanced inventory reporting in QuickBooks Enterprise provides detailed insights across multiple sites... Key features include real-time data, site-specific analysis, and actionable insights that simplify inventory planning." - Raeann Salter, QuickBooks Advanced ProAdvisor
These detailed reports set the stage for streamlining processes across all locations.
Standardizing Processes Across All Locations
Consistency is key to running a smooth multi-location operation. One of the most impactful steps you can take is to maintain a single item record for each SKU across all sites. This ensures that your global inventory totals remain accurate and your item list stays manageable.
Make sure to customize transaction forms - such as sales orders, invoices, bills, and purchase orders - to include "Site" and "Bin Location" fields. If these fields aren’t visible, the data won’t flow correctly into your reports. Additionally, set independent reorder points for each location, as these don’t automatically roll up into a global figure. Each warehouse needs its own minimum threshold to prevent localized stockouts.
When moving stock between sites or bins, always use the Transfer Inventory form rather than manually adjusting quantities. This practice ensures a clean audit trail and keeps your records accurate. Standardizing these processes not only improves consistency but also prepares your operation to take advantage of more advanced tools.
How Rapid Inventory Supports Better Inventory Control
While QuickBooks Desktop offers a strong foundation, there are certain areas where it falls short - like real-time dashboards, backorder management, and advanced lot tracking. That’s where Rapid Inventory comes in.
QuickBooks’ sales orders often act as placeholders, but Rapid Inventory adds structured backorder tracking and partial shipping workflows, giving your team a clearer view of what’s owed to customers and when. It also supports FIFO and FEFO picking strategies, along with lot and serial number tracking, which helps reduce manual data entry errors that can arise in multi-location setups.
With real-time inventory reports accessible from any browser, managers at different sites can stay informed without needing to be on the same network. These features work alongside QuickBooks Desktop’s native tools, providing a more comprehensive solution for managing multi-location operations.
Long-Term Best Practices for Multi-Location Inventory Management
Once you’ve established standardized processes, these practices will help maintain inventory accuracy and streamline operations over the long haul.
Data Governance and Naming Conventions
Stick to one item record per SKU across all locations. This approach avoids fragmented valuation and accounting headaches as your business scales.
Use clear, descriptive names for inventory sites, like "Wholesale Warehouse" or "Truck 3", instead of relying on vague codes. Organize stock with a logical bin hierarchy (aisle, shelf, rack) to make locating items easier. QuickBooks Enterprise supports up to 1,000,000 inventory locations, giving you plenty of room to grow.
"Treating each touchpoint with intention preserves data integrity and prevents stock discrepancies." - Fourlane
Another key step is setting both global and site-level reorder points. QuickBooks Help emphasizes that "Site reorder points don't 'roll up' (add up) to calculate a global reorder point. You must set the global reorder point for each item". Without this, you risk running out of stock at some locations before any alerts are triggered.
Setting Up User Roles and Permissions
Assigning specific roles and permissions is essential to reducing errors. QuickBooks Enterprise lets you restrict access to critical inventory functions like Transfer Inventory, Adjust Quantity/Value On Hand, and Set Reorder Points, ensuring tasks are clearly divided.
Changes to Advanced Inventory settings must be made in Single-User Mode to avoid conflicts. Also, ensure that transaction templates for invoices, sales orders, and purchase orders include Inventory Site and Bin Location columns. This ensures staff consistently record these details. If Advanced Inventory settings appear grayed out for an authorized user, try refreshing their permissions by navigating to Help > Manage my License > Sync License Data Online.
Well-defined roles provide a foundation for effective training and regular audits.
Ongoing Training and Periodic Reviews
Adopt a consistent review schedule to keep inventory management on track:
| Frequency | Reports | Objective |
|---|---|---|
| Weekly | Stock Status by Item, Items by Bin Location | Improve fulfillment and streamline picking |
| Monthly | Inventory Adjustment History, Valuation by Site | Identify training needs, shrinkage, and overstock patterns |
| Periodically | Inventory Expiration Status, FIFO Cost Layer | Protect profit margins and manage product shelf life |
| Annually | Inventory Site Listing, Reorder Point Review | Fine-tune site structure and improve cash-flow planning |
The Inventory Adjustment History report is particularly useful for spotting issues. Frequent manual adjustments at a specific location often signal a process problem or the need for additional training.
Rapid Inventory simplifies this review process with real-time reports accessible from any browser. Managers can stay informed without needing to be on-site. The platform also offers free onboarding and ongoing training, which is especially helpful when integrating mobile barcode scanning. Reducing manual data entry is one of the quickest ways to eliminate recurring errors found in monthly adjustment reports.
"Advanced inventory adds the nuance required for high-volume, multi-location or highly regulated environments... it's the difference between simply recording inventory and actively orchestrating it." - Fourlane Inc
Conclusion
Managing inventory across multiple locations in QuickBooks Desktop is entirely possible, but it takes careful setup, consistent workflows, and the right tools. QuickBooks Enterprise with Advanced Inventory provides a strong starting point, offering features like bin-level tracking, site-specific reorder points, FIFO costing, serial and lot number tracking, and automated updates to your general ledger, which help keep your financial records accurate without extra manual work.
However, it's important to recognize QuickBooks’ limitations. As Joseph Sprei, Founder of Ask the Ledger, explains:
"QuickBooks Desktop Enterprise with the Advanced Inventory add-on is the deepest QuickBooks goes - FIFO costing, multi-location, bin tracking, serial and lot numbers, basic barcode scanning."
For businesses that outgrow these capabilities - needing advanced workflows, backorder tracking, or real-time warehouse visibility - integrations like Rapid Inventory provide a solution. This tool syncs seamlessly with QuickBooks Desktop, supports FIFO/FEFO picking strategies, enables partial shipping, cycle counting, and mobile barcode scanning, and works from any browser without interfering with your existing accounting processes.
Success with multi-location inventory isn’t just about having the most advanced software. It’s about establishing clear naming conventions, training staff thoroughly, and maintaining regular data reviews. The tools discussed here - from QuickBooks Enterprise’s Advanced Inventory to Rapid Inventory’s added functionality - are only as effective as the systems and habits you build around them.
Begin with accurate data, set up your sites thoughtfully, and grow your processes from there.
FAQs
How do I move inventory out of the temporary “starting site” after enabling multiple sites?
To relocate inventory from the temporary starting site, navigate to the Inventory menu and select Transfer Inventory. In the form, specify the starting site under Transfer From and the destination under Transfer To. Select the items you want to transfer, fill in the necessary details, and click Save & Close. Double-check the inventory counts for both sites beforehand to ensure your records stay accurate.
Why are my “Site” and “Bin” columns missing on sales forms and POs?
If the Site and Bin columns are missing on sales forms or purchase orders, start by checking if Advanced Inventory is turned on. To do this, go to Edit > Preferences > Items and Inventory > Company Preferences > Advanced Inventory Settings and enable both Multiple Inventory Sites and Bin Tracking.
Next, customize your form template. Open the form, navigate to Formatting > Customize Data Layout, and switch to the Columns tab. Ensure the Site and Bin Location fields are selected for both screen and print views.
What’s the best way to prevent negative inventory across locations in QuickBooks Desktop?
To keep your inventory accurate in QuickBooks Desktop and prevent it from going negative, make sure to activate the warning for transactions that might result in negative inventory. You can find this option in the Advanced Inventory settings. Additionally, setting up location-specific reorder points can help you stay ahead of stock shortages.
For better oversight, regularly review reports like Inventory Stock Status by Site. These reports can highlight low-stock items and discrepancies, giving you the information you need to manage your inventory effectively.


