

If QuickBooks Desktop stock counts don’t match your inventory system, I’d fix the first failed sync, check item mapping and warehouse setup, then correct only the counts I’ve confirmed.
Most quantity sync problems come from a short list of issues: bad item mapping, wrong item type, inactive items, location mismatches, failed batch syncs, or file and permission problems. A mismatch on one SKU often points to setup. A mismatch across many SKUs at the same time often points to the sync service, company file, or user access.
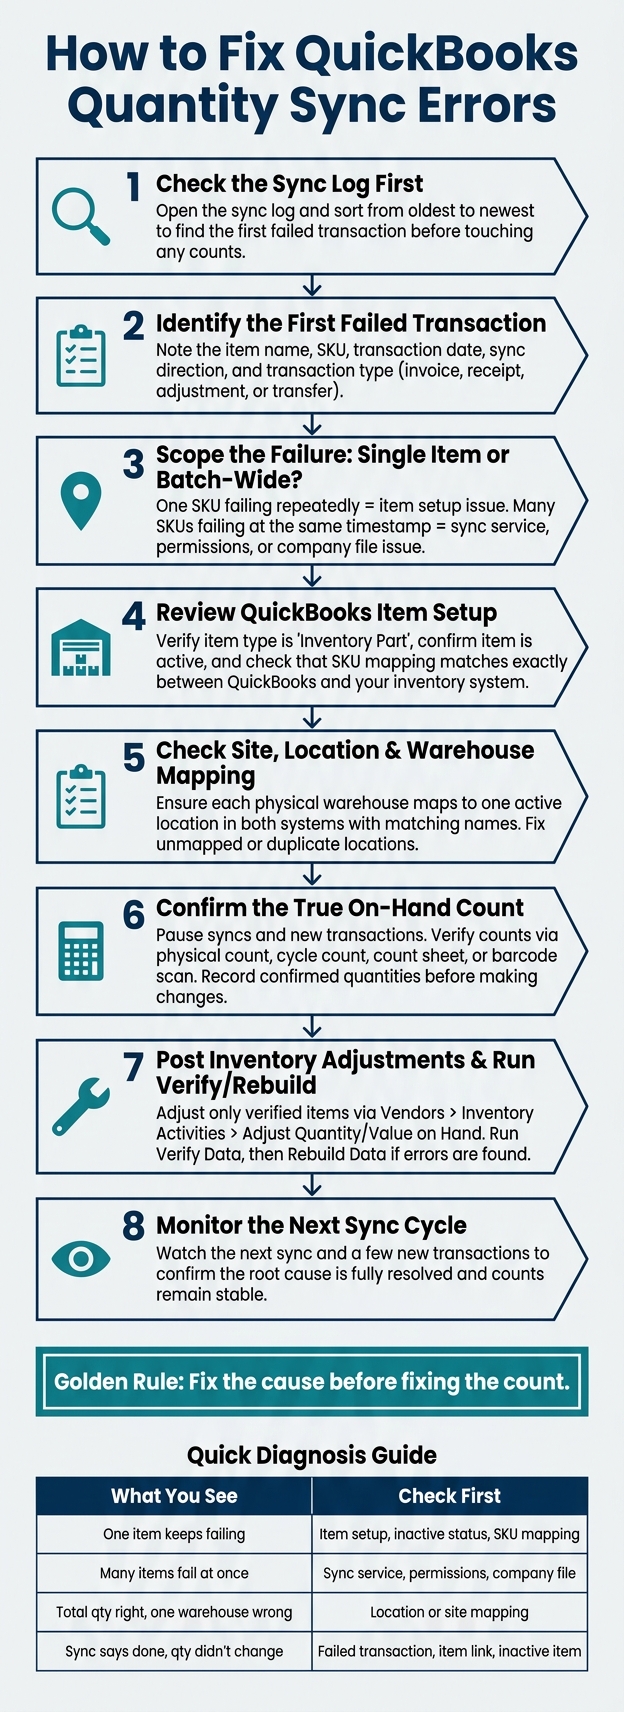
Here’s the short version:
- Start with the sync log, not a manual count change
- Find the first failed transaction and fix that first
- Check the item record: item type, active status, SKU link, and duplicate records
- Check site and warehouse mapping if totals look right but location counts don’t
- Pause sync and verify the true on-hand count with a physical count, cycle count, or barcode scan
- Post inventory adjustments only after you confirm the count
- Run Verify Data and Rebuild Data if QuickBooks still shows bad numbers
- Watch the next sync cycle to confirm the issue stays fixed
A simple way to sort the problem:
| What I see | What I check first |
|---|---|
| One item keeps failing | Item setup, inactive status, SKU mapping |
| Many items fail at once | Sync service, permissions, company file |
| Total quantity looks right, but one warehouse is wrong | Location or site mapping |
| Sync says done, but quantity didn’t change | Failed transaction, item link, or skipped inactive item |
If I had to narrow it down to one rule, it would be this: fix the cause before fixing the count. That keeps one bad invoice, receipt, transfer, or adjustment from throwing stock off again on the next sync.
How to Fix QuickBooks Quantity Sync Errors: Step-by-Step
QuickBooks Desktop: Inventory Issues (Part 1 of 2) Troubleshooting
sbb-itb-19ed50f
Check the Sync Log First
The sync log tells you which transaction failed first. That matters because it helps you separate the cause from the symptom fast. Before you change any counts, open the log. In many cases, a quantity mismatch points back to a failed transaction, not the root problem. If you adjust counts too early, you can cover up the failure that caused the inventory drift in the first place.
In Rapid Inventory, the main place to review sync discrepancies is the Inventory > Reconcile > History tab. Sort the log from oldest to newest so the first failure shows up first.
Find the First Failed Item and Transaction
A simple review order makes this much easier. Start with the item name and SKU so you can confirm which product failed. Then check the transaction date, sync direction, and transaction type, such as an invoice, receipt, adjustment, or transfer.
The sync direction tells you which system introduced the wrong quantity first. If QuickBooks Desktop pushed the bad quantity, start the fix there. If the inventory software pushed it, the issue is more likely tied to item mapping, warehouse assignment, or transaction logic.
Fix the first failed transaction first. Later failures are often just fallout from that earlier problem.
Once you've identified that first failed transaction, the next step is to check whether the item itself is set up correctly.
Separate Single-Item and Batch-Wide Failures
The log also shows how far the problem spread. Use it to see whether the failure is limited to one SKU or affects many records.
A single-item issue usually looks pretty clear: one SKU fails again and again while other items in the same batch sync without trouble. The error message is often the same each time, and the SKU may fail on the same transaction type every time.
A batch-wide issue looks different. You’ll see the same error message across many SKUs, often in the same short time window - right after an application update, a permission change, or a company file issue. If every row in a sync session shows a failed status, the root cause is usually bigger than one item’s setup. In that case, look at the sync engine, permissions, or file integrity instead of any single record.
| Log Pattern | Likely Cause |
|---|---|
| One SKU fails repeatedly; others sync normally | Item setup, bad mapping, or inactive status |
| Many SKUs fail at the same timestamp | Sync service, permission, or company file issue |
Sort by SKU and error message to spot repeat failures. If one SKU keeps failing, review its item setup next. That quick scope check tells you whether to keep digging into the item itself or move on to a broader sync problem.
Review QuickBooks Item Setup
Once the log points to one SKU, check the item record first. Start there before you touch any counts.
Check Item Type, Active Status, and Item Mapping
First, verify the item type. In QuickBooks Desktop, only Inventory Part items track on-hand quantity. If the item is set up as a Non-Inventory Part or Service, QuickBooks won’t track stock for it. When that happens, the sync may show zero or fail.
Next, make sure the item is active. In QuickBooks Desktop, inactive items are often skipped during sync cycles. So even if stock changes somewhere else, those updates may never get written back.
The third check is item mapping. Each item needs an exact match between its QuickBooks record and the matching record in your inventory management software for QuickBooks Desktop. This is where things often go sideways. Duplicate item names, renamed SKUs, and items that were deleted and then recreated can all break that connection.
Compare both item lists and look for:
- Duplicate SKUs
- Renamed items
- Records recreated under a new name
Any of those can break the mapping and lead to skipped updates or duplicate updates.
If the type, status, and mapping all look right, the next thing to check is whether the item is landing in the correct warehouse.
Check Site, Location, and Warehouse Setup
If you track stock across more than one warehouse, location setup matters just as much as item setup. You can have the right total on-hand count and still have a mismatch. Why? Because stock may be sitting in the wrong site. When that happens, every report and sync shows the item in the wrong place.
Each physical warehouse should map to one active location in each system, with matching names. If a transfer posts to an unmapped location, stock can land in the wrong site or fail to sync at all.
| Setup Condition | Common Setup Problem | Quantity Issue Caused |
|---|---|---|
| One active record per physical warehouse | Multiple records for the same warehouse name | Stock splits across duplicate location records; on-hand totals appear wrong |
| Matching location names in both systems | Location exists in one system but not the other | Stock can be assigned to the wrong site or fail to sync there |
| Transfers recorded as true location moves | Transfer posted to an unmapped location | Source warehouse shows short; destination shows overstated |
| Inactive locations removed from both systems | Stale or test locations left active | Items assigned to inactive sites fail to sync; stock goes missing in reports |
If the total count is right but the site count is off, fix the location mapping before you adjust quantity. Make sure every warehouse has a matching, active site in QuickBooks, and send every transfer to the right location.
Correct Bad Counts in the Right Order
Once the item setup and location mapping check out, fix the numbers in the right sequence. That part matters more than it sounds. If you post an adjustment before you confirm the true count, you can make the gap even worse.
Confirm the Real On-Hand Count Before Making Changes
Pause active syncs and stop new inventory transactions, including large imports and bulk adjustments, until counts are stable.
Then verify the affected items using your best source of truth:
- Physical count
- Cycle count report
- Count sheet
- Barcode scan data
If a full count across thousands of SKUs isn't practical, start with the items that show the biggest gaps, the highest-dollar stock, and the fastest movers. Write down the confirmed quantity and location in a worksheet before you change anything in QuickBooks.
Review Transactions, Post Inventory Adjustments, and Run Verify/Rebuild
Use the first failed transaction in the sync log as your starting point. Then trace the drift back through transactions posted around that same time. In QuickBooks Desktop, open the Item List, run a QuickReport for the affected item, and filter it to the date range where counts started to split apart. Customize the report so it shows transaction type, date, quantity, and running balance. You're looking for odd activity: sales that pushed stock negative, receipts that were edited or deleted, transfers sent to the wrong site, or large manual adjustments that don't line up with warehouse records.
Next, use the Audit Trail report as a second check for edits, deletes, and manual changes near the mismatch date. Filter for invoices, receipts, adjustments, transfers, and build assemblies. Set the Entered/Modified date range to 14–30 days before the discrepancy was found. Then review the Last Modified By column to see whether a user made a manual change the sync tool never picked up.
Prioritize transactions closest to the first mismatch; they are the most likely cause.
After you find the problem transaction, post an inventory quantity/value adjustment from Vendors > Inventory Activities > Adjust Quantity/Value on Hand. Enter the adjustment on the count date, use Inventory Shrinkage or Inventory Adjustment, and add a memo that points to the count sheet or ticket. Adjust only items you've verified.
After that, re-run the Inventory Valuation Summary and Inventory Stock Status by Item reports to make sure the corrected items now show the expected quantities. If the numbers still don't match, run File > Utilities > Verify Data. If QuickBooks reports errors, follow up with Rebuild Data, then run Verify again to confirm the issue is fixed. Once the reports and test sync come back clean, move on to the prevention steps that follow.
Prevent Future Quantity Sync Errors
After you fix the count, the next job is simple: make sure the same mismatch doesn’t creep back in.
Standardize Item Setup and Transaction Timing
Start with item setup and posting order. That’s where a lot of repeat sync issues begin.
Use one SKU per item, one naming format, and one unit of measure. If two people set up the same item in slightly different ways, the sync can go sideways fast.
Timing matters too. Set a daily cut-off so transactions don’t get stranded mid-process when a sync runs. For example:
- Post all receipts by 3:00 PM
- Post all shipments by 4:00 PM
That kind of routine cuts down on in-between states that lead to bad quantity data.
For items that arrive and ship on the same day, always post the receipt first, then run the sync, then post the sale. That order matters. If you flip it, the system can read the item as unavailable or out of balance.
It also helps to limit who can create new items or backdate transactions. Too many hands in the setup process usually means more duplicates, wrong item types, or date-related sync problems. A monthly review of newly created items gives you a chance to catch those mistakes before they start affecting quantity flow.
For count checks, tie the review pace to your order volume. If certain items move fast, use cycle counting on those SKUs so you can catch drift early instead of finding it weeks later.
Use Two-Way Sync and Inventory Reporting to Catch Issues Earlier
Good process cuts down on human error. Two-way sync helps catch the stuff that still slips through.
With two-way sync, quantity, status, and location changes stay lined up in both systems. If quantity moves in only one direction, drift can build quietly in the background until you’ve got a bigger mess on your hands.
Rapid Inventory is built for QuickBooks Desktop workflows and includes two-way QuickBooks sync, multi-location and warehouse tracking, mobile barcode scanning, cycle counting workflows, and real-time inventory reports. Barcode-based receiving and shipping help reduce keying mistakes before data ever reaches QuickBooks. Real-time dashboards also make it easier to spot negative quantities or odd stock changes early. Teams can also review Reconcile History to see when and why the system had to auto-adjust QuickBooks quantities.
Conclusion: Fix the Cause, Correct the Count, and Monitor the Next Sync
Once setup is stable, move from cleanup mode to early warning.
Quantity sync errors tend to follow the same pattern: a mismatch shows up, counts drift more, and the gap gets tougher to fix the longer it sits. The process that works is pretty direct - recognize the symptom early, read the sync log first, review item setup and location mapping, correct counts in a clean sequence, and put controls in place so the same error doesn't repeat.
After a correction, keep an eye on the next sync and a few new transactions to make sure the root cause is gone.
FAQs
Why fix the first failed sync before adjusting inventory?
Unresolved sync errors tend to snowball. They can stall timestamps, slow performance by making the system chew through extra records, and create bad data that leads to missed billing cycles, audit problems, and records you can’t trust.
That’s why fixing the first failure matters. It gives you a clean baseline before you make inventory changes, which helps stop small issues from turning into a bigger mess.
How do I know if the problem is item mapping or a sync service issue?
Start by checking the sync log in Rapid Inventory. In most cases, it tells you whether the issue comes from the sync service or from item mapping. You’ll often see messages like "Item not found" or "Account could not be found."
If the item is in your inventory system but missing in QuickBooks Desktop, that points to a mapping error. The fix is usually simple: create the missing item in QuickBooks, or connect it in the mapping dashboard.
When should I run Verify Data and Rebuild Data in QuickBooks Desktop?
Run Verify Data and Rebuild Data in QuickBooks Desktop when you think the company file may be damaged or when inventory numbers still look wrong after manual adjustments.
Use Verify Data from File > Utilities to scan the file for errors or data damage. If QuickBooks reports lost data integrity, run Rebuild Data to repair the file. Create a backup first.



