
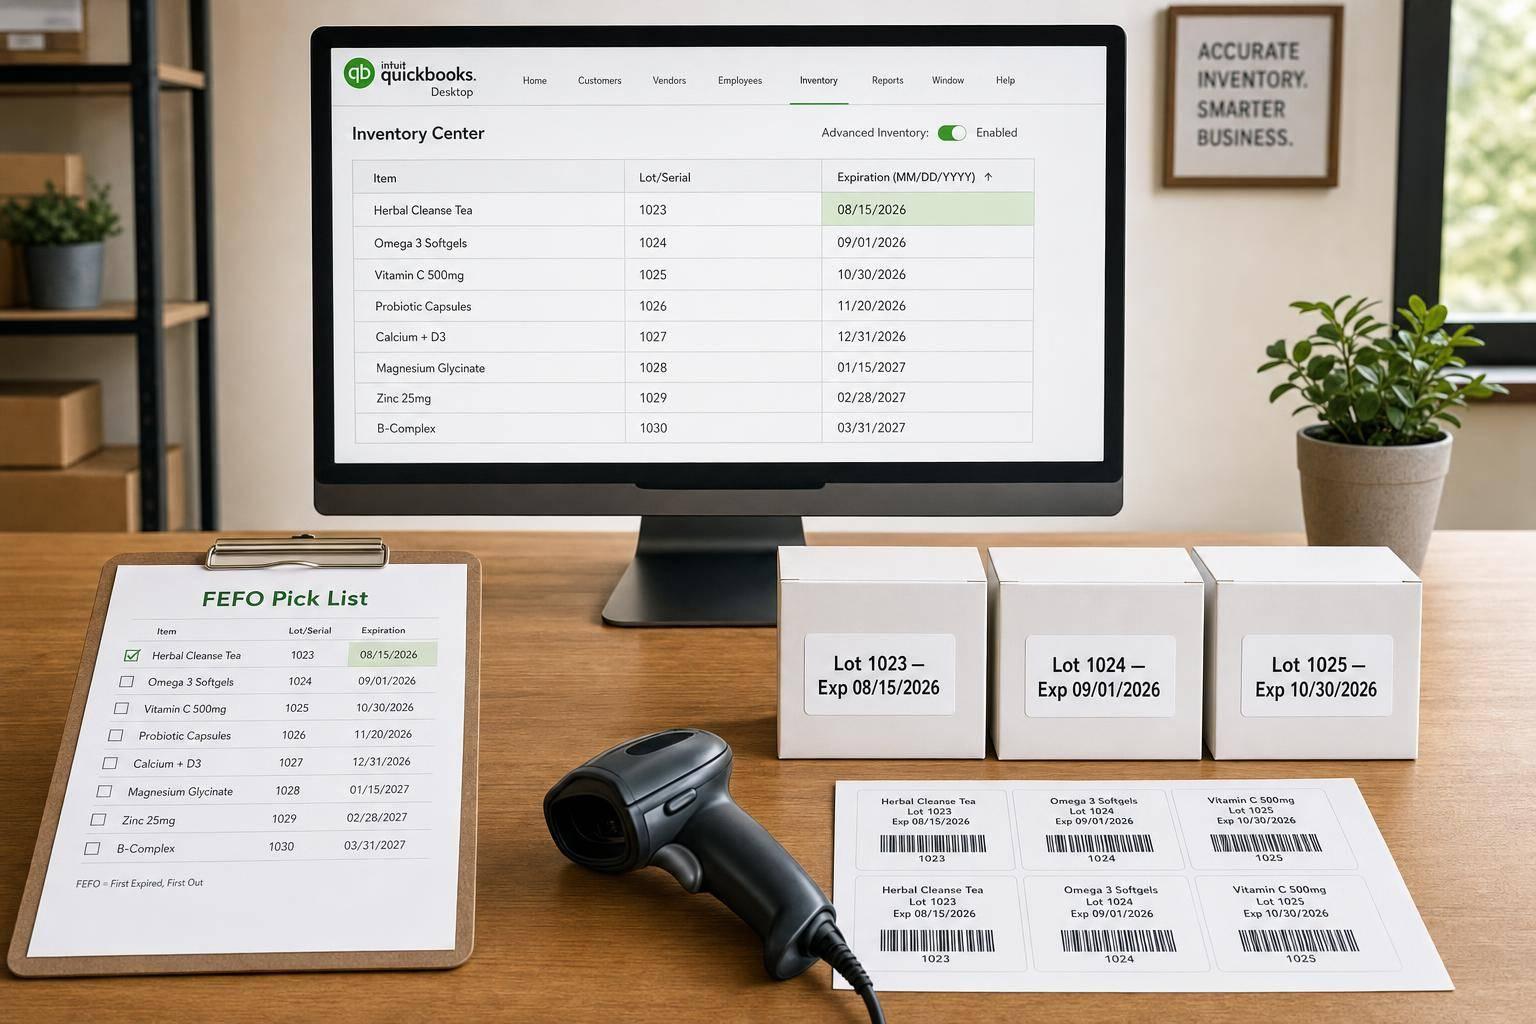
If you use QuickBooks Desktop Enterprise, expiration tracking works only when you turn on Advanced Inventory and record lot or serial details at receiving. That’s the whole system in plain English: set it up right, enter each lot with its expiration date, then use reports and stock rules to move the oldest-dated product out first.
Here’s the short version I’d want to see first:
- I need QuickBooks Desktop Enterprise with Advanced Inventory
- I must turn on lot or serial tracking plus expiration dates
- I need to enter dates in MM/DD/YYYY format, like 09/08/2026
- I should record one line per lot when a shipment has mixed dates
- QuickBooks stores expiration dates, but it does not force FEFO
- QuickBooks also does not block my team from selling expired stock
- I can use reports to spot stock that expires in 30–45 days or 60–90 days
- When stock expires, I need to quarantine it and adjust it out of inventory
That means this process is less about a switch in settings and more about daily data entry. If receiving staff skip a lot number, merge two date ranges into one line, or type the wrong date, the rest of the workflow gets messy fast.
A simple way to think about it:
| Step | What I do | What to watch for |
|---|---|---|
| Setup | Turn on inventory, Advanced Inventory, lot/serial tracking, and expiration dates | Admin access and Single-user mode are required |
| Receiving | Enter item, lot/serial, quantity, location, and expiration date | Use one receipt line per lot |
| Storage and picking | Review lots by site, bin, and expiration date | QuickBooks won’t force FEFO for me |
| Review | Check near-expired stock on a set schedule | Set rules for 60–90 days, 30–45 days, and expiration day |
| Write-off | Remove expired stock with an inventory adjustment | Use an expense account such as shrinkage or obsolete inventory |
So if I had to sum up the article in one sentence: QuickBooks can track expiration dates, but only if I feed it clean lot data and use that data on purpose.
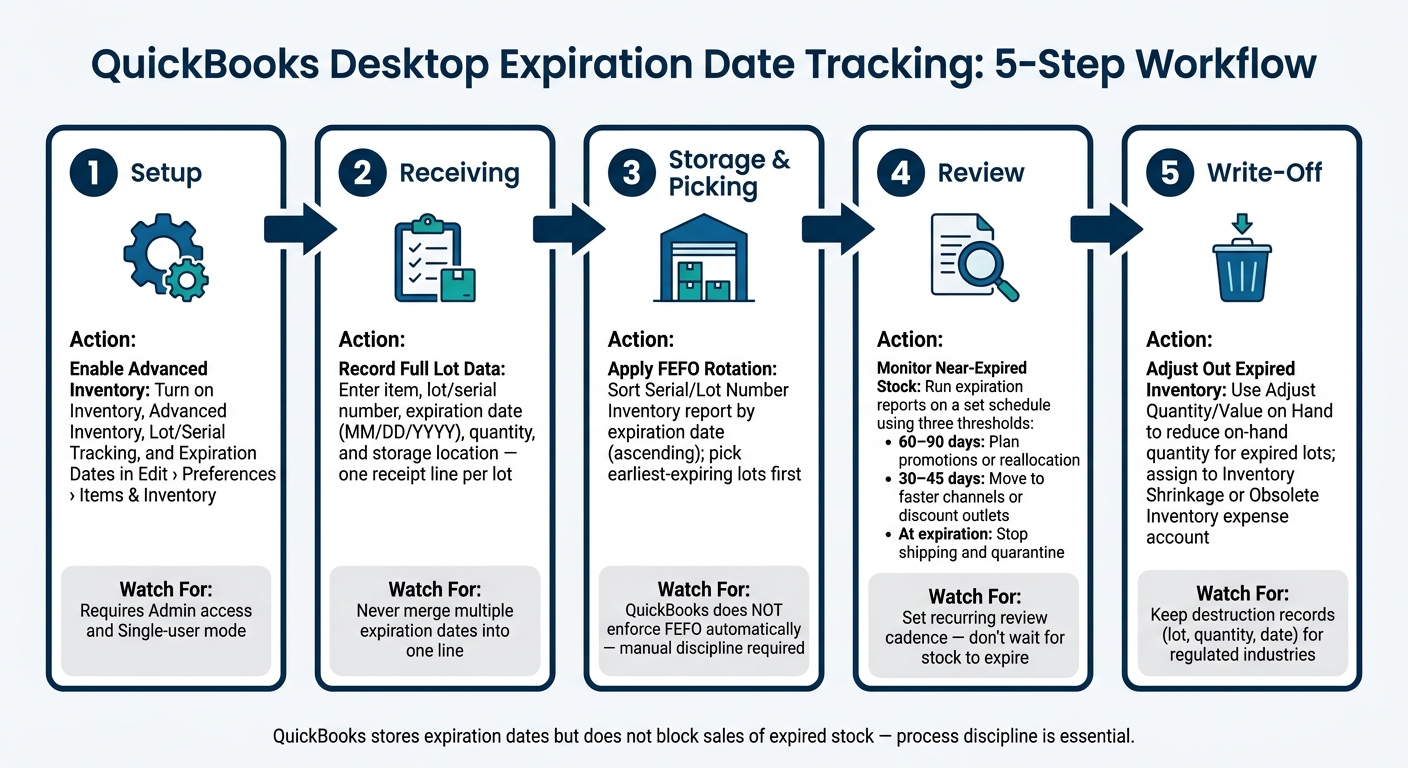
QuickBooks Desktop Expiration Date Tracking: 5-Step Workflow
How to set up expiration date tracking in QuickBooks Desktop Enterprise
Turn on inventory, Advanced Inventory, and Serial or Lot Numbers with Expiration Dates
Before you can track expiration dates, QuickBooks Desktop Enterprise needs a few inventory settings turned on first, or you can use inventory management software for QuickBooks Desktop to automate the process. The main goal here is simple: enable the fields that store lot and expiration data.
Go to Edit › Preferences › Items & Inventory › Company Preferences. First, make sure Inventory and purchase orders are active is checked. Then open Advanced Inventory Settings and go to the Serial/Lot Numbers & Expiration Dates tab.
From there:
- Select Activate Lot or Serial Numbers
- Choose Lot Numbers if you track inventory in batches
- Choose Serial Numbers if you track each unit one by one
- Select Activate Expiration date
You need to turn on inventory, Advanced Inventory, and lot or serial tracking before you enter expiration dates.
There’s one catch: only an Admin can change these settings, and QuickBooks must be in Single-user mode.
Choose which transaction forms show expiration dates
Once the feature is on, decide where the expiration date field should appear. A good rule of thumb is to show it on receiving forms first, then on sales and transfer forms so the data follows the item through its life cycle.
Use the Show expiration dates in setting to choose the forms.
| Transaction Type | When to enable it |
|---|---|
| Item receipts, bills, credit card purchases | Capture lot and expiration data when inventory is received |
| Invoices, sales receipts | Review and select lots by expiration date when fulfilling orders |
| Inventory transfers and quantity adjustments | Correct or reassign expiration data when stock is moved or adjusted |
| Build Assembly | Track component and finished-goods expiration dates for manufactured items |
You can also choose how QuickBooks handles missing expiration dates on those forms:
- Alert me if expiration date is empty shows a warning, but still lets the user save the transaction
- Don't alert me if expiration date is empty keeps the field optional
That setting applies to the forms you selected.
If you want tighter control, make serial or lot numbers required on the same forms: item receipts, invoices, sales receipts, inventory transfers, and Adjust Quantity on Hand.
Once these fields are turned on, your receiving team can enter lot, quantity, location, and expiration data on each inbound transaction.
sbb-itb-19ed50f
What data to record when inventory is purchased and received
Enter lot or serial numbers, expiration dates, quantities, and locations
Bad receiving data creates problems later, especially with expiration tracking. The fix is simple: record the full lot record the moment inventory comes in.
For each receipt line, enter the item name, lot number or serial number, expiration date in MM/DD/YYYY format, quantity, unit of measure, receipt or PO number, and storage location. Match the vendor packing slip and the product label exactly, including the lot code as printed.
If a shipment includes more than one lot or more than one expiration date, enter one receipt line per lot. Don’t roll them into one line. That shortcut causes trouble for lot-level picking and reporting.
For example, if 100 units arrive split across two expiration dates, enter them as two separate lines, not one combined quantity. The line totals should still match the purchase order.
Correct or assign expiration data using inventory adjustments
If received stock has missing or wrong lot number, serial number, expiration, quantity, or location data, use the Adjust Quantity/Value on Hand form to fix it.
Before making any adjustment, check the product label, vendor paperwork, and receiving notes. If you can’t confirm the date, quarantine the stock. Never guess. One bad edit can throw off sales records, reporting, inventory value, and recall readiness.
How Rapid Inventory supports receiving accuracy
Rapid Inventory helps cut receiving mistakes with mobile barcode scanning for item IDs, lot numbers or serial numbers, expiration dates, quantities, and bin or warehouse locations. Its two-way QuickBooks Desktop sync keeps those records aligned without double entry.
Clean receiving data keeps FEFO picking and expiration reports accurate as inventory moves into storage and then out through sales.
How to use expiration data in storage, picking, sales, and reporting
Track inventory with expiration dates by warehouse, site, bin, and lot
Once you capture lot and expiration data at receiving, that information should guide what happens next: where stock goes, what gets picked, and how inventory gets rotated.
Run the Serial/Lot Number Inventory report and tailor it to show item name, lot number, site, quantity, and expiration date. Then sort the report in ascending order by expiration date and filter by site. That makes it much easier to spot near-expired stock by location.
You can also use that same report to build pick orders, starting with the lots that expire first.
Pick and sell the earliest-expiring stock first using FEFO
FEFO - First-Expired, First-Out - means your team picks the lot with the earliest expiration date first, as long as it's still within its usable window. That sounds close to FIFO, but the two are not the same.
FEFO picks the lot with the earliest expiration date. FIFO picks the oldest receipt. For perishables, pharmaceuticals, and other dated items, those dates often don't line up. And when they don't, spoilage and write-offs can climb fast.
A simple rule works well here:
- Use FIFO for stable, non-dated stock.
- Use FEFO for perishables, pharmaceuticals, and other items where expiration matters more than receipt date.
To put FEFO into practice, train pickers to sort lot reports by expiration date in ascending order. On the floor, rotate stock so the earliest-expiring lots are easiest to reach. That way, the process works both on paper and in the bin.
Rapid Inventory can surface lot, location, and expiration data in mobile pick workflows and sync picks back to QuickBooks Desktop.
Handle near-expired or expired inventory with reports and adjustments
When a lot gets too close to expiration, don't keep treating it like normal stock. That's the point where picking turns into decision-making: discount it, transfer it, quarantine it, or write it off.
Set clear thresholds so the team knows what to do without guessing:
- 60–90 days to expiration: Review the lot and plan promotions, volume discounts, or channel reallocation.
- 30–45 days to expiration: Move it to faster-turnover channels, discount outlets, or internal use.
- At expiration: Stop shipping, quarantine the stock, and write it off.
Near-expiration reports can trigger those actions before the product expires. If stock has already expired, use an Inventory Adjustment transaction in QuickBooks Desktop to reduce the on-hand quantity for the affected item and lot or serial numbers. Assign the adjustment to an expense account such as Inventory Shrinkage or Obsolete Inventory.
If you work in regulated industries like food or pharmaceuticals, keep records showing which lots were destroyed, how much was destroyed, and the dates involved.
Rapid Inventory can also help with expiration dashboards and cycle counting.
QuickBooks Enterprise - Expiration Dates - Inventory with Lot Numbers - Advanced Inventory
Conclusion: The core process for expiration date tracking in QuickBooks Desktop
Expiration date tracking in QuickBooks Desktop Enterprise comes down to three parts working in sync: turn on Advanced Inventory, record expiration data when items are received, and use that data to drive storage, picking, and write-offs. Put simply, that’s the working process for keeping expiration control in QuickBooks Desktop on track.
When receiving is done right, everything that follows gets easier. Accurate receiving data is the backbone of the whole workflow. It’s the record that makes FEFO picking, near-expiration reviews, and write-offs possible later on. Store inventory by lot and location, pick the lots that expire first, review expiration reports on a regular basis, and use inventory adjustments to remove expired stock.
For teams that want to move faster across locations, Rapid Inventory helps tighten up that process. Rapid Inventory adds two-way sync, mobile barcode scanning, multi-location and warehouse tracking, and FEFO picking so receiving and picking stay in step.
FAQs
Can QuickBooks stop expired items from being sold?
QuickBooks Desktop won’t automatically block the sale of expired items.
It can store expiration dates and show them in the Inventory Expiration Status report. But there’s no built-in hard stop that prevents someone from selling an item after it expires.
That gap matters. If your team is moving fast, it’s easy for the wrong lot to slip through.
To reduce that risk, many businesses use Rapid Inventory alongside QuickBooks Desktop. Its FEFO picking method helps staff choose stock with the earliest expiration date first, which lowers the chance of expired products being sold.
What if one shipment has multiple expiration dates?
Record each expiration date with the matching lot or serial number. That way, every part of the shipment stays tracked correctly during receiving and at the point of sale.
With Rapid Inventory, you can assign expiration dates to individual lots and use FEFO picking so items with the earliest dates go out first.
How often should I review expiring inventory?
Review expiring inventory on a regular basis instead of waiting until something goes wrong. When you check the Inventory Expiration Status report consistently, you can catch items that are getting close to their expiration date early enough to discount, donate, or dispose of them.
It also helps to build expiration checks into routine audits and cycle counts. That keeps your physical stock in line with your digital records and cuts down on surprises. Rapid Inventory can support real-time reporting to help with accuracy and compliance throughout the year.



