
If your assembly cost changes and your sales price stays the same, your margin shrinks. That’s the whole issue.
I’d price inventory assemblies in QuickBooks Desktop like this:
- Start with the assembly’s current build cost
- Check the weighted average cost of each part
- Include labor and other charges in the BOM
- Set the sales price with either a markup or a target margin
- Review prices again when part costs change
Here’s the short version: QuickBooks Desktop does not usually update an assembly’s sales price when component costs go up. In many setups, it also treats the cost shown in the item record as a starting estimate, while the actual build cost comes from the parts used at the time of the build. So if you build 100 units with higher-cost components but keep the same selling price, profit per unit drops.
A few points matter most:
- BOM cost helps me set the starting price
- Actual build cost tells me what the assembly now costs in stock
- Editing a BOM changes future builds, not units already on hand
- Enterprise can update costs with less manual work than Premier or Accountant
- Multi-location inventory errors can block builds or skew part cost use
For pricing, I’d use one of these basic formulas:
- Cost-plus: Cost + (Cost × Markup %)
- Margin-based: Cost ÷ (1 − Target Margin %)
- Manual market pricing: Price based on what buyers will pay, then check margin against cost
| Method | Best when | Watch for |
|---|---|---|
| Cost-plus | You want a fixed markup | Can miss market pressure |
| Margin-based | You need a set gross margin | Needs a manual calculation |
| Manual market pricing | You sell based on buyer demand | Margin can slip if costs rise |
If I had to sum up the whole article in one line, it would be this: use current build cost as the base, then review sales price on a set schedule so rising part costs don’t eat your profit.
QB Power Hour: QuickBooks Inventory Assemblies and Manufacturing - Part 3
If you need a more robust solution for your business, you can try Rapid Inventory for free to streamline your QuickBooks Desktop workflows.
sbb-itb-19ed50f
How QuickBooks Desktop Calculates Assembly Cost

QuickBooks pricing starts with assembly cost. So if that number is off, your pricing can be off too.
Inventory Parts, Assemblies, and Average Cost
An inventory part is a tracked component you purchase and keep in stock. An inventory assembly is the finished item you build from parts listed in a BOM, along with service or non-inventory items used for labor and other charges.
QuickBooks Desktop uses weighted average cost to value inventory and calculate COGS when you sell an item. For a finished assembly, the cost in the item setup is just a starting estimate. Component prices move over time, so assembly cost is based on the weighted average cost of the parts used, not simply the latest price you paid.
BOM cost gives you the starting number. Actual build cost shows whether that number still leaves enough margin.
What Goes Into Assembly Cost
An assembly's cost can include more than raw materials. QuickBooks lets you add service items for labor and non-inventory items for other costs right in the BOM, so those amounts flow into the finished item.
QuickBooks updates actual assembly cost when you save a Build Assembly transaction.
| Bill of Materials (BOM) Cost | Actual Average Cost | |
|---|---|---|
| Definition | Estimated BOM cost | Actual average cost from the completed build |
| What it includes | Estimated costs of inventory, service, and non-inventory items | The actual costs of components used at the time of the build |
| When it updates | When the BOM is edited or component item records change | Only when a new Build Assembly transaction is completed |
| Pricing impact | Used to estimate margins and set initial sales prices | Used to determine actual profitability and COGS for financial reporting |
One point trips people up all the time: editing a BOM does not change the cost of assemblies already in stock. Those changes apply only to new manufacturing orders created after the edit. In plain English, items already on hand may carry a cost that doesn't match the updated BOM. That's why margin checks matter.
Use BOM cost to set the starting price, and use actual build cost to see what your margin looks like in practice.
With cost defined, the next step is making sure the assembly item and BOM capture every cost the right way.
Set Up Inventory Assemblies and Cost Fields in QuickBooks Desktop
Use the item setup to keep assembly cost and sales price in sync.
Create the Assembly Item and Assign the Right Accounts
Start by turning on inventory tracking. Go to Edit > Preferences > Items & Inventory and make sure "Inventory and purchase orders are active" is checked.
Then create the assembly item. In Lists > Item List, click the Item drop-down and choose New. Set the item type to Inventory Assembly.
Next, assign the accounts that tell QuickBooks where each part of the transaction should go. These accounts shape how cost and revenue move through your books:
- COGS Account - cost of sold units
- Income Account - sales revenue
- Asset Account - finished goods value
Before you build the BOM, review each component's cost in the Item List. If one part is off, the total assembly cost can drift fast.
Once the item record is ready, build the BOM using the correct component costs.
Build the BOM and Review Cost Update Settings
Add each component and the exact quantity used for one finished unit. QuickBooks gives you four costing options, and each one handles updates a little differently.
| Cost Configuration Option | How Cost Is Calculated | When It Updates | When to Use |
|---|---|---|---|
| Use Global Preference | Based on general Items & Inventory preferences | Follows global preference rules | Same costing method across all items |
| User Defined Cost | Entered manually in the item record | Only when manually changed | Fixed costs or overhead not included in the BOM |
| Use Total BOM Cost | Sum of all component costs in the BOM | When BOM components or quantities are edited | Cost should match the current BOM setup |
| Auto-updated BOM Cost (Enterprise with Advanced Inventory only) | Automatically adds up current component costs | Automatically as component costs change | Live cost tracking without manual edits |
After the BOM is set, use that cost as the basis for your sales price. One thing trips people up all the time: if a component cost goes up, QuickBooks does not auto-update the assembly's sales price. You need to change that manually in the Item List.
When Multi-Location Inventory Accuracy Matters
If you build from more than one stock location, location accuracy matters just as much as the component cost itself. QuickBooks calculates assembly cost based on the weighted average cost of components. So if parts are sitting in the wrong location on paper, builds can get blocked or costs can come out wrong.
Rapid Inventory helps with this through two-way QuickBooks sync, warehouse tracking, and real-time reports. When location counts are right, builds and pricing stay aligned.
Calculate Assembly Cost and Set the Sales Price
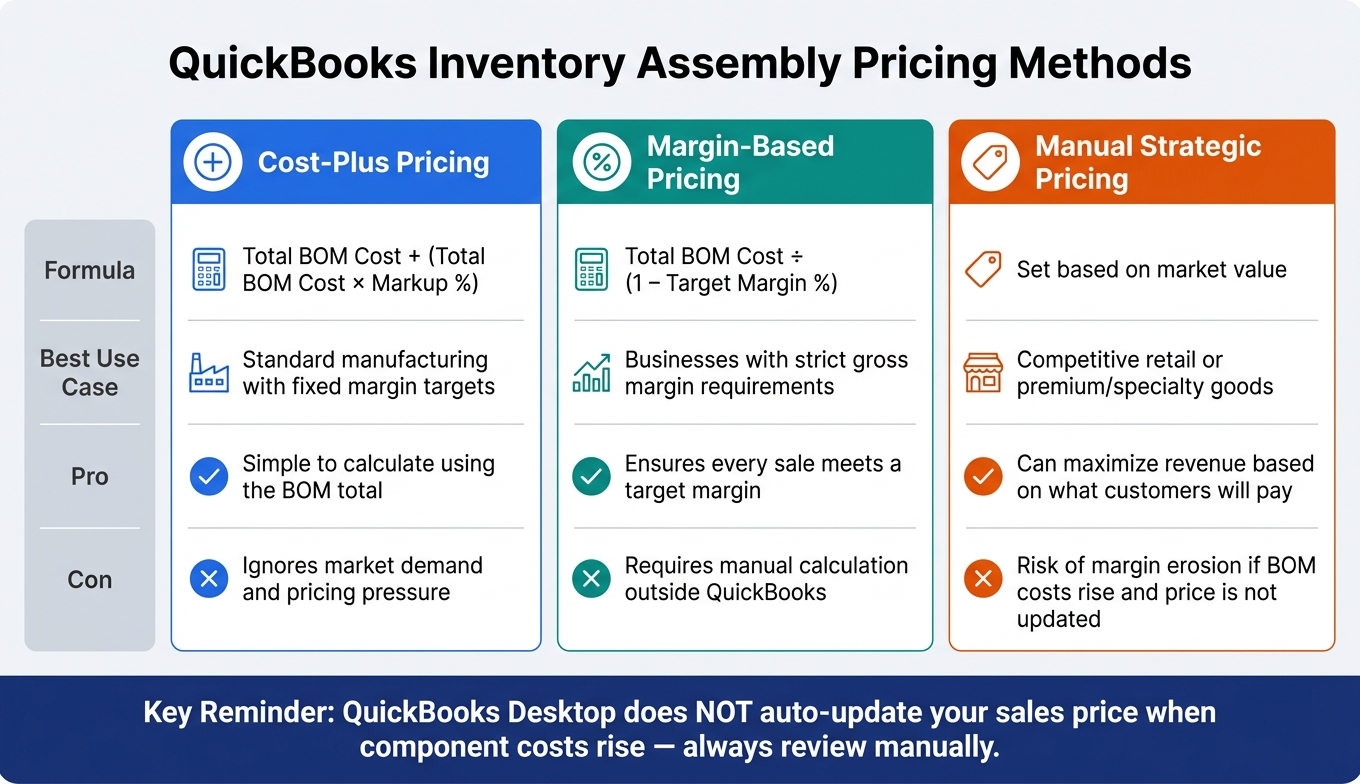
QuickBooks Assembly Pricing Methods: Cost-Plus vs. Margin-Based vs. Market Pricing
Once the BOM is in place, check the live build cost before you set a sales price.
Review Build Cost Before Setting a Price
Open the Build Assemblies window (Vendors > Inventory Activities > Build Assemblies) and choose your assembly item. QuickBooks shows the total BOM cost below the component list. Use that number as your cost base, not the sales price.
Then review Qty on Hand and Qty Needed for each component. If a part is short, click Show Shortage to flag it. That step matters because shortages can lead to new purchases at higher prices, and that can change the final assembly cost before you lock in a price.
If you're working with multi-level builds, select Automatically build required subassemblies so QuickBooks includes nested component costs.
Want to see how QuickBooks gets a component's cost? Run Reports > Inventory > Inventory Valuation Summary, set the date range to All, and double-click an item to view the average cost calculation.
Choose a Pricing Method and Enter the Sales Price
After you confirm the cost, pick the pricing method that lines up with your margin target.
| Pricing Method | Formula | Best Use Case | Pros | Cons |
|---|---|---|---|---|
| Cost-Plus Pricing | Total BOM Cost + (Total BOM Cost × Markup %) | Standard manufacturing with fixed margin targets | Simple to calculate using the BOM total | Ignores market demand and pricing pressure |
| Margin-Based Pricing | Total BOM Cost ÷ (1 − Target Margin %) | Businesses with strict gross margin requirements | Helps ensure every sale meets a target margin | Requires manual calculation outside QuickBooks |
| Manual Strategic Pricing | Set based on market value | Competitive retail or premium/specialty goods | Can maximize revenue based on what customers will pay | Risk of margin erosion if BOM costs rise and the price is not updated |
To enter the price, go to Lists > Item List, double-click the assembly, and type the amount into the Sales Price field.
Use Real-Time Reports to Verify Cost Before Pricing
Run a real-time inventory cost report to confirm part costs and stock before saving the price. It's a simple gut check that helps keep the sales price in line with current component costs.
Keep Assembly Costs Accurate and Fix Common Pricing Problems
Keep Assembly Costs Current as Inventory Changes
After you set the sales price, keep the cost base current so margins don't slowly slip.
Assembly costs move when component average costs change. Inventory adjustments can move them too. That's why this isn't a set-it-and-forget-it job. You need a simple review routine.
Use the checklist below to keep assembly pricing lined up with current costs.
| Task | Location in QuickBooks Desktop | Recommended Frequency |
|---|---|---|
| Check pending builds | Inventory > Build Assemblies (check for "Pending") | Weekly |
| Record purchases at current cost | Vendors > Enter Bills / Receive Items | As purchases occur |
| Review average cost | Reports > Inventory > Inventory Valuation Summary | Monthly |
| Compare price to BOM cost | Lists > Item List > double-click the assembly | Monthly or after major cost shifts |
| Review build history | Inventory > Build Assemblies > History | Quarterly |
Enterprise can auto-roll component changes into assembly cost.
Fix Cost Mismatches, Shrinking Margins, and Missing Labor Costs
If pricing still looks wrong, start with the usual trouble spots.
| Symptom | Likely Cause in QuickBooks Desktop | Steps to Fix |
|---|---|---|
| Assembly cost doesn't match BOM expectations | Weighted average cost reflects older purchase prices | Run Inventory Valuation Summary, double-click the assembly to review cost history, and confirm each component has an assigned cost |
| Margins shrinking after component cost increases | Sales price wasn't updated after component costs rose; QuickBooks does not auto-update sales prices by default | Update the Sales Price in the Item List, or turn on automatic price updates in Enterprise |
| Labor missing from assembly cost | Labor or overhead items are missing from the BOM | Edit the assembly item, open the BOM table, and add the relevant Service or Other Charge items with their actual rates |
Missing labor trips up a lot of teams. If your BOM only includes raw material parts, the assembly cost ends up too low. That means your margin can wear down over time without much warning.
Conclusion: Price Assemblies with Accurate Costs and Regular Review
Pricing isn't a one-time task. Keep your BOM complete, review build costs on a set schedule, and update the sales price when component costs change. For businesses managing inventory across multiple locations, Rapid Inventory supports more accurate assembly costing through multi-location tracking and real-time inventory visibility for QuickBooks Desktop users.
FAQs
How often should I review assembly prices?
Review assembly prices any time the costs of the parts in your bill of materials change.
QuickBooks Desktop does not automatically update an assembly item's sales price when component costs change. So in most cases, you'll need to update those prices manually.
Regular price checks help keep profit margins on track and make sure your pricing still matches your current inventory value.
What happens to old stock after a BOM change?
Changing the bill of materials for an assembly in QuickBooks does not go back and change the cost or value of items already sitting in inventory.
When you sell those items, QuickBooks uses the component costs from the time the assembly was built, or it follows your inventory valuation method, such as weighted average cost. Past transactions stay as they are, so if the value of existing inventory needs to be fixed, you may need an accountant to make manual adjusting entries.
Should I price from BOM cost or actual build cost?
It depends on how you handle accounting.
BOM cost is the total cost of all the parts needed to make the assembly. Actual build cost is figured out when you complete and save a build assembly transaction, based on your inventory valuation method.
QuickBooks also gives you a few other cost options. You can use:
- the total BOM cost
- a user-defined cost
- global preferences
You can also turn on auto-updated BOM cost, so changes in component prices flow into your assembly costs.



