
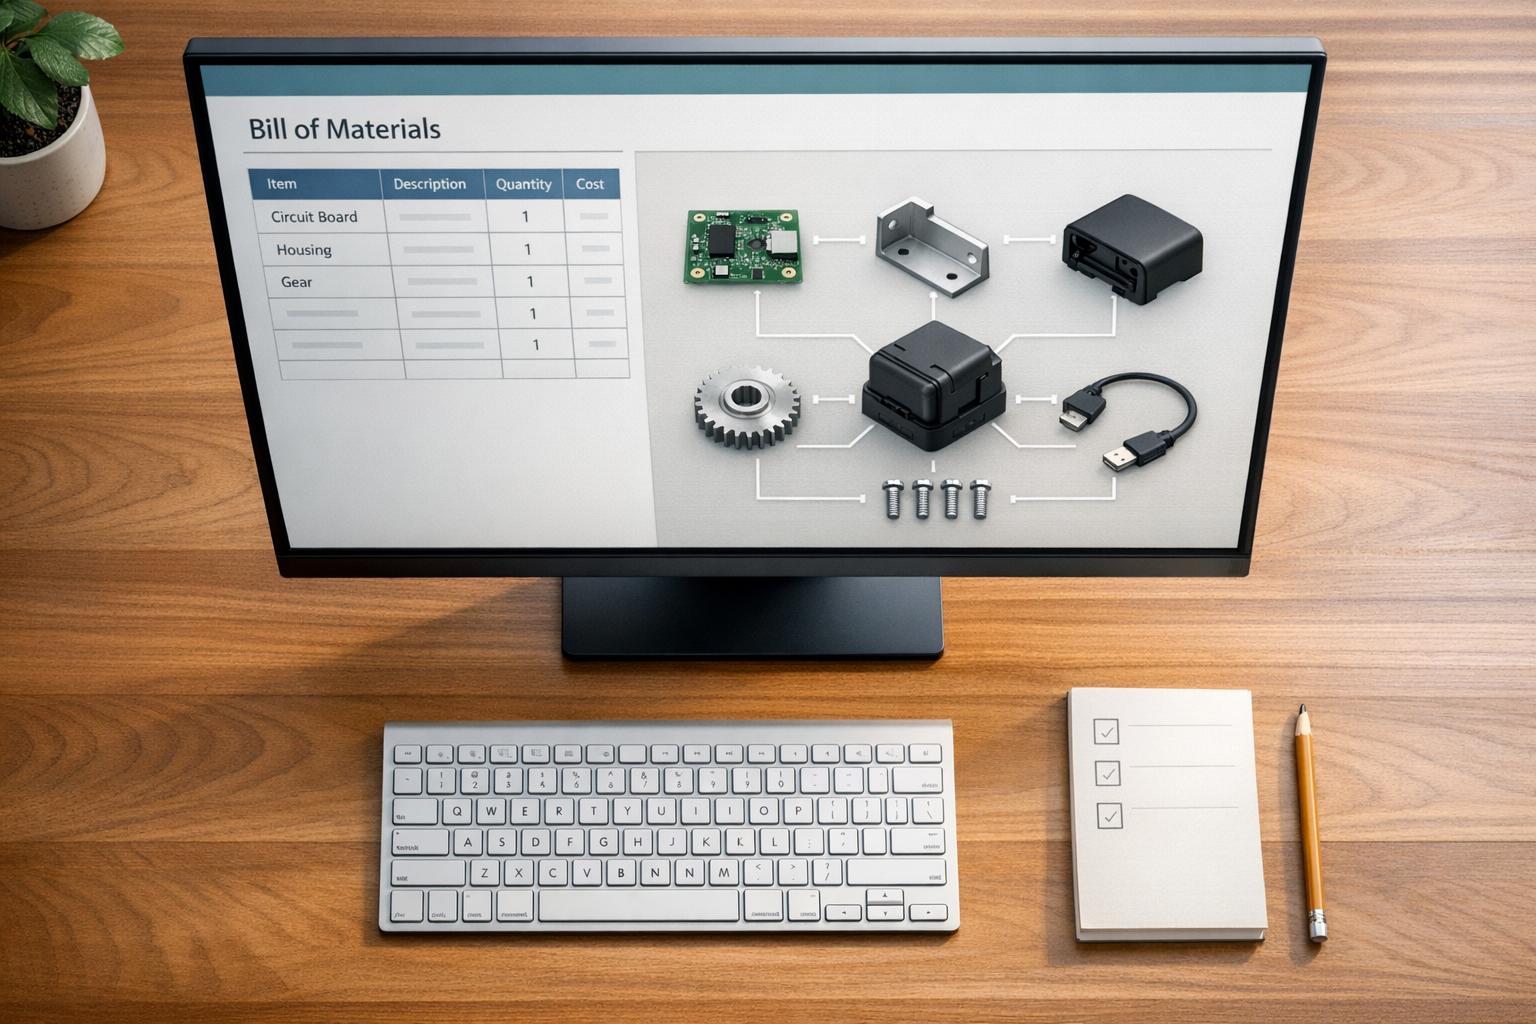
QuickBooks Desktop's Bill of Materials (BOM) feature simplifies inventory and production management. It tracks raw materials, components, and costs for creating finished goods. Available in Premier, Enterprise, and Accountant editions, BOMs adjust inventory automatically during production and calculate total costs, including labor and overhead. With QuickBooks Desktop support ending after May 31, 2026, setting up BOMs correctly is crucial to maintaining accurate inventory and cost tracking.
Key Steps to Set Up BOMs:
- Activate Inventory Tracking: Go to Edit > Preferences > Items & Inventory to enable inventory and assembly tools.
- Set Up Components: Add raw materials, non-inventory parts, services, and other charges to the Item List with accurate costs.
- Create Inventory Assembly Items: Define finished products, assign accounts, and add components to the BOM.
- Use Features Like Build Points: Get alerts when stock runs low.
- Automate Subassemblies: Simplify production for complex products.
For businesses managing complex assemblies, tools like Rapid Inventory can enhance efficiency by automating data imports and syncing with QuickBooks.
Quick Tip: Regularly update BOMs to reflect changes in production needs, but note that edits only apply to future builds.

How to Set Up Bills of Materials in QuickBooks Desktop: 5-Step Process
QuickBooks Desktop: Inventory Assemblies & Importing components (Bill of Materials) from Excel
sbb-itb-19ed50f
What You Need Before Creating a Bill of Materials
Before diving into creating a Bill of Materials (BOM) in QuickBooks, it's crucial to set up inventory management software for QuickBooks Desktop and familiarize yourself with item categories. Without these core settings, you won't have access to the assembly features in the software.
Turning On Inventory Tracking in QuickBooks Desktop
By default, inventory tracking is turned off in QuickBooks Desktop, so you'll need to activate it to unlock the BOM and assembly tools.
Here’s how to enable it:
- Go to Edit > Preferences > Items & Inventory.
- Select the Company Preferences tab.
- Check the box labeled Inventory and purchase orders are active and hit OK.
Once this is done, you'll see the assembly features appear in your software.
For smoother operations, consider enabling these additional settings in the same menu:
- Warn if not enough inventory to sell: This ensures you're alerted when stock runs low.
- Don't allow negative inventory quantities (available in QuickBooks Enterprise): This prevents creating assemblies if you lack the necessary components.
If your products involve different measurement units (e.g., feet, pounds, or hours), activate the Unit of Measure feature in the same settings. This ensures precise tracking when you buy or use components in units different from how they’re sold.
Once inventory tracking is set up, the next step is understanding the distinction between finished goods and component items.
Inventory Assembly Items vs. Component Items
Knowing the difference between Inventory Assembly Items and Component Items is key to setting up your BOM correctly.
- Inventory Assembly Items: These represent your finished products - the items you manufacture.
- Component Items: These include the raw materials, parts, labor, and fees used to create the finished goods.
When you build an assembly, QuickBooks automatically decreases the quantities of components and increases the count of finished goods. This keeps your inventory and financial records aligned, reflecting production costs and stock levels accurately.
Here’s how to categorize components:
- Use Inventory Parts for materials you want to track individually, like screws or wood planks.
- Use Non-inventory Parts for items you use but don’t need to track individually, such as glue or grease.
- Include Service items for labor costs and Other Charge items for overhead fees directly in your BOM to get a complete view of production costs.
If you’re selling items together as a set - like a gift basket or tool kit - without manufacturing them into a new product, use a Group item instead of an Inventory Assembly.
These steps ensure your materials and parts are well-organized, setting you up for success as you move forward with creating your BOM.
Setting Up Inventory Components
Before creating a Bill of Materials in QuickBooks, you need to set up each component as an individual item. These components include everything that goes into your finished product - raw materials, parts, and even services.
Adding Raw Materials and Parts to QuickBooks
To add a component, start by navigating to the Lists menu, selecting Item List, and clicking the Item drop-down menu to choose New. Before adding anything, double-check your Item List to avoid duplicates, which can mess up your stock tracking.
When creating each component, pick the right item type:
- Inventory Parts: Use this for materials where you need to track exact quantities, like screws or lumber.
- Non-inventory Parts: For items you use but don’t track individually (e.g., glue or small bolts).
- Service Items: If labor costs are part of your Bill of Materials, set them up under this category.
- Other Charge Items: Use this for overhead costs like shipping or processing fees.
"If you track a component's quantity, set it up as an inventory part. If you use a component that you don't (or can't) track, set it up as a non-inventory part." - QuickBooks Help
Make sure to enter the cost of each item so QuickBooks can calculate the total cost of assembling your product. Assign a Cost of Goods Sold (COGS) account to monitor expenses when the final product is sold. Even if a raw material isn’t sold on its own, QuickBooks requires an income account to save the item. If you’re uncertain about which account to use, consult your accountant for guidance.
Once your components are added, the next step is to organize them for better tracking.
Organizing Components for Easier Tracking
After setting up your raw materials and parts, organizing them is key to keeping your inventory system running smoothly. Assign items as Inventory Parts to track both quantity and value, or as Non-inventory Parts if you only need to track costs.
For more complex products, consider creating sub-assemblies. These allow QuickBooks to automatically build intermediate components, making your workflow more efficient and your records more accurate. Set up "Build Point (Min)" and "Max" levels for each item to trigger reorder alerts when stock runs low. You can also use the Shortage Report from the Inventory menu to identify components that need replenishment for upcoming builds.
Creating a Bill of Materials in QuickBooks Desktop
Once you've set up your inventory components, the next step is to create your Bill of Materials (BOM) in QuickBooks Desktop. This process ties everything together, helping you manage costs and inventory efficiently.
Creating an Inventory Assembly Item
To start, open the Lists menu and select Item List. At the bottom of the list, click the Item drop-down and choose New. When prompted to select an item type, choose Inventory Assembly - this is what enables the BOM functionality.
Now, fill in the details for your product:
- Enter the product's name, description, and unit of measure.
- In the inventory information section, set a Build Point (Min) - this ensures QuickBooks alerts you when stock is running low and more units need to be produced.
- Assign the appropriate Asset Account, COGS Account, and Income Account to track inventory values, costs, and revenue.
If you sometimes purchase the finished product pre-assembled from a vendor, check the box labeled "I purchase this assembly item from a vendor." This option helps you track vendor-supplied assemblies alongside your in-house builds.
Once this setup is complete, you can move on to adding the components that make up your BOM.
Adding Components to Your BOM
Add each component required to build one unit of your product. These can include:
- Inventory parts (raw materials)
- Non-inventory parts (items not tracked in inventory)
- Service items (e.g., labor costs)
- Other charges (e.g., overhead costs)
"The bill of materials details all the component items, raw materials, and services (like labor) required to build one unit of the assembly." - Intuit
If your product includes another assembly as a component, you can add that subassembly directly to the BOM. To streamline production, enable the Automatically build required subassemblies option. This ensures QuickBooks handles the creation of sub-components during the main assembly process. If you're in the planning stage, you can select Mark Pending to track production needs without initiating the build.
After listing all components, it's time to define the cost structure.
Setting Costs and Prices for Assembly Items
QuickBooks automatically calculates the total cost of your assembly based on the costs of the individual components in your BOM. You can also manually enter a cost figure to account for additional expenses, such as utilities or equipment depreciation.
Next, set the Sales Price for your product - this will be used for invoicing and calculating profit margins. The Total Value field will display your current investment in finished goods inventory. Before finalizing, ensure all components have accurate costs in their item records, as these values directly impact the total assembly cost.
| Field Name | Purpose | Account Type |
|---|---|---|
| Cost | Tracks component expenses and production costs | Cost of Goods Sold (COGS) |
| Sales Price | Sets the revenue per unit sold | Income Account |
| Asset Account | Tracks the value of unsold finished goods | Inventory Asset |
| Total Value | Reflects the total investment in current stock | (Calculated) |
Working with Bills of Materials Daily
Mastering QuickBooks' component tracking and BOM updates is key to avoiding inventory errors.
Building Assemblies in QuickBooks Desktop
To build an assembly, go to the Inventory menu and select Build Assemblies.
From the Assembly Item drop-down menu, pick your product. QuickBooks will display the BOM, listing all required components and their quantities. At the top, the Quantity Available reflects the number of items you can build, factoring in current stock minus items already committed to orders or pending builds. To see the maximum number you can build with available stock, click "Maximum number available."
If QuickBooks flags a shortage, you can either adjust the build quantity or mark the build as pending. Use the Show Shortage button to pinpoint exactly which components need reordering.
For assemblies that include subassemblies, enable the option to automatically build those subassemblies. Once the build is finalized, QuickBooks updates inventory: component quantities decrease while finished goods stock increases.
For pending builds, once the required components arrive, revisit the transaction and select Remove Pending Status to complete the assembly.
Now let’s move on to how you can update and edit BOMs as your needs evolve.
Editing and Updating Existing BOMs
Regularly updating BOMs ensures accurate inventory tracking. To make changes, open the Lists menu and select Item List. Double-click the Inventory Assembly item you want to edit. In the Bill of Materials table, you can add new components, remove existing ones, or adjust quantities. Click OK to save your changes.
These updates only apply to future builds. As FritzF, a Moderator in the QuickBooks Community, explains:
"Adding a new part to an inventory assembly will not affect the existing or already-built ones. It will only affect newly built assemblies after the new part is added".
If you need to replace a component across multiple BOMs - like when a raw material is discontinued - QuickBooks offers a Where Used feature. Right-click the component in the Item List and select Where Used to view every assembly containing that item. Select the assemblies needing updates, enter the replacement item in the Replacement Item field, and click Replace to update all selected BOMs simultaneously.
QuickBooks Enterprise users have even more options. As qbteachmt, a Level 15 Contributor in the QuickBooks Community, highlights:
"QB Enterprise allows you to Vary the build as you make the Build... you can Substitute and Change the BOM on the fly, on the Build".
This flexibility lets you adjust quantities or swap components during a specific build without permanently altering the master BOM.
Here are some handy features in QuickBooks to manage builds effectively:
| Build Feature | Purpose |
|---|---|
| Show Shortage | Highlights components that need reordering |
| Mark Pending | Saves the build for later completion when components are available |
| Automatically build required subassemblies | Handles multi-level BOMs in one step |
| Maximum number | Displays the maximum units you can build with current stock |
Using Additional Tools for Better Inventory Management
QuickBooks Desktop does allow for creating BOMs (Bills of Materials), but when it comes to handling complex assemblies, its capabilities fall short. For starters, every component in a BOM has to be entered manually - there’s no option to copy-paste or perform a bulk upload. If your assembly involves 20, 50, or even 75+ parts, this process can quickly turn into a massive time sink.
Exporting BOMs isn’t much easier. To do so, you have to individually review each inventory assembly item, then open and print it to a PDF. For businesses managing a wide range of products, this manual process can feel like a logistical headache.
To streamline these workflows, tools like Rapid Inventory can make a big difference.
How Rapid Inventory Improves BOM Management
Rapid Inventory simplifies BOM management by automating data imports and syncing directly with QuickBooks. Its features include bulk import capabilities, real-time consolidated reports for faster BOM reviews, and mobile barcode scanning to cut down on mistakes during high-volume production runs.
The tool also supports multi-location tracking and advanced picking strategies like FIFO (First In, First Out) and FEFO (First Expired, First Out). This makes it easier to manage components across multiple warehouses while keeping cost calculations accurate. Additional perks like cycle counting and backorder tracking further expand QuickBooks’ basic functionality.
Since Rapid Inventory is web-based, you can access it from anywhere, and it comes with free training, onboarding, and ongoing support to help you hit the ground running.
Conclusion
Begin by enabling inventory tracking and correctly setting up Inventory, Non-inventory, and Other Charge items with accurate costs. This ensures QuickBooks calculates your assembly expenses properly. For more intricate products, activate subassembly automation to simplify the process.
Precision is key when managing your BOM over time. Regularly review your item list to eliminate duplicates, and keep in mind that changes to a BOM only affect manufacturing orders created after those edits are saved. If you're using QuickBooks Enterprise, enabling the "Don't allow negative inventory quantities" option helps maintain accurate records.
To manage your BOM effectively each day, use the "Show Shortage" feature to spot components that need reordering and monitor the maximum number of units you can produce. If parts are missing, mark builds as pending to keep your workflow organized.
While QuickBooks Desktop is great for handling basic BOM needs, manual data entry might slow things down for assemblies with 20 or more components. For these more complex setups, tools like Rapid Inventory can automate data imports and help streamline your process.
Running regular inventory reports helps catch discrepancies early, keeping production on track. A well-organized BOM process not only ensures inventory accuracy but also supports a smoother and more efficient production workflow.
FAQs
Can I build an assembly if I don’t have enough components in stock?
No, you can't build an assembly in QuickBooks Desktop if there aren't enough components available. The software will notify you about the shortage and block the assembly process until all the necessary parts are in stock.
How do I include labor and overhead costs in my BOM totals?
QuickBooks Desktop determines assembly costs by summing up the costs of component items. If you want to factor in labor, you can include it as either a service or a component within your Bill of Materials (BOM). For overhead, you can allocate these costs by setting up a separate expense account or making manual adjustments to the BOM. Additionally, the software offers an auto-updated BOM cost feature, which ensures your assembly costs stay aligned with the most current data.
How can I bulk import or export BOMs instead of entering them one by one?
QuickBooks Desktop doesn’t have a built-in feature for bulk importing or exporting Bills of Materials (BOMs). However, you can work around this by preparing an IIF file containing your BOM data and importing it through the menu: File > Import > From IIF Files.
For those looking for a more automated approach, developers can create custom solutions. These might involve using IIF files or integrating with QuickBooks Desktop through SDKs or APIs, which can help simplify and speed up the process of managing data uploads.


